October 10th, 2007 in Photoshop Tutorials by Richard Carpenter
Futuristic Wallpaper Tutorial
Create a new document what ever size you want the background for. Select the gradient tool, set your forground color to #5b5e63 and your background to black. On the gradient toolbar at the top select “reflected gradient”.
![]()
Drag the gradeint across your canvas.

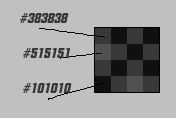
Create a new document 4×4 pixels and create this pattern using these 3 colors. (PATTERN FROM TALK-MANIA)

Once the pattern is created, head back to your wallpaper, create a new layer above your background layer, label this pettern. Fill this layer with your pattern. Add a layer mask and drag a black reflected gradient over the top. Your pattern should look like this.

Create a new layer above your pattern and background layer, select the rounded marquee tool and draw out a circle in the middle of your canvas. Fill the circle with a color of your choice, then add this layer style.

Duplicate the layer you just created then right click it and goto clear styles, you should now have a blank circle. Fill the blank circle with the color #3d6d9c. Select the paint brush tool with a brush size of 100 soft, set the mode to linear dodge and flow to 60%.
 Click you layer with the blue circle on whilst hold the CTRL key on the keyboard to make a selection, then with your brush just color the bottom end of your orb.
 Then with a smaller brush size add a little circle.
Now add these layer styles.


Now select the rounded marquee tool and draw a circle in the middle of your orb fill this with the color white.

Add a layer mask and drag a black linear gradient over the top.

Do the same again add a circle at the top.

Select the rounded marquee tool again and on a new layer create another circle, only this time goto “select > modify > contract” and contract the circle by about 25-20 pixels. Then hit the delete key, this will turn the cirlce into a ring.

Add these layer styles to the ring.


Repeat the steps above only this time make a ring and add these layer styles instead.


You should have something like this.

Select the pen tool and create a shape like this.

Add these layer styles to your shape.


Duplicate this layer 3 times so you have a total of 4 shapes, Postion them like the image below. (use flip tool).

Now last but not least, add a layer mask and drag a reflected gradient over them.

Be Part Of The Community!
Become part of the hv-designs community.
Subscribe Via RSS or Follow Us On Twitter.


12 Responses to “Futuristic Wallpaper Tutorial”