Your ads will be inserted here by
AdSense Now!.
Please go to the plugin admin page to paste your ad code.
Once your WordPress installation is up and running, you are ready to start blogging. WordPress is the right choice for blogging because it’s quite a powerful tool with a seemingly infinite array of options and possibilities.
The main focus of this article is to explain how to make a blog post and how to control all of the information for that post, and not just the title and content. In this article by Hasin Hayder and April Hodge Silver, we will explore how to keep your content organized and searchable using tags and categories.
Adding A Simple Post
Let’s review the process of adding a simple post to your blog. Whenever you want to do maintenance on your WordPress website, you have to start by logging in to the WP Admin (WordPress Administration panel) for your site. To get to the admin panel, just point your web browser to http://yoursite.com/wp-admin.
Remember that if you have installed WordPress in a subfolder (for example, blog), then your URL has to include the subfolder (that is, http://yoursite.com/blog/wp-admin).
When you first log into the WP Admin, you’ll be at the Dashboard. The Dashboard has a lot of information on it. The very top bar, which I’ll refer to as the top menu, is mostly dark grey and on the left, of course, is the main menu. The top menu and the main menu exist on every page within the WP Admin. The main section on the right contains information for the current page you’re on. In this case, we’re on the Dashboard. It contains boxes that have a variety of information about your blog, and about WordPress in general.
The quickest way to get to the Add New Post page at any time is to click on the New Post link at the top of the page in the top bar (top menu).
This is the Add New Post page:

To quickly add a new post to your site, all you have to do is:
–Type in a title into the text field under Add New Post (for example, Making Lasagne).–
–Type the text of your post in the content box. Note that the default view is Visual, but you actually have a choice of the HTML view as well.–
–Click on the Publish button, which is at the far right. Note that you can choose to save a draft or view a preview of your post.–
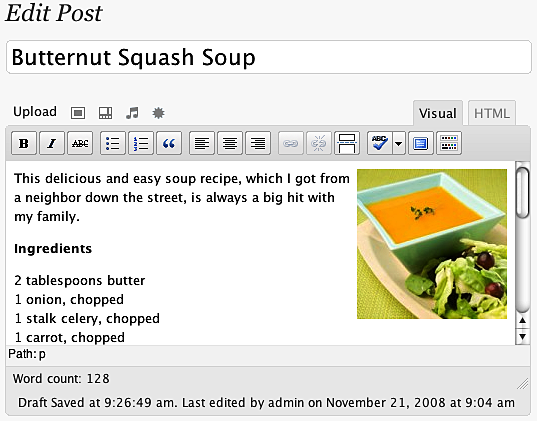
In the following image, the title field, the content box, and the Publish button of the Add New Post page are highlighted:

Once you click on the Publish button, you have to wait while WordPress performs its magic. You’ll see yourself still on the Edit Post page, but now the following message has appeared telling you that your post was published and giving you a link to View post:

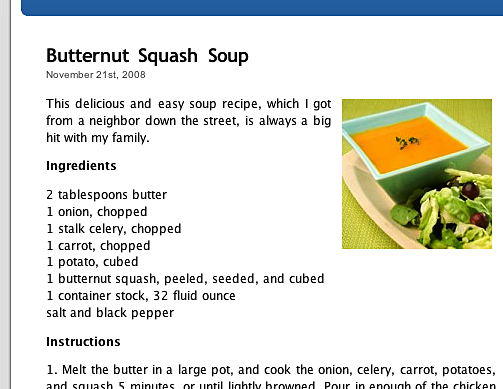
If you go to the front page of your site, you’ll see that your new post has been added at the top (newest posts are always at the top):

Common Post Options
Categories and tags are two similar types of information that you can add to a blog post. We use them to organize the information in your blog by topic and content (rather than just by, say, date), and to help visitors find what they are looking for on your blog.
Categories are primarily used for structural organizing. They can be hierarchical. A relatively busy blog will probably have at least 10 categories, but probably not more than 15 or 20. Each post in this blog will likely have one to four categories assigned to it. For example, a blog about food might have these categories: Cooking Adventures, In The Media, Ingredients, Opinion, Recipes Found, Recipes Invented, and Restaurants.
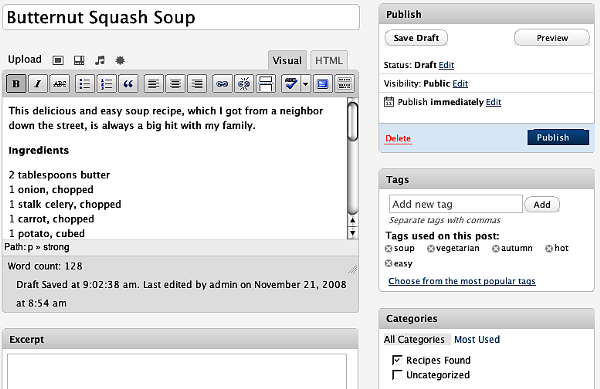
Tags are primarily used as shorthand for describing the topics covered in a particular blog post. A relatively busy blog will have anywhere from 15 to 30 tags in use. Each post in this blog will likely have three to ten tags assigned to it. For example, a post on the food blog about a recipe for butternut squash soup may have these tags: soup, vegetarian, autumn, hot, easy.
Let’s add a new post to the blog. This time, we’ll give it not only a title and content, but also tags and categories. When adding tags, just type your list of tags into the Tags box on the right, separated by commas:

Then click on the Add button. The tags you just typed in will appear below the text field with little xs next to them. You can click on an x to delete a tag. Once you’ve used some tags in your blog, you’ll be able to click on the Choose from the most popular tags link in this box so that you can easily re-use tags.
Categories work a bit differently than tags. Once you get your blog going, you’ll usually just check the boxes next to existing categories in the Categories box. In this case, as we don’t have any existing categories, we’ll have to add one or two.
In the Categories box on the right, click on the + Add New Category link. Type your category into the text field and click on the Add button. Your new category will show up in the list, already checked. Look at the following screenshot:

If in the future you want to add a category that needs a parent category, select Parent category from the pull-down menu before clicking on the Add button. If you want to manage more details about your categories, move them around, rename them, assign parent categories, and assign descriptive text. You can do this on the Categories page, which we’ll see in detail later in this article.
Now fill in your title and content here:
Click on the Publish button and you’re done. When you look at the front page of your site, you’ll see your new post on the top, your new category in the sidebar, and the tags and category (that you chose for your post) listed under the post itself:

Adding An Image To A Post
You may often want to have an image show up in your post. WordPress makes this very easy. Let’s add an image to the post we just created. You can click on Edit underneath your post on the front page of your site to get there quickly. Alternatively, go back to the WP Admin, open Posts in the main menu, and then click on Edit underneath your new post.
To add an image to a post, first you’ll need to have that image on your computer. Before you get ready to upload an image, make sure that your image is optimized for the Web. Huge files will be uploaded slowly and slow down the process of viewing your site. You can re-size and optimize images using software such as GIMP or Photoshop. For the example in this article, I have used a photo of butternut squash soup that I have taken from the website where I got the recipe, and I know it’s on the desktop of my computer. Once you have a picture on your computer and know where it is, follow these steps to add the photo to your blog post:
Click on the little photo icon, which is next to the word Upload/Insert and below the box for the title:

In the box that appears, click on the Select Files button and browse to your image. Then click on Open and watch the uploader bar. When it’s done, you’ll have a number of fields you can fill in:

The only fields that are important right now are Title, Alignment, and Size. Title is a description for the image, Alignment will tell the image whether to have text wrap around it, and Size is the size of the image. As you can see, I’ve chosen the Right alignment and the Thumbnail size.
Now click on Insert into Post. This box will disappear, and your image will show up in the post on the edit page itself:
Now click on the Update Post button and go look at the front page of your site again. There’s your image!
You may be wondering about those image sizes. What if you want bigger or smaller thumbnails? You can set the pixel dimensions of your uploaded images and other preferences by opening Settings in the main menu and then clicking on Media. This takes you to the Media Settings page:

Here you can specify the size of the uploaded images for:
–Thumbnail–
–Medium–
–Large–
If you change the dimensions on this page and click on the Save Changes button, only images you upload in the future will be affected. Images you’ve already uploaded to the site will have had their thumbnail, medium, and large versions created already using the old dimensions.
Using The Visual Editor Vs The HTML Editor
WordPress comes with a Visual editor, otherwise known as a WYSIWYG editor (pronounced wissy-wig, which stands for What You See Is What You Get). This is the default editor for typing and editing your posts. If you’re comfortable with HTML, you may prefer to write and edit your posts using the HTML editor—particularly useful if you want to add special content or styling.
To switch from the rich text editor to the HTML editor, click on the HTML tab next to the Visual tab at the top of the content box:

You’ll see your post in all its raw HTML glory and you’ll get a new set of buttons that lets you quickly bold and italicize text as well as add link code, image code, and so on. You can make changes and swap back and forth between the tabs to see the result.
If you want the HTML tab to be your default editor, you can change this on your Profile page. Navigate to Users | Your Profile, and select the Disable the visual editor when writing checkbox.
Drafts, Timestamps, and Managing Posts
WordPress gives you the option to save a draft of your post so that you don’t have to publish it right away but can still save your work. If you’ve started writing a post and want to save a draft, just click on the Save Draft button at the right (in the Publish box), instead of the Publish button. Even if you don’t click on the Save Draft button, WordPress will attempt to save a draft of your post for you about once a minute. You’ll see this in the area just below the content box. The text will say Saving Draft… and then the time of the last draft saved:

At this point, after a manual save or an auto-save, you can leave the Edit Post page and do other things. You’ll be able to access all of your draft posts from the Dashboard or from the Edit Posts page.
Your ads will be inserted here by
AdSense Now!.
Please go to the plugin admin page to paste your ad code.
WordPress will also let you alter the timestamp of your post. This is useful if you are writing a post today that you wish you’d published yesterday, or if you’re writing a post in advance and don’t want it to show up until the right day. The default timestamp will always be set to the moment you publish your post. To change it, just find the Publish box and click on the Edit link (next to the calendar icon and Publish immediately), and fields will show up with the current date and time for you to change:

Change the details, click on the OK button, and then Publish your post (or save a draft).
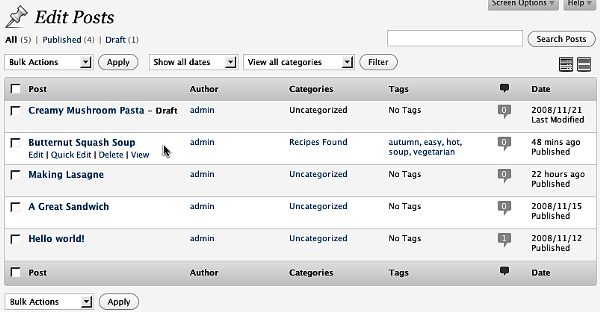
If you want to see a list of your posts so that you can easily skim and manage them, you just need to go to the Edit Posts page in the WP Admin by navigating to Posts in the main menu. You’ll see a detailed list of your posts, as seen in the next screenshot:
Advanced Post Options
By now, you have a handle on the most common and simple options for posts and you may be wondering about some of the other options on the Edit Post page. We’ll cover them all in this section.
A quick display tip:
When you first visit the Edit Post page, all of the four advanced options (Excerpt, Send Trackbacks, Custom Fields, and Discussion) are ‘open’ below the post content. If you never use them and want to clean up the look of this page, you can single-click each bar and they’ll collapse. You can also rearrange them by dragging them to a new order. You can also use Screen Options (top right of the page) to uncheck certain boxes, and thus not display them at all.
Excerpt
WordPress offers theme designers the option to show a post’s excerpt (instead of its full content) on pages within the theme. If you enter some text into the excerpt box on the Edit Post page, that text will be used as the post’s excerpt on theme pages that call for it. However, if there is no text in this box, WordPress will use the first 55 words of the post’s content (which is stripped of HTML tags) followed by […] (which is not a link).
The more tag should not be confused with the excerpt. This is different from the excerpt because you, not the theme designer control its use. Text before this tag, for any post that has it, will be the only thing that’s shown on all blog pages (for example homepage, category page, search results page, and so on). The full post text will only show up on the post page. All you have to do is put the more link at the spot in your post where you’d like the cut-off to be. WordPress will automatically cut off the post there and replace it with a Read the rest of this post link.
To add this tag to a post, first place your cursor in the spot where you’d like the post to be split up. Then click on the more tag button in the editor. If you’re using the Visual editor, the button you want to click looks like this:
![]()
If you’re using the HTML editor, the button looks like this:
![]()
Trackbacks
Trackbacks are useful if you write a blog post that is a response to a post on someone else’s blog and you want them to know about it. Just copy the trackback URL from that person’s blog post and paste it into this box. An excerpt of your blog post will show up as a comment on their blog post.
If someone wants to display a blog post on their blog about a post on your blog using the default theme, he or she can find the trackback URL on the post page for every post. For example, click on the title of one of your posts on your blogs’ front page and you’ll go to the post page:
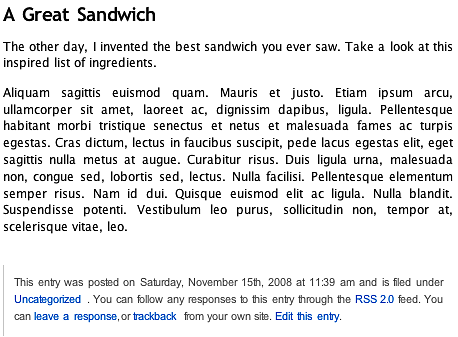
All this person has to do is right-click on the trackback link and select Copy Link Location, which in this case is http://packt:8888/2008/11/a-great-sandwich/trackback/. If permalinks are not turned on, it would be http://packt:8888/wptrackback.php?p=6.
Trackbacks are becoming somewhat out-of-date with the advent of pinging. In fact, many WordPress themes are written to essentially disable trackbacks. Pinging is WordPress’s way of notifying popular update services, such as Ping-o-Matic!, which other people use to keep up-to-date with your blog and other people’s blogs. We will explain more about pinging in the following section.
Discussion
A Discussion box has two checkboxes in it: one for allowing comments, and the other for trackbacks and pingbacks. When you first install WordPress, both these checkboxes will be checked by default. You have to uncheck them if you want to turn off the comments or trackbacks and pingbacks for the post.
Pingbacks are essentially the same as trackbacks, but differ in two important ways:
The notification from your blog to the blog of the person you’re commenting on happens automatically—you don’t have to enter a special URL into a special field. All you have to do is link your blog post to their blog post.
Pingbacks don’t send any content.
If you uncheck the comments box, visitors will not be able to comment on this blog post.
If you uncheck the trackbacks and pingbacks box, when other people mention your blog post and link to it on their own websites, your blog post won’t notice and won’t care. So, if you are using WordPress to run a non-blog website, this is the best option for you.
If the box stays checked, other people’s pingbacks about this post will show up under your post along with comments, if any. If you’re using WordPress to run a blog website, you’ll want pingback to stay checked—especially if you want sites such as Technorati and other rating/authority sites to stay alerted.
If you want either or both of these boxes to be unchecked by default, go to Settings and then Discussion in the main menu. You can uncheck either or both of the boxes labeled Allow link notifications from other blogs (pingbacks and trackbacks.) and Allow people to post comments on the article:

Custom Fields
Custom Fields are a way for you to add additional information about your blog posts that are not part of WordPress by default. By default, every WordPress post has a number of pieces of information (fields) such as title, content, date, categories, and so on. If there is a field you want all or many of your posts to have, you can add it here.
For example, let’s say you are a gadget reviewer and every blog post is a review of some new gadget. Every time you write a review, you’re writing it about a product made by some company, and you’d like to have that company’s logo associated with the blog post. You can make a custom field called company_logo and the value can be the path to the logo image.
To use this custom field information, you either have to manually modify your theme files, or use a plugin.
Password & Private Protection
WordPress gives you the option to hide posts. You can hide a post from everyone but yourself by marking it Private, or you can hide it from everyone but the people with whom you share a password by marking it as Password protected. To implement this, look at the Publish box at the upper right of the Edit Post page. If you click on the Edit link next to Visibility: Public, a few options will appear:
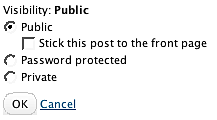
If you click on the Password protected radio button, you’ll get a box where you can type a password. Visitors to your blog will see the post title along with a note that they have to type in a password to read the post.
If you click on the Private radio button, the post will not show up on the blog at all to any viewers, unless you are the viewer and you are logged in.
If you leave the post Public and check the Stick this post to the front page checkbox, this post will be the first post on the front page, regardless of its publication date.
Be sure to click on the OK button if you make any changes.
Post Slug
This box may not be visible by default, in which case you have to open Screen Options at the top of the page and check the box next to Post Slug.
The post slug is used in the URL if your blog is using permalinks. Permalinks are a way to prettify your URLs. For example, right now, the URL for my Butternut Squash soup post is http://packt:8888/?p=10. If I turn on permalinks, by default the URL would be http://packt:8888/2008/11/butternut-squash-soup/. The very last part of the URL, butternut-squash-soup, is the slug. WordPress chose the slug by taking my post title, making it all lowercase, removing all punctuation, and replacing spaces with dashes. If I’d prefer it to be something else, such as squash-soup, this Post Slug box is where I can change it. The slug is something that Google search loves, so using them helps to optimize your site for search engines.
Adding Writing Options
WordPress offers a neat bookmark called Press This. You can put it into your browser’s bookmarks or favorites, which will let you quickly write a blog post about the website you’re visiting. (This used to be called the bookmarklet.) You may have encountered this same feature as offered by Facebook, Del.ico.us, and other social networking sites.
You just have to add Press This to your browser once, and then you can use it anytime. To add the Press This link to your browser in the WP Admin, go to the Tools menu. At the bottom of the Tools page is a Press This link. Just grab it with your mouse and drag it up to your browser’s bookmark bar.
Now it’s available to you. For example, if you’re reading a newspaper website and you read an article you’d like to mention in a blog post, just click the Press This bookmark (or favorite). A window will pop up with the Edit Post page in it and the URL of the site you’re looking at already written in as a link:
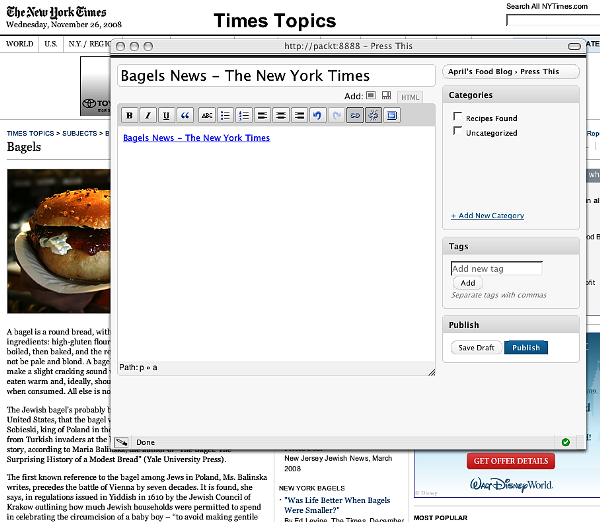
You can then write whatever additional text you want, add tags and categories, and then either save it as a draft or publish it right away.
Posting Via Email
If you want to add a post to your blog without having to open the WP Admin and log in, you can set up your WordPress installation to accept posts sent via email. First, you have to set up a special secret email address that is accessible via POP. WordPress will check that email address and turn any emails in it into posts. So you have to be sure not to use this email address for any other purpose!
Once you have the email address set up at your mail server, go to your WP Admin and navigate to Settings | Writing. Scroll down a bit to Post via e-mail:
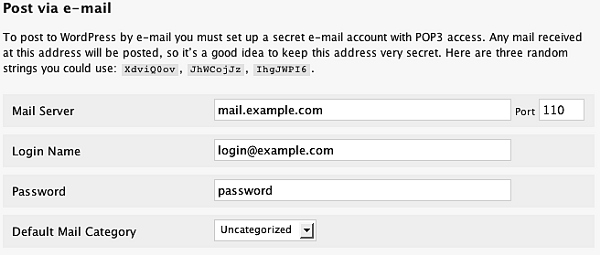
Now just enter the server, login name, and password into the Writing Settings page and be sure to click on the Save Changes button
Adding and Managing Categories
Earlier in this article, you learned how to quickly add a category when adding a post. Now let’s talk about how to manage your categories in a bigger way. First, navigate to Posts | Categories in your WP Admin. You’ll see the Categories page:

This is a useful page that combines the ability to add, edit, and review all of your categories. As you can see, any categories you’ve added via the Edit Post page are listed. You can Edit, Quick Edit, or Delete any category by clicking on the appropriate link in the list.
If you add a category on this page, you can also choose its slug. The slug is the short bit of text that shows up in the URL of your site if you have permalinks enabled. If you don’t choose a slug, WordPress will create one for you by taking the category name, reducing it to all lowercase, replacing spaces with dashes, and removing any other punctuation marks.
Another thing you can do on this page is choose a parent category for any category. If you choose to use parent categories, your categories will be displayed hierarchically, just as your pages are displayed.
Summary
In this article you learned everything you need to know to add content to your blog and manage that content. You learned about posts and categories. You discovered tags and excerpts. You also learned about adding images, using the rich text editor, changing timestamps, customizing excerpts, and the different ways of posting.
Liked This Article? Why Not Buy The Book
Create your own complete blog or web site from scratch with WordPress.
Your ads will be inserted here by
AdSense Now!.
Please go to the plugin admin page to paste your ad code.