September 26th, 2007 in Photoshop Tutorials by Richard Carpenter
Glossy Metal Text Tutorial
Create a new canvas 400 pixels wide and 133 pixels high with background colour #212121
Change the foreground colour to #DCDCDC and choose the font for your text. I’ve chosen “SF GRUNGE SANS BOLD” but most fonts will work (the bolder the better – try to avoid light fonts). Set the font size to 72pt and the anti-aliasing to Strong. Type HV-DESIGNS onto the canvas or what ever you feel is fit.

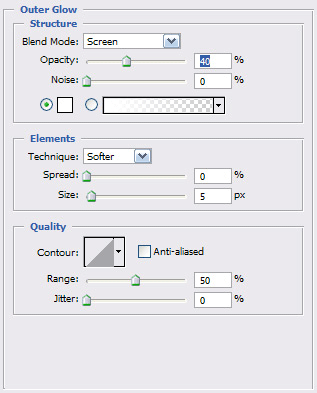
Add an Outer Glow layer style like this:

Your canvas should look like this:

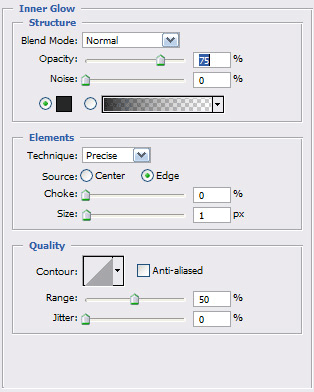
Add an Inner Glow layer style like this:

Your canvas should look like this:

Add a Gradient Overlay layer like this:

Your canvas will look like this:

Add a Stroke layer like this:

Your canvas should look like this:

Right-Click the HV-DESIGNS layer and choose Duplicate Layer… Name the layer to Outline and click OK. In the layer panel drag the Outline layer so it is underneath the HV-DESIGNS layer but above the Background layer. Right-click the Outline layer and choose Clear Layer Styles. Set the Fill of this layer to 0%.
Add an Outer Glow layer style to the outline layer like this:

Your canvas should look like this:

Add a Stroke layer style to the outline layer like this:

Your canvas should look like this:

Create a new layer above the HV-DESIGNS layer and name it Highlight. With the Highlight layer selected hold down Ctrl and left-click the HV-DESIGNS layer to select the layer’s transparency. The canvas will look like this:

Set the foreground colour to #FFFFFF and select the Fill tool. Fill the selected area of the Outline layer and set the layer opacity to 50% so it looks like this:

Select the Rectangular Marquee Tool and select the bottom half of the Highlight layer like this:

Press Delete. It is now finished and should look like this:

Now experiment abit to achieve better results LIKE THIS:

Be Part Of The Community!
Become part of the hv-designs community.
Subscribe Via RSS or Follow Us On Twitter.


6 Responses to “Glossy Metal Text Tutorial”