2009-03-31-psd-to-css-to-wordpress-pt3

Your ads will be inserted here by

AdSense Now!.

Please go to the plugin admin page to paste your ad code.

Hello welcome to part 3 of the PSD to CSS to WORDPRESS tutoral, in this part of the tutorial we’ll be converting our CSS template into a working wordpress theme. You can download the theme for free using the button below you can also down all 3 tutorials in PDF format.

DOWNLOAD ALL 3 TUTORIALS IN PDF format HERE.

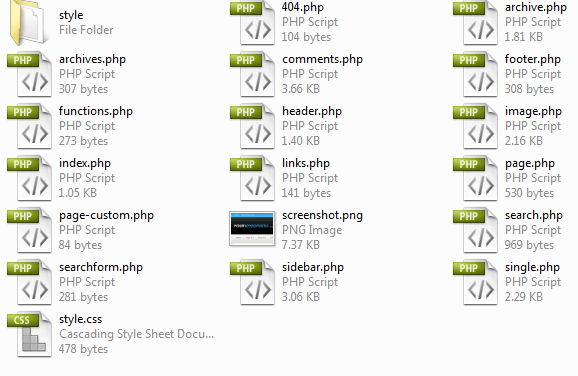
Before we start converting our theme over to wordpress you might want to download and install “xamp” this will allow you to run wordpress on your local hard drive saving on bandwidth and internet load times. Your also going to need a theme by “elliot jay stocks” called “starkers”. The theme is a completely naked theme, its been stripped of all its CSS and HTML, basically giving you a blank wordpress canvas to work on, its ideal for wordpress developers to start from. The theme uses files from wordpress 2.6.2. But this doesnt mean its not going to work with the latest wordpress software, i started with the exact same theme to build my hv-designs website and thats running in wordpress 2.7. If your thinking “bummer i wanted threaded comments” well you can easily grab a 2.7 comments file and replace it. Hopefully “elliot jay stocks” will release a naked 2.7 theme soon. Any way lets press on once you’ve downloaded the “stalkers theme” extract it to your desktop, rename the stalkers theme folder to “mywordpress”, you can also change the screenshot if you wish.
Step1

In your stalkers theme there is a folder called “style” inside this folder are some additional CSS files for IE hacks, typography and reset files. You dont really need this folder so if you want to you can delete it, but keep it by all means if you wish to keep it. Open up the “style.css” file in the main “mywordpress” theme directory. Once its open you’ll be greeted with this.

 /* Theme Name: Starkers Theme URI: http://elliotjaystocks.com Description: The totally nude WordPress theme. Phwoar! (Based on the famous <a href="http://binarybonsai.com/kubrick/">Kubrick</a> by <a href="http://binarybonsai.com/">Michael Heilemann</a>) Version: 2 (WP2.6.2) Author: Elliot Jay Stocks Author URI: http://elliotjaystocks.com Tags: starkers, naked, clean, basic */  @import "style/css/reset.css"; @import "style/css/typography.css"; @import "style/css/layout.css"; 

Delete the 3 imported .CSS files at the bottom of the page, then edit the theme name, description etc… Mine looks like this.

 /* Theme Name: MyWordpress Theme URI: http://www.hv-designs.co.uk Description: A wordpress theme Version: 1 Author: Richard Carpenter */ 

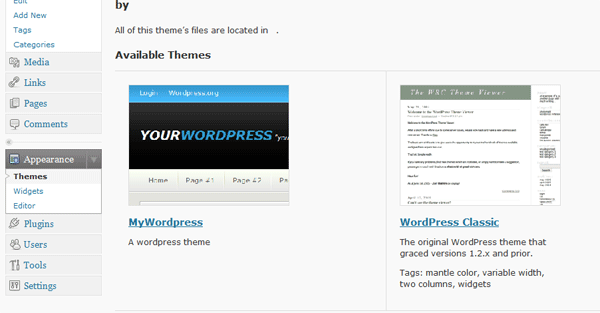
Save your .CSS file when you load up the theme in wordpress under the appreance tab you’l now see this.
Step2

If you havent changed your image you should see a wooden naked body. Which was the orginal starkers theme screenshot. Back to your .CSS file underneath the information we just edited, copy and paste the whole of your CSS templates CSS file into it save and exit. Now open up the “header.php” file, you’ll now be greeted will loads of PHP mixed in with some HTML, the first thing we can do is remove all the code from the TITLE tag at the top of document.

 <!DOCTYPE html PUBLIC "-//W3C//DTD XHTML 1.0 Transitional//EN" "http://www.w3.org/TR/xhtml1/DTD/xhtml1-transitional.dtd"> <html xmlns="http://www.w3.org/1999/xhtml" <?php language_attributes(); ?>>  <head profile="http://gmpg.org/xfn/11">  <title> <?php if (is_home()) { echo bloginfo('name'); } elseif (is_404()) { echo '404 Not Found'; } elseif (is_category()) { echo 'Category:'; wp_title(''); } elseif (is_search()) { echo 'Search Results'; } elseif ( is_day() || is_month() || is_year() ) { echo 'Archives:'; wp_title(''); } else { echo wp_title(''); } ?> </title> 

Once you’ve deleted the php from the title tag, just replace it with what ever you want to display at the top of the browser.

 <!DOCTYPE html PUBLIC "-//W3C//DTD XHTML 1.0 Transitional//EN" "http://www.w3.org/TR/xhtml1/DTD/xhtml1-transitional.dtd"> <html xmlns="http://www.w3.org/1999/xhtml" <?php language_attributes(); ?>>  <head profile="http://gmpg.org/xfn/11">  <title>MYWORDPRESS "your wordpress slogan can go here"</title> 

If you didnt want to manually add your wordpress title instead you can use your blogname, when you installed wordpress it asked for the name of your blog, it is also displayed in your wordpress admin panel at the top. If you wanted to dynamically display that instead of the manual title you can use this bit of code.

 <!DOCTYPE html PUBLIC "-//W3C//DTD XHTML 1.0 Transitional//EN" "http://www.w3.org/TR/xhtml1/DTD/xhtml1-transitional.dtd"> <html xmlns="http://www.w3.org/1999/xhtml" <?php language_attributes(); ?>>  <head profile="http://gmpg.org/xfn/11">  <title> <?php bloginfo('name'); ?> </title> 

Next still inside the header.php file at the very bottom delete everything underneath the body tag your header.php document should look like this.

 <!DOCTYPE html PUBLIC "-//W3C//DTD XHTML 1.0 Transitional//EN" "http://www.w3.org/TR/xhtml1/DTD/xhtml1-transitional.dtd"> <html xmlns="http://www.w3.org/1999/xhtml" <?php language_attributes(); ?>>  <head profile="http://gmpg.org/xfn/11">  <title>MYWORDPRESS "your slogan can go here"</title>  <meta http-equiv="content-type" content="<?php bloginfo('html_type') ?>; charset=<?php bloginfo('charset') ?>" /> <meta name="description" content="<?php bloginfo('description') ?>" /> <?php if(is_search()) { ?> <meta name="robots" content="noindex, nofollow" /> <?php }?>  <link rel="stylesheet" type="text/css" href="<?php bloginfo('stylesheet_url'); ?>" media="screen" /> <link rel="alternate" type="application/rss+xml" title="<?php bloginfo('name'); ?> RSS Feed" href="<?php bloginfo('rss2_url'); ?>" /> <link rel="pingback" href="<?php bloginfo('pingback_url'); ?>" />  <?php wp_head(); ?>  </head>  <body> 

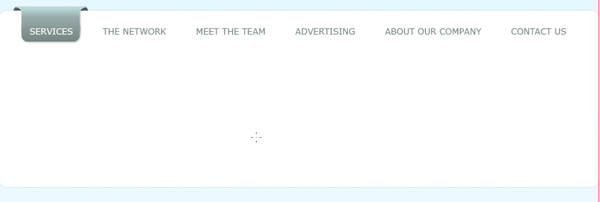
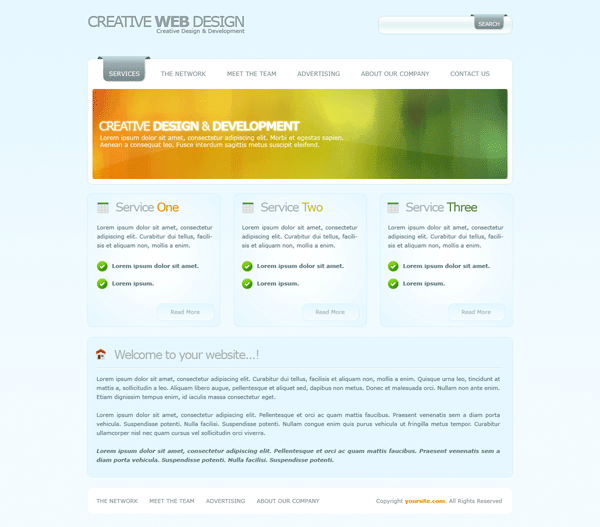
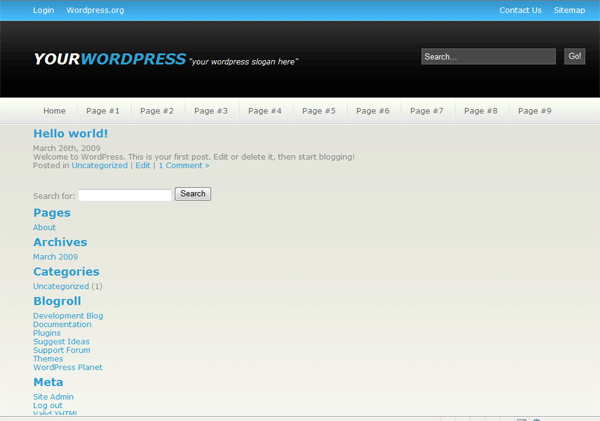
All the content we add now will be pasted in underneath the body tag. Copy your images folder from your CSS templates directory and paste it into the themes directory. Open up your index.html file from your CSS template. Copy everything from the opening “container DIV” to the ending “navigation DIV”. Paste it underneath the body tag. Save your header.php file, if you check the theme in your browser it should look like this.
Step3

Pretty quick eh??, we just need to make a few tweaks and the header file should be complete. On our navigation we have a list that we created page #1, page #2, page #3 etc… well we want wordpress to add our pages dynamically when we goto add page in our admin panel. To do this we change our navigation to look like this.

 <div id="navigation"><!--navigation starts-->  <ul class="nav_links"> <li> <a href="http://www.your_page_here.com">Home</a></li> <li class="withdiv"><?php wp_list_pages('sort_column=menu_order&amp;amp;amp;title_li='); ?></li> </ul>  </div><!--navigation ends--> 

We can keep the 1st button “home” just link it to your main domain name “http://www.what_ever.com. But underneath we can delete page #1 – page #9 and just add the one line off php wrapped in out LI tag. The php basically gets your wordpress pages from the database and displays them in page order. If you only had say one wordpress page and loads of external pages you wanted to use then just add another page underneath like this.

 <div id="navigation"><!--navigation starts-->  <ul class="nav_links"> <li><a href="http://www.your_page_here.com">Home</a></li> <li class="withdiv"><?php wp_list_pages('sort_column=menu_order&amp;amp;amp;title_li='); ?></li> <li class="withdiv"><a href="http://www.your_external_page.com">External Page</a></li> </ul>  </div><!--navigation ends--> 

You can have as many as you like within reason, anything that overflows the 900px navigation will just mess the layout up so be carefull. Another item we need to tweak is our search field, delete the form structure from your search DIV and add the following peice of PHP.

 <div id="search"><!--search starts--> <?php include (TEMPLATEPATH . "/searchform.php"); ?> </div><!--search ends--> 

If you check your theme in your browser now, you’l notice the search form has lost all its styling. Open up “searchform.php” from your “mywordpress theme folder”. This file contains our search form and looks like this.

 <form method="get" id="searchform" action="<?php bloginfo('url'); ?>/"> <label class="hidden" for="s"><?php _e('Search for:'); ?></label> <input type="text" value="<?php the_search_query(); ?>" name="s" id="s" /> <input type="submit" id="searchsubmit" value="Search" /> </form> 

All’s we need to do is add our class of “search-field” and “search-button” which we created when we created our CSS template. The form now looks like this.

 <form method="get" id="searchform" action="<?php bloginfo('url'); ?>/"> <label class="hidden" for="s"></label> <input type="text" class="search-field" value="Search..." name="s" id="s" /> <input type="submit" id="searchsubmit" class="search-button" value="Go!" /> </form> 

We’ve applyed our search form classes, deleted the the “search for” text before the search field and changed the word on the submit button from “search” to “go!”. Close the searchform.php file and check your theme in your browser to see the changes you can also test out your search form it should now work, you wont see anything exciting as we need to style our search results page. Thats it for the header.php file you can now close it. Now open up your “index.php” file in from your themes directory. The index.php file is the main page of our website, this is the 1st page people will see when logging onto your website. We have quite abit of work to do, to get it working. All the PHP code wrapped inside the H2 tag is the title of the post.

 <h2><a href="<?php the_permalink() ?>" rel="bookmark" title="Permanent Link to <?php the_title_attribute(); ?>"><?php the_title(); ?></a></h2> 

The PHP code wrapped in the P tag underneath is the date.

 <p><?php the_time('F jS, Y') ?> <!-- by <?php the_author() ?> --></p> 

Then there a line of PHP code underneath the P tag which says.

 <?php the_content('Read the rest of this entry &amp;amp;amp;raquo;'); ?> 

This displays the content of the post, and when you use the wordpress more tag to cut off your posts the text “read the rest of this entry” is displayed. Then finally we have another P tag.

 <p><?php the_tags('Tags: ', ', ', '<br />'); ?> Posted in <?php the_category(', ') ?> | <?php edit_post_link('Edit', '', ' | '); ?> <?php comments_popup_link('No Comments &amp;amp;amp;#187;', '1 Comment &amp;amp;amp;#187;', '% Comments &amp;amp;amp;#187;'); ?></p> 

This PHP displays the tags if there any for the post, it displays what catergorie the post was posted in and shows how many comments were made on the posts. Now we need to jumble all this PHP around so it displays the way we want, like our CSS template. Firstly we need to copy and paste a couple of DIV tags in there from our CSS template. The 1st two DIV tags we need to add are DIV ID content and DIV ID content-left. We add these two DIV’s at the very top underneath GET HEADER.

 <?php get_header(); ?>  <div id="content"><!--content starts--> <div id="content-left"><!--content left starts-->  <?php if (have_posts()) : ?> 

Then at the very bottom of our page above GET SIDEBAR we need to end our content left DIV.

 <?php endif; ?>  </div><!--content left ends-->  <?php get_sidebar(); ?>  <?php get_footer(); ?> 

Now we need to add our “a-post” class to the document we add this just above div class post and end it underneath the PHP code containing the tags and number of comments etc…

 <!--p while (have_posts()) : the_post();--> <div class="a-post"><!--wordpress post starts--></div> <div id="post-<?php the_ID(); ?>" class="post"> <h2><a href="<?php the_permalink() ?>" rel="bookmark" title="Permanent Link to <?php the_title_attribute(); ?>"><?php the_title(); ?></a></h2> <p><?php the_time('F jS, Y') ?> <!-- by <?php the_author() ?> --></p></div> <?php the_content('Read the rest of this entry &amp;amp;amp;raquo;'); ?>  <p><?php the_tags('Tags: ', ', ', '<br />'); ?> Posted in <?php the_category(', ') ?> | <?php edit_post_link('Edit', '', ' | '); ?> <?php comments_popup_link('No Comments &amp;amp;amp;#187;', '1 Comment &amp;amp;amp;#187;', '% Comments &amp;amp;amp;#187;'); ?></p>  <!--wordpress post ends-->  <!--p endwhile;--> 

We now need to start sorting through the PHP code and get rid of what we dont want to be displayed. At the very bottom around line 34 you should see.

 <?php include (TEMPLATEPATH . "/searchform.php"); ?> 

This line will display a search field when a post cant be found, we have a search field in our header already so we dont really need a 2nd one. Delete the one line of code. Scroll up to the PHP code which contains the post tags and amount of comments.

 <p><?php the_tags('Tags: ', ', ', '<br />'); ?> Posted in <?php the_category(', ') ?> | <?php edit_post_link('Edit', '', ' | '); ?> <?php comments_popup_link('No Comments &amp;amp;amp;#187;', '1 Comment &amp;amp;amp;#187;', '% Comments &amp;amp;amp;#187;'); ?></p> 

On our main page we dont really need the tags, or the edit post link, so the delete these two lines.

 <?php the_tags('Tags: ', ', ', '<br />'); ?> 
 <?php edit_post_link('Edit', '', ' | '); ?> 

Your code should now look like this.

 <p>Posted in <?php the_category(', ') ?> | <?php comments_popup_link('No Comments &amp;amp;amp;#187;', '1 Comment &amp;amp;amp;#187;', '% Comments &amp;amp;amp;#187;'); ?></p> 

We now need to start copying and pasting our post classes over to our theme. The first one we need to copy over will be for our thumbnail code. Copy the class “post-img” from our CSS template, paste it underneath the “div class post”. The code looks like this.

 <div class="a-post"><!--wordpress post starts-->  <div class="post" id="post-<?php the_ID(); ?>">  <div class="post-img"> <img src="images/post_thumbnail.png" alt="Test Image" /> </div> 

We then had some PHP wrapped in a H2 tag, change the H2 tag to a H1 tag then wrap the whole thing in our “post-title class” from our CSS template.

 <div class="post-title"> <h1><a href="<?php the_permalink() ?>" rel="bookmark" title="Permanent Link to <?php the_title_attribute(); ?>"><?php the_title(); ?></a></h1> <p><?php the_time('F jS, Y') ?> <!-- by <?php the_author() ?> --></p> </div> 

We then need to move over our “post-desc class” from our CSS template, we wrap this class around the post content PHP.

 <div class="post-desc"><?php the_content('Read the rest of this entry &amp;amp;amp;raquo;'); ?></div> 

Our index.php all in all should now look like this.

 <?php get_header(); ?>  <div id="content"><!--content starts--> <div id="content-left"><!--content left starts-->  <?php if (have_posts()) : ?>  <!--p while (have_posts()) : the_post();--> <div class="a-post"><!--wordpress post starts--></div> <div class="post-img"> <img src="images/post_thumbnail.png" alt="Test Image" /> </div>  <div class="post-title"> <h1><a href="<?php the_permalink() ?>" rel="bookmark" title="Permanent Link to <?php the_title_attribute(); ?>"><?php the_title(); ?></a></h1> <p><?php the_time('F jS, Y') ?> <!-- by <?php the_author() ?> --></p> </div> <div class="post-desc"><?php the_content('Read the rest of this entry &amp;amp;amp;raquo;'); ?></div> <p>Posted in <?php the_category(', ') ?> | <?php comments_popup_link('No Comments &amp;amp;amp;#187;', '1 Comment &amp;amp;amp;#187;', '% Comments &amp;amp;amp;#187;'); ?></p>  <!--wordpress post ends-->  <!--p endwhile;--> <ul> 	<li><!--p next_posts_link('&laquo; Older Entries')--></li> 	<li><!--p previous_posts_link('Newer Entries &raquo;')--></li> </ul> <!--p else :--> <h2>Not Found</h2> Sorry, but you are looking for something that isn't here.  <?php endif; ?>  </div><!--content left ends-->  <?php get_sidebar(); ?>  <?php get_footer(); ?> 

Underneath our “post-desc” class we have this code.

 <p>Posted in <?php the_category(', ') ?> | <?php comments_popup_link('No Comments &amp;amp;amp;#187;', '1 Comment &amp;amp;amp;#187;', '% Comments &amp;amp;amp;#187;'); ?></p> 

We want to delete the first chunk which basically says “posted in and then some php code”. We dont really need this bit. So the code would look like this after its been deleted.

Your ads will be inserted here by

AdSense Now!.

Please go to the plugin admin page to paste your ad code.

 <p><?php comments_popup_link('No Comments &amp;amp;amp;#187;', '1 Comment &amp;amp;amp;#187;', '% Comments &amp;amp;amp;#187;'); ?></p> 

We then need to delete the starting P tag and ending P tag from the code above, then cut the PHP code and paste it into the post title class next to the PHP code for the time and date.

 <div class="post-title"> <h1><a href="<?php the_permalink() ?>" rel="bookmark" title="Permanent Link to <?php the_title_attribute(); ?>"><?php the_title(); ?></a></h1> <p><?php the_time('F jS, Y') ?> <!-- by <?php the_author() ?> --> | <?php comments_popup_link('No Comments &amp;amp;amp;#187;', '1 Comment &amp;amp;amp;#187;', '% Comments &amp;amp;amp;#187;'); ?></p> </div> 

Thats it for the index.php file for now. Now lets get the sidebar sorted, open up your sidebar.php, most of the code at the top can go. Delete from.

 <ul> <?php /* Widgetized sidebar, if you have the plugin installed. */ if ( !function_exists('dynamic_sidebar') || !dynamic_sidebar() ) : ?> 

All the way down to.

 <?php wp_list_pages('title_li=<h2>Pages</h2>' ); ?> 

Now above the code above add

 <div class="side-bar"><!--sidebar starts--> 

At the very bottom of the page add your sidebar ending and content ending DIV’s.

 </div><!--sidebar ends--> </div><!--content ends--> 

Now change ALL H2 tags to H1 tags. Your search bar is complete, if you test your theme in the browser you will see the sidebar is not the same as our CSS template. If your not really that bothered about having all the catergores, archives etc.. in the sidebar and want to create something on your own, then just remove all the code from inbetween the sidebar opening and ending tags. Then just create your own sidebar as we did in our CSS template. Id highly recommend wrapping your “custom” sidebar content in the sidebar-content class.

 <div class="side-bar-content"> 

Which we used in our CSS template. I always find it best to create your own sidebar from scratch. Now lets sort out our footer, open your footer.php file, there shouldn’t be alot of content in there just highlight it all and hit the delete key. In your index.HTML file from the CSS template copy this chunk of code.

 </div><!--container ends-->  <div id="footer"><!--footer starts-->  <div id="footer-topbar"> <h1>mywordpress<span> "Your fancy wordpress slogan here"</span></h1> </div>  <div id="footer-content"> <p>Copyright &amp;amp;amp;copy; mywordpress.co.uk | All Rights Reserved<br /> Design By <a href="http://www.hv-designs.co.uk">HV-Designs.co.uk</a></p> </div>  </div><!--footer ends-->  </body> </html> 

Paste it into your footer.php file, save and exit. Refresh your theme in your browser to see the changes. The footer is as easy as that. The theme is nearly complete we just need to tweak a few more pages. Open up “page.php” this file relates to single pages which we add through the wordpress admin panel. The tags we added to our index.php file can also be used in this file. Underneath the “get header php code” add this code.

 <div id="content"><!--content starts--> <div id="content-left"><!--content left starts--> <div class="a-post"> 

At the very bottom above the “get sidebar php” code add.

 </div> </div> 

Your “page.php” code should now look like this.

 <!--p get_header();-->  <div id="content"><!--content starts--> <div id="content-left"><!--content left starts--> <div class="a-post">  <!--p if (have_posts()) : while (have_posts()) : the_post();--> <h2><!--p the_title();--></h2> <!--p the_content('<br--> <p class="serif">Read the rest of this page »</p>  '); ?> <!--p wp_link_pages(array('before'-->'<strong>Pages:</strong> ', 'after' => '  ', 'next_or_number' => 'number')); ?>  <!--p endwhile; endif;--> <!--p edit_post_link('Edit this entry.', ' <div  mce_tmp="1">', '</div> <div  mce_tmp="1">');-->  </div> </div>  <!--p get_sidebar();-->  <!--p get_footer();--> 

If you check a page on your theme it should now be wrapped in a box like we used for our main posts in the index.php file. This wont be the first time you’ll reuse the code, we can use the same code in our search.php file which displays our search results within our wordpress theme, which brings me to our next file. Open up your index.php file and goto “file > save as” save the index.php as “search.php” overwrite the existing file. All done, when you search using the search field in the header, the search results will be displayed the same as our posts. Obvisouly you can make your search results look how they want by applying different styles and DIV’s to the file. Now open up “archive.php” underneath the “get header php code” add the following.

 <div id="content"><!--content starts--> <div id="content-left"><!--content left starts--> <div class="a-post"> 

At the very bottom of above the “get sidebar php” code add two ending DIV’s.

 </div> </div> 

Everything thats in your wordpress archive like posts by categorie, posts with the same tags, posts posted on the same day etc… all this information will be displayed like our single pages are. If you make a post with a couple of tags or click a month under the “archives” section in the sidebar you’ll see how its displayed. Again you can make it display what you want how you want. Have you noticed a pattern emerging????? most of the files use the same PHP tags but its just displayed in a different way. You can make your archives page look the same as your search page and index.php page, you just need to add the relative “classes / DIV’s” to the “post loop”. Right now time for our 404 page. Open up the 404.php file. again add the post code from our CSS template.

 <?php get_header(); ?>  <div id="content"><!--content starts--> <div id="content-left"><!--content left starts-->  <div class="a-post"><!--wordpress post starts-->  <h2>Error 404 - Not Found</h2>  </div> </div>  <?php get_sidebar(); ?> <?php get_footer(); ?> 

Theres only two more files left to edit then your theme is complete. Ive left these two files till last because they are sometime abit fiddley. Open up your “single.php” file underneath the “get header php code” add the post classes.

 <?php get_header(); ?>  <div id="content"><!--content starts--> <div id="content-left"><!--content left starts-->  <div class="a-post"><!--wordpress post starts--> 

Scroll down to the very bottom above the “get footer code” add the two ending DIV’s. The sidebar is not included in the single.php file so we need to add it manually. Underneath the two ending DIV’s add the get sidebar php code.

 <!--p endif;-->  </div> </div>  <!--p get_sidebar();-->  <!--p get_footer();--> 

Load up your theme in the browser and check what your post pages look like. Look ok, the comments field looks abit big for our theme, so our next job is to shorten it. Open up your “comments.php” file. Near the bottom locate the form. Which looks like this.

 <form action="<?php echo get_option('siteurl'); ?>/wp-comments-post.php" method="post" id="commentform">  <?php if ( $user_ID ) : ?>  <p>Logged in as <a href="<?php echo get_option('siteurl'); ?>/wp-admin/profile.php"><?php echo $user_identity; ?></a>. <a href="<?php echo get_option('siteurl'); ?>/wp-login.php?action=logout" title="Log out of this account">Log out &amp;amp;amp;raquo;</a></p>  <?php else : ?>  <input type="text" name="author" id="author" value="<?php echo $comment_author; ?>" size="22" tabindex="1" <?php if ($req) echo "aria-required='true'"; ?> /> <label for="author">Name <?php if ($req) echo "(required)"; ?></label>  <input type="text" name="email" id="email" value="<?php echo $comment_author_email; ?>" size="22" tabindex="2" <?php if ($req) echo "aria-required='true'"; ?> /> <label for="email">Mail (will not be published) <?php if ($req) echo "(required)"; ?></label>  <input type="text" name="url" id="url" value="<?php echo $comment_author_url; ?>" size="22" tabindex="3" /> <label for="url">Website</label>  <?php endif; ?>  <p><strong>XHTML:</strong> You can use these tags: <code><?php echo allowed_tags(); ?></code></p>  <textarea name="comment" id="comment" cols="100%" rows="10" tabindex="4"></textarea>  <input name="submit" type="submit" id="submit" tabindex="5" value="Submit Comment" /> <input type="hidden" name="comment_post_ID" value="<?php echo $id; ?>" /> <?php do_action('comment_form', $post->ID); ?>  </form> 

At the bottom of this code you should see the text area.

 <textarea name="comment" id="comment" cols="100%" rows="10" tabindex="4"></textarea> 

Notice the “columns” are set to 100%, thats where our problem lies. Remove the “%” and change to 70. It should now look like this.

 <textarea name="comment" id="comment" cols="70" rows="10" tabindex="4"></textarea> 

Test the changes in your browser, the text area is now a snug fit my end. Our next problems lie’s with our text input fields, there is a quick fix for these. At the begining of each form field add the P tag then at the end add the ending P tag.

 <p><input type="text" name="author" id="author" value="<?php echo $comment_author; ?>" size="22" tabindex="1" <?php if ($req) echo "aria-required='true'"; ?> /> <label for="author">Name <?php if ($req) echo "(required)"; ?></label></p>  <p><input type="text" name="email" id="email" value="<?php echo $comment_author_email; ?>" size="22" tabindex="2" <?php if ($req) echo "aria-required='true'"; ?> /> <label for="email">Mail (will not be published) <?php if ($req) echo "(required)"; ?></label></p>  <p><input type="text" name="url" id="url" value="<?php echo $comment_author_url; ?>" size="22" tabindex="3" /> <label for="url">Website</label></p> 

You can add your own styles to the form boxes, just make a class with some styless in your CSS file, then apply the class to the input form boxes. Another problem with have is our text boxes sit right on top of our XHTML text. To sort this add a BR tag after the last form box.

  <input id="url" name="url" size="22" type="text" value="<?php echo $comment_author_url; ?>" tabindex="3" /> <label for="url">Website</label>  <!--p endif;-->  <!--BR TAG GOES HERE-->  <strong>XHTML:</strong> You can use these tags: <code><!--p echo allowed_tags();--></code>  <textarea name="comment" id="comment" cols="70" rows="10" tabindex="4"></textarea>  <input id="submit" name="submit" type="submit" value="Submit Comment" tabindex="5" /> <input name="comment_post_ID" type="hidden" value="<?php echo $id; ?>" /> <!--p do_action('comment_form', $pos-->ID); ?> 

Now make some example comments on your theme, you’ll notice they aint very nice too look at, everything is close together, theres basically no styling or nothing. This is where we need to start adding some basic styling of our own. In our comments.php file scroll towards the top to locate the comments loop. We need to add two new classes the first class is a class of “comment-box” this wraps the whole comments loop, dont forget to end the class at the bottom. The second class is a class for our gravatar, you can see where the gravatar is called in php by looking at the code below.

 <?php foreach ($comments as $comment) : ?>  <div class="comment-box"><!--NEW CLASS-->  <li <?php echo $oddcomment; ?>id="comment-<?php comment_ID() ?>">  <div class="gravatar"><!--NEW CLASS--> <?php echo get_avatar( $comment, 32 ); ?><!--GRAVATAR IS CALLED--> </div>  <cite><?php comment_author_link() ?></cite> Says: <?php if ($comment->comment_approved == '0') : ?> <p>Your comment is awaiting moderation.</p> <?php endif; ?> <p><a href="#comment-<?php comment_ID() ?>" title=""><?php comment_date('F jS, Y') ?> at <?php comment_time() ?></a> <?php edit_comment_link('edit','&amp;amp;amp;nbsp;&amp;amp;amp;nbsp;',''); ?></p> <?php comment_text() ?> </li> </div> 

Open up your CSS file for the theme and add your classes.

 .comment-box { border: 1px dashed #666666; margin-bottom: 10px; padding: 5px; float: left; text-align: justify; width: 565px; }  .gravatar { float: right; margin: 5px; } 

To the whole comment loop were going to add a 1 pixel dashed border, a bottom margin to seperate each comment, then add 5 px padding so the content inside the comments box arn’t right against the dashed lines, we then float out box left, justify our text and set a width of 565px. We then add our styling for our gravatar image, We just want to float the gravatar image to the right and add a 5px margin all the way around the image. The comment text should flow around our gravatar image. You can also change the size of your gravatar image by altering the number in the code.

 <div class="gravatar"> <?php echo get_avatar( $comment, 32 ); ?> </div> 

The number 32 in the code means the image will be 32px by 32 px. Try changing to something eles, i find 72 is a nice size. Save and test what your comments look like in your browser. They dont look too bad. Still think it needs some work. Lets insert a line break inbetween the date and time, locate the time and date in the loop.

 <?php foreach ($comments as $comment) : ?> <div class="comment-box"> <li <?php echo $oddcomment; ?>id="comment-<?php comment_ID() ?>">  <div class="gravatar"> <?php echo get_avatar( $comment, 72 ); ?> </div>  <cite><?php comment_author_link() ?></cite> Says: <?php if ($comment->comment_approved == '0') : ?> <p>Your comment is awaiting moderation.</p> <?php endif; ?> <p><a href="#comment-<?php comment_ID() ?>" title=""><?php comment_date('F jS, Y') ?> at <?php comment_time() ?></a> <?php edit_comment_link('edit','&amp;amp;amp;nbsp;&amp;amp;amp;nbsp;',''); ?></p>  <br /><!--ADD THE BR TAG HERE-->  <?php comment_text() ?> </li> </div> 

Thats pretty much it for the comments, obviously you can take more time to per-fect the look of your theme. Test your theme in the browser, ive tested mine in firefox and internet explorer and it works fine, there are a few minor bugs which we’ll sort now. If you notice in firefox there are numbers next to the comments and bullet points here and there. Open up the CSS file and paste in the following rule.

 ul, ol { list-style:none; } 

Another bug you’ll notice is that wordpress doesnt include the line breaks inbetween text on pages (NOT POSTS) and comments. To sort this we just need to add.

 #content p { margin: 5px 0 10px; padding: 0; }  .comment-box p { margin: 5px 0 10px; padding: 0; } 

I am sorry if ive missed any bugs. The theme is complete the only snippet of code id add now is so we can use custom fields for our post images. Open up your index.php file and locate the class “post-img” within the post loop.

 <div class="post-img"> <img src="images/post_thumbnail.png" alt="Test Image" /> </div> 

Delete the code containing the image and replace with the code below. The code below basically means if a post used a custom field of image display the thumbnail, if the post uses an image apply the url.

 <a href="<?php $values = get_post_custom_values("url"); echo $values[0]; ?>" title="<?php the_title(); ?>"> <img src=" <?php $values = get_post_custom_values("image"); echo $values[0]; ?>" alt="<?php the_title(); ?>" /></a> 

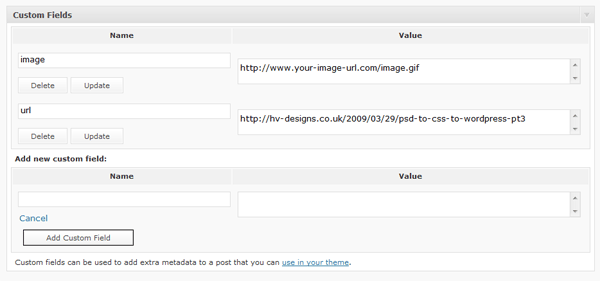
So when were in wordpress and we make a post instead of inserting it into the actual post we goto our custom fields section at the bottom.

Step4

Enter our first custom field of “image”.

Step5

Click add custom field, do the same for the next field, enter “url” then enter the url of the post.
Step6

Once you have entered the custom fields once, when you add more posts the custom fields will be available within a drop down box.

Finally The End

The end, you should now have a working wordpress theme from a PSD file we created a couple of days ago, although this tutorial wont make you a wordpress developer over night…. its a start. The PHP part of a wordpress theme is pretty simple and isnt hard to work out whats what. There is loads of documentation over at wordpress.org to help you with certain things if you ever get stuck. Id also suggest downloading a wordpress cheat sheet, someone made one a while back but i dont have the link. Also diving into wordpress can be a right pain and i can safely say it will piss you off big time. You’ve just got to work at it and work at it, another thing id suggest is to make and code each file before you start the wordpress side of coding, that way most of the hard work would of been done, it will just be a case of sifting through the loops. Il try to make a couple more wordpress tutorials in the near future. Any questions just ask. See you next time.

Your ads will be inserted here by

AdSense Now!.

Please go to the plugin admin page to paste your ad code.

2008-07-23-3d-glossy-arrows-

Your ads will be inserted here by

AdSense Now!.

Please go to the plugin admin page to paste your ad code.

Create a new document big enough for your arrows to fit, fil your background with a color of your choice. Select the arrow out the custom shapes libary.

Draw out your desired arrow shape, fill it with a color of your choice as this will change when we add the layer styles.

Label your arrow shape layer “TOP ARROW”. Now hold down the alt key on the keyboard and press the down arrow key then the left arrow key (keeping alt key pressed down) do this about 20-40 times, this will determine the thickness of our arrow. Once you have finished merge all your duplicated arrow layers into one by press “ctrl + e” once you have merged all your layers label the new layer “arrow bottom” you should have 3 layers in your layers pallet “background layer”, “bottom arrow”, “top arrow” (make sure your top arrow layer is at the top). heres what you should have ive colored my bottom layer red for your benifit.

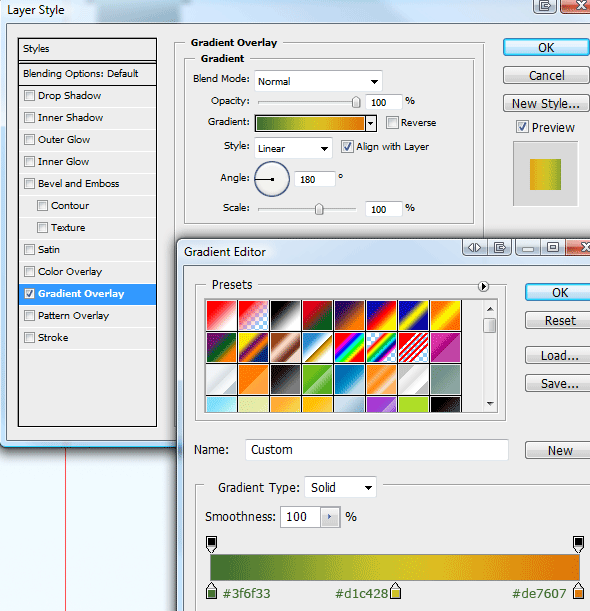
Now add this gradient overlay to your top arrow layer.

Add these layer styles to your “bottom arrow layer”.

You arrow should look something like this.

Using the pen tool create a selection like this.

Your ads will be inserted here by

AdSense Now!.

Please go to the plugin admin page to paste your ad code.

Create a new layer above your top arrow layer and label it “shine top” fill the selection with the color white set layer opacity to about 20-22%.

Do the same for the bottom arrow layer only this time use a half a circle (see image below). Lower the opacity even more to complete the effect.

Now select the pen tool, a 1 pixel brush and the color white just create a line somewhere on the arrow.

Right-click and goto stroke path. Lower the opacity to about 60%.

Do the same as above only this time choose a different part of the arrow.

Now finally select the elliptical marquee tool and create 2 white circles.

Goto “filter > blur > guassian blur”. Blur the circles by about 3 %.

All done.

Your ads will be inserted here by

AdSense Now!.

Please go to the plugin admin page to paste your ad code.

2009-08-30-jquery-ui-accordion-widget-pt1-

Your ads will be inserted here by

AdSense Now!.

Please go to the plugin admin page to paste your ad code.

In this article by packt publishing we’ll be looking into a jQuery UI Accordion Widget. The accordion widget is another UI widget made up of a series of containers for your content, all of which are closed except for one.

Therefore, most of its content is initially hidden from view. Each container has a heading element associated with it, which is used to open the container and display the content. When you click on a heading, its content is displayed. When you click on another heading, the currently visible content is hidden while the new content is shown.

It should be noted that the height of the accordion’s container element will automatically be set so that there is room to show the tallest content panel in addition to the headers. This will vary, of course, depending on the width that you set on the widget’s container.

Accordion’s Structure

Let’s take a moment to familiarize ourselves with what an accordion is made of. Within the outer container is a series of links. These links are the headings within the accordion and each heading will have a corresponding content panel, or drawer as they are sometimes referred to, which opens when the heading is clicked. The following screenshot shows these elements as they may appear in an accordion.

Step1

It’s worth remembering that when using the accordion widget, only one content panel can be open at any one time. Let’s implement a basic accordion now. In a blank page in your text editor, create the following page.

 <ul id="myAccordion"> <li> <a href="#">Header 1</a> <div>Wow, look at all this content that can be shown or hidden with a simple click!</div> </li> <li> <a href="#">Header 2</a> <div>Lorem ipsum dolor sit amet, consectetuer adipiscing elit. Aenean sollicitudin. Sed interdum pulvinar justo. Nam iaculis volutpatligula. Integer vitae felis quis diam laoreet ullamcorper. Etiam tincidunt est vitae est. Ut posuere, mauris at sodales rutrum, turpis tellus fermentum metus, ut bibendum velit enim eu lectus. Suspendisse potenti. </div> </li> <li> <a href="#">Header 3</a> <div>Donec at dolor ac metus pharetra aliquam. Suspendisse purus. Fusce tempor ultrices libero. Sed quis nunc. Pellentesque tincidunt viverra felis. Integer elit mauris, egestas ultricies, gravida vitae, feugiat a, tellus.</div> </li> </ul>  <script type="text/javascript" src="jqueryui1.6rc2/jquery-1.2.6.js"></script> <script type="text/javascript" src="jqueryui1.6rc2/ui/ui.core.js"></script> <script type="text/javascript" src="jqueryui1.6rc2/ui/ui.accordion.js"></script> <script type="text/javascript"> //function to execute when doc ready $(function() {  //turn specified element into an accordion $("#myAccordion").accordion(); }); </script> 

Save the file as accordion1.html in your jqueryui folder and try it out in a browser. We haven’t specified any styling at all at this stage, but as you can see from the following screenshot, it still functions exactly as intended.

Step2

Little code is required for a basic working version of the accordion widget. A simple unordered list element is the mark-up foundation which is transformed by the library into the accordion object.

The following three separate external script files are required for an accordion:

– The jQuery library itself (jquery-1.2.6.js) –
– The UI base file (ui.core.js) –
– The accordion source file (ui.accordion.js) –

The first two files are mandatory requirements of all components of the UI library. They should be linked to in the order shown here. Each widget also has its own source file, and may depend on other components as well.

The order in which these files appear is important. The jQuery library must always appear first, followed by the UI base file. After these files, any other files that the widget depends upon should appear before the widget’s own script file. The library components will not function as expected if files are not loaded in the correct order.

Finally, we use a custom “script” block to turn our “ul” element into the accordion. We can use the jQuery object shortcut $ to specify an anonymous function which will be executed as soon as the document is ready. This is analogous to using $(document).ready(function(){}) and helps to cut down on the amount of code we have to type.

Following this, we use the simple ID selector $(“#myAccordion”) to specify the element on the page we want to transform. We then use the accordion() constructor method to create the accordion

Other elements can be turned into accordions as well. All list element variants are supported including ordered lists and definition lists. You don’t even need to base the accordion on a list element at all. You can build a perfectly functional accordion using just nested “div” and “a” elements, although additional configuration will be required

In the above example, we used an empty fragment (#) as the value of the href attribute. You should note that any URLs supplied for accordion headers will not be followed when the header is clicked within the accordion when using the default implementation.

Styling The Accordion

With no styling, the accordion will take up 100% of the width of its container. Like with other widgets, we have several options for styling the accordion. We can create our own custom stylesheet to control the appearance of the accordion and its content, we can use the default or flora themes that come with the library, or we can use Theme Roller to create an extensive skin for the whole library. Let’s see how using the flora theme for the accordion will cause it to render. In accordion1.html, add the following “link” tag to the “head” of the page.

 <link rel="stylesheet" type="text/css" href="jqueryui1.6rc2/themes/flora/flora.accordion.css"> 

Save the new file as accordion2.html, also in the jqueryui folder, and view it again in a browser. It should appear something like this.

Step3

The accordion theme file assumes that an unordered list is being used as the basis of the widget and specifically targets “li” elements with certain style rules. We can easily create our own custom theme to style the accordion for situations where we want to use a non-list-based accordion widget, or if we simply want different colors or font styles.

You can use the excellent Firebug plugin for Firefox, or another DOM viewer, to see the class names that are automatically added to certain elements when the accordion is generated. You can also read through an un-minified version of the source file if you really feel like it. These will be the class names that we’ll be targeting with our custom CSS.

The following screenshot shows Firebug in action.

Step4

Change accordion2.html so that it appears as follows (new code is shown in bold).

 <div id="myAccordion"> <span class="corner topLeft"></span><span class="corner topRight"></span><span class="corner bottomLeft"></span><span class="corner bottomRight"></span> <div><a href="#">Header 1</a><div>Wow, look at all this content that can be shown or hidden with a simple click!</div></div> <div><a href="#">Header 2</a><div>Lorem ipsum dolor sit amet, consectetuer adipiscing elit. Aenean sollicitudin. Sed interdum pulvinar justo. Nam iaculis volutpatligula. Integer vitae felis quis diam laoreet ullamcorper. Etiam tincidunt est vitae est. Ut posuere, mauris at sodales rutrum, turpis tellus fermentum metus, ut bibendum velit enim eu lectus. Suspendisse potenti.</div></div> <div><a href="#">Header 3</a><div>Donec at dolor ac metus pharetra aliquam. Suspendisse purus. Fusce tempor ultrices libero. Sed quis nunc. Pellentesque tincidunt viverra felis. Integer elit mauris, egestas ultricies, gravida vitae, feugiat a, tellus.</div></div> </div> <script type="text/javascript" src="jqueryui1.6rc2/jquery-1.2.6.js"></script> <script type="text/javascript" src="jqueryui1.6rc2/ui/ui.core.js"></script> <script type="text/javascript" src="jqueryui1.6rc2/ui/ui.accordion.js"></script> <script type="text/javascript"> //function to execute when doc ready $(function() {  //turn specified element into an accordion $("#myAccordion").accordion(); }); </script> 

Save this version as accordion3.html in the jqueryui folder. The class name ui-accordion is automatically added to the accordion’s container element. Therefore, we can use this as a starting point for most of our CSS selectors. The links that form our drawer headers are given the class ui-accordion-header so we can also target this class name. In a new file, create the following stylesheet.

 #myAccordion {  width:200px;  border:2px solid #000000;  position:relative;  list-style-type:none;  padding-left:0; } .ui-accordion-header {  text-decoration:none;  font-weight:bold;  color:#000000;  display:block;  width:100%;  text-align:center; } .ui-accordion div div {  font-size:90%; } .ui-accordion a {  color:#ffffff;  background:url(../img/accordion/header-sprite.gif) repeat-x 0px 0px; } .ui-accordion a.selected {  background:url(../img/accordion/header-sprite.gif)  repeat-x 0px -22px; } .ui-accordion a:hover {  background:url(../img/accordion/header-sprite.gif)  repeat-x 0px -44px; } /* container rounded corners */ .corner {  position:absolute;  width:12px; height:13px;  background:url(../img/accordion/corner-sprite.gif) no-repeat; } .topLeft {  top:-2px; left:-2px;  background-position:0px 0px; } .topRight {  top:-2px; right:-2px;  background-position:0px -13px; } .bottomRight {  bottom:-2px; right:-2px;  background-position:0px -26px; } .bottomLeft {  bottom:-2px; left:-2px;  background-position:0px -39px; } 

Save this file as accordionTheme.css in your styles folder and preview accordion3.html in a browser. We will need a new folder for the images we use in this and subsequent examples. Create a new folder inside the img folder and name it accordion. With just two images, and a few simple style rules, we can drastically change the default appearance of the accordion with our own custom skin as shown in the following screenshot.

Step5

Configuring The Accordion

The accordion has a range of configurable properties which allow us to easily change the default behaviour of the widget. The following table lists the available properties, their default value, and gives a brief description of their usage.

Configuring The Accordion

Configurable properties The configurable properties for all of the different components of jQuery UI are constantly evolving with each new release of the library. You can keep track of the latest properties by looking through the online jQuery UI API pages. Each component has its own page and can be accessed from jQuery Docs

Most of the properties are self-explanatory, and the values they accept are usually booleans, strings, or element references. Let’s put some of them to use so we can explore their functionality. Alter accordion3.html so that it appears as follows.

 <div id="myAccordion"> <span class="corner topLeft"></span><span class="corner topRight"></span><span class="corner bottomLeft"></span><span class="corner bottomRight"></span> <div><a href="#">Header 1</a><div>Wow, look at all this content that can be shown or hidden with a simple mouseover!</div></div> <div><a href="#">Header 2</a><div>Lorem ipsum dolor sit amet, consectetuer adipiscing elit. Aenean sollicitudin. Sed interdum pulvinar justo. Nam iaculis volutpat ligula. Integer vitae felis quis diam laoreet ullamcorper. Etiam tincidunt est vitae est. Ut posuere, mauris   at sodales rutrum, turpis tellus fermentum metus, ut bibendum velit enim eu lectus. Suspendisse potenti.</div></div> <div><a href="#">Header 3</a><div>Donec at dolor ac metus pharetra aliquam. Suspendisse purus. Fusce tempor ultrices libero. Sed quis nunc. Pellentesque tincidunt viverra felis. Integer elit mauris, egestas ultricies, gravida vitae, feugiat a, tellus.</div></div> </div>  <script type="text/javascript" src="jqueryui1.6rc2/jquery-1.2.6.js"></script> <script type="text/javascript" src="jqueryui1.6rc2/ui/ui.core.js"></script> <script type="text/javascript" src="jqueryui1.6rc2/ui/ui.accordion.js"></script> <script type="text/javascript"> //function to execute when doc ready $(function() {  //set the event property var accOpts = { event:"mouseover" }  //turn specified element into an accordion $("#myAccordion").accordion(accOpts);   }); </script> 

First, we create a new object literal called accOpts which contains one property key and a value. We then pass this object into the accordion() constructor as an argument, and it overrides the default properties of the widget. The string we specified for the value of the event property becomes the event that triggers the activation of the drawers, making this a very useful property. Save the changes as accordion4.html.

You should note that you can also set properties using an inline object within the widget’s constructor method without creating a separate object (see accordion4Inline.html). Using the following code would be equally as effective, and would often be the preferred way for coding.

 <script type="text/javascript"> //function to execute when doc ready $(function() {  //turn specified element into an accordion $("#myAccordion").accordion({ event:"mouseover" }); }); </script> 

We can set other properties at the same time as well. If we want to change which drawer is open by default when the accordion is rendered, as well as change the trigger event, we would supply both properties and the required values, with each pair separated by a comma. Update accordion4.html so that it appears as follows.

 <div id="myAccordion"> <span class="corner topLeft"></span><span class="corner topRight"></span><span class="corner bottomLeft"></span><span class="corner bottomRight"></span> <div><a id="header1" href="#">Header 1</a><div>Wow, look at all this content that can be shown or hidden with a simple mouseover!</div></div> <div><a id="header2" href="#">Header 2</a><div>Lorem ipsum dolor sit amet, consectetuer adipiscing elit. Aenean sollicitudin. Sed interdum pulvinar justo. Nam iaculis volutpat ligula. Integer vitae felis quis diam laoreet ullamcorper. Etiam tincidunt est vitae est. Ut posuere, mauris at sodales rutrum, turpis tellus fermentum metus, ut bibendum velit enim eu lectus. Suspendisse potenti.</div></div> <div><a id="header3" href="#">Header 3</a><div>Donec at dolor ac metus pharetra aliquam. Suspendisse purus. Fusce tempor ultrices libero. Sed quis nunc. Pellentesque tincidunt viverra felis. Integer elit mauris, egestas ultricies, gravida vitae, feugiat a, tellus.</div></div> </div>  <script type="text/javascript" src="jqueryui1.6rc2/jquery-1.2.6.js"></script> <script type="text/javascript" src="jqueryui1.6rc2/ui/ui.core.js"></script> <script type="text/javascript" src="jqueryui1.6rc2/ui/ui.accordion.js"></script> <script type="text/javascript"> //function to execute when doc ready $(function() {  //configure accordion var accOpts = { event:"mouseover", active:"#header3" }  //turn specified element into an accordion $("#myAccordion").accordion(accOpts);   }); </script> 

Your ads will be inserted here by

AdSense Now!.

Please go to the plugin admin page to paste your ad code.

The first change is to give our header elements id attributes in the underlying HTML in order to target them with the active property. In our object literal, we then specify the selector for the header we would like to open by default. Save the file as accordion5.html. When the page is opened, the third drawer should be displayed by default.

The other properties listed in the table at the start of this section are equally as easy to configure. Change the object literal so that it appears as follows.

 //configure accordion var accOpts = { event:"mouseover", active:"#header3", alwaysOpen:false, autoHeight:false } 

Save these changes as accordion6.html and view the results in a browser. First, you should find that when you first roll over a heading the drawer opens as normal, but the accordion grows or shrinks depending on how much content is in the drawer. It no longer stays at a fixed height. This can be seen in the following example.

Step6

You should also find that if you roll over a heading whose drawer is already open, the drawer will close and the accordion will shrink so that only the headers are displayed with no open drawers. Note that when using false with the alwaysOpen property, the accordion will shrink in this way regardless of whether the autoHeight property is set to true or false.

Step7

The fillSpace property, if set, will override autoHeight. You should also be aware that the clearStyle property will not work with autoHeight. One final property we should look at is the navigation property. This property is used to enable navigating to new pages from accordion headings. Change accordion6.html to this.

 <div id="myAccordion"> <span class="corner topLeft"></span><span class="corner topRight"></span><span class="corner bottomLeft"></span><span class="corner bottomRight"></span> <div><a id="header1" href="#1">Header 1</a><div>Wow, look at all this content that can be shown or hidden with a simple mouseover!</div></div> <div><a id="header2" href="#2">Header 2</a><div>Lorem ipsum dolor sit amet, consectetuer adipiscing elit. Aenean sollicitudin. Sed interdum pulvinar justo. Nam iaculis volutpat ligula. Integer vitae felis quis diam laoreet ullamcorper. Etiam tincidunt est vitae est. Ut   posuere, mauris at sodales rutrum, turpis tellus fermentum metus, ut bibendum velit enim eu lectus. Suspendisse potenti.</div></div> <div><a id="header3" href="#3">Header 3</a><div>Donec at dolor ac metus pharetra aliquam. Suspendisse purus. Fusce tempor ultrices libero. Sed quis nunc. Pellentesque tincidunt viverra felis. Integer elit mauris, egestas ultricies, gravida vitae, feugiat a, tellus.</div></div> </div>  <script type="text/javascript" src="jqueryui1.6rc2/jquery-1.2.6.js"></script> <script type="text/javascript" src="jqueryui1.6rc2/ui/ui.core.js"></script> <script type="text/javascript" src="jqueryui1.6rc2/ui/ui.accordion.js"></script> <script type="text/javascript"> //function to execute when doc ready $(function() {  //configure accordion var accOpts = { event:"mouseover", active:"#header3", alwaysOpen:false, autoHeight:false, navigation:true }  //turn specified element into an accordion $("#myAccordion").accordion(accOpts);   }); </script> 

Save the changes as accordion7.html. When you roll over one of the headings, they will still open as normal, but if you click on one of the headings, the URL specified as the header’s href attribute will be followed.

With navigation enabled, the widget will check for a fragment identifier at the end of the URL when the page loads. If there is a fragment identifier, the accordion will open the drawer whose heading’s href attribute matches the fragment. So, if the second heading is clicked in this example, and then the page is refreshed, the second drawer of the accordion will be opened automatically. Therefore, it is important to ensure that the href attributes for each accordion header is unique to avoid conflicts in this situation.

Accordion Methodology

The accordion includes a selection of methods that allow you to control and manipulate the behavior of the widget programmatically. Some of the methods are common to each component of the library, such as the destroy method, which is used by every widget. We’ll look at each of these methods in turn.

Destruction

One method provided by the accordion is the destroy method. This method removes the accordion widget and returns the underlying mark-up to its original state. We’ll use the default properties associated with accordion instead of the ones we configured for the last few examples. In a new page in your text editor, add the following code.

 <div id="myAccordion"> <span class="corner topLeft"></span><span class="corner topRight"></span><span class="corner bottomLeft"></span><span class="corner bottomRight"></span> <div><a href="#">Header 1</a><div>Wow, look at all this content that can be shown or hidden with a simple click!</div></div> <div><a href="#">Header 2</a><div>Lorem ipsum dolor sit amet, consectetuer adipiscing elit. Aenean sollicitudin. Sed interdum pulvinar justo. Nam iaculis volutpat ligula. Integer vitae felis quis diam laoreet ullamcorper. Etiam tincidunt est vitae est. Ut posuere, mauris at sodales rutrum, turpis tellus fermentum metus, ut bibendum velit enim eu lectus. Suspendisse potenti.</div></div> <div><a href="#">Header 3</a><div>Donec at dolor ac metus pharetra aliquam. Suspendisse purus. Fusce tempor ultrices libero. Sed quis nunc.   Pellentesque tincidunt viverra felis. Integer elit mauris, egestas ultricies, gravida vitae, feugiat a, tellus.</div></div> </div> <button id="accordionKiller">Kill it!</button>  <script type="text/javascript" src="jqueryui1.6rc2/jquery-1.2.6.js"></script> <script type="text/javascript" src="jqueryui1.6rc2/ui/ui.core.js"></script> <script type="text/javascript" src="jqueryui1.6rc2/ui/ui.accordion.js"></script> <script type="text/javascript"> //function to execute when doc ready $(function() {  //turn specified element into an accordion $("#myAccordion").accordion();  //attach click hander to button $("#accordionKiller").click(function() {  //destroy the accordion $("#myAccordion").accordion("destroy"); }); }); </script> 

The “body” of the page contains a new “button” element, which can be used to destroy the accordion. The final “script” block also contains a new anonymous function. We use the standard jQuery library’s click() method to execute some code when the targeted “button” element is clicked.

We use the same accordian() constructor method to destroy it as we did to create it. But this time, we supply the string “destroy” as an argument. This causes the class names added by the library to be removed, the opening and closing behavior of the headers to no longer be effective, and all of the previously hidden content will be made visible.

Because we used an ID selector in our theme file to style the accordion container, this element will retain its size and borders. The roll-over effects were added by targeting the class names created by the library. As these are removed, along with the rest of the accordion’s functionality, the rollovers do not activate. Save this file as accordion8.html.

Enabling and disabling

Two very simple methods to use are enable and disable. These are just as easy to use as destroy, although they do have some subtle behavioral aspects that should be catered for in any implementation as you’ll see. Change accordion8.html to the following.

 <div id="myAccordion"> <span class="corner topLeft"></span><span class="corner topRight"></span><span class="corner bottomLeft"></span><span class="corner bottomRight"></span> <div><a href="#">Header 1</a><div>Wow, look at all this content that can be shown or hidden with a simple click!</div></div> <div><a href="#">Header 2</a><div>Lorem ipsum...</div></div> <div><a href="#">Header 3</a><div>Donec at dolor...</div></div> </div> <button id="enable">Enable!</button><button id="disable">Disable!</button>  <script type="text/javascript" src="jqueryui1.6rc2/jquery-1.2.6.js"></script> <script type="text/javascript" src="jqueryui1.6rc2/ui/ui.core.js"></script> <script type="text/javascript" src="jqueryui1.6rc2/ui/ui.accordion.js"></script> <script type="text/javascript"> //function to execute when doc ready $(function() {  //turn specified element into an accordion $("#myAccordion").accordion();  //add click handler for enable button $("#enable").click(function() {  //enable the accordion $("#myAccordion").accordion("enable"); });  //add click handler for disable button $("#disable").click(function() {  //disable the accordion $("#myAccordion").accordion("disable"); }); }); </script> 

We use these two methods in exactly the same way as the destroy method. Simply call accordion() with either enable or disable supplied as a string parameter. Save this file as accordion9.html and try it out.

One thing you’ll quickly notice is that when the accordion has been disabled, the rollover and selected effects are still apparent. This could be misleading as there is no visual cue that the widget has been disabled. This behavior is sure to be fixed in a later revision of the library. But for now, we can easily fix this with a little standard jQuery goodness and apply disabled states ourselves.

Another problem we have with our test page is that clicking the Enable! button while the accordion is already enabled does nothing. There is, of course, nothing for it to do. Some kind of indication that the widget is already enabled would be helpful. Let’s see how easy it is to fix these minor issues. Update the current page to this.

 <div id="myAccordion"> <span class="corner topLeft"></span><span class="corner topRight"></span><span class="corner bottomLeft"></span><span class="corner bottomRight"></span> <div><a href="#">Header 1</a><div>Wow, look at all this content that can be shown or hidden with a simple click!</div></div> <div><a href="#">Header 2</a><div>Lorem ipsum...</div></div> <div><a href="#">Header 3</a><div>Donec at...</div></div> </div> <button id="enable">Enable!</button><button id="disable">Disable!</button>  <script type="text/javascript" src="jqueryui1.6rc2/jquery-1.2.6.js"></script> <script type="text/javascript" src="jqueryui1.6rc2/ui/ui.core.js"></script> <script type="text/javascript" src="jqueryui1.6rc2/ui/ui.accordion.js"></script> <script type="text/javascript"> //function to execute when doc ready $(function() {  //turn specified element into an accordion $("#myAccordion").accordion().addClass("enabled");  //add click handler for enable button $("#enable").click(function() {  //alert if already enabled, enable and change classes if not ($("#myAccordion").hasClass("enabled")) ? alert("Accordion already enabled!") : $("#myAccordion").accordion("enable").addClass("enabled").removeClass("disabled") ;	});  //add click handler for disable button $("#disable").click(function() {  //alert if already disabled, disable and change classes if not ($("#myAccordion").hasClass("disabled")) ? alert("Accordion already disabled!") : $("#myAccordion").accordion("disable").addClass("disabled").removeClass("enabled") ;	}); }); </script> 

The new code takes care of notifying the visitor if they click the Enable! button while the accordion is already enabled, or if the Disable! button is clicked while it is already disabled, through simply adding two additional class names; enabled and disabled

We use the standard jQuery addClass() method to initially set an additional class name of enabled on the accordion’s container. A simple JavaScript ternary then looks for the presence of this class and invokes the alertif it is detected. This is done using the jQuery hasClass() method.

If the accordion is changed from enabled to disabled, the addClass(), and also the removeClass() methods are used to swap our class names appropriately. A less intrusive way for us to do this, without the need for alerts, would be to actually disable the Enable! button while the accordion is enabled and vice-versa. I’ll leave you to try this on your own.

Save this as accordion10.html. Now we can add some new styles to our stylesheet to address our new disabled class. Open accordionTheme.css in your text editor and add the following new selectors and rules after the existing ones.

 /* disabled state */ .disabled a {  background:url(../img/accordion/disabled.gif) repeat-x 0px 0px;  cursor:default; } .disabled a.selected {  background:url(../img/accordion/disabled.gif) repeat-x 0px 0px;  cursor:default; } .disabled a:hover {  background:url(../img/accordion/disabled.gif) repeat-x 0px 0px;  cursor:default; } 

Save this as accordionTheme2.css (don’t forget to update the link to the stylesheet in the “head”). Now, when the Disable! button is clicked, the new class name will pick up our grayed out headings. As we’ve specified the same background image for the selected and hover states, the accordion will not appear to respond in any way to clicks or mouse overs while disabled.

Drawer Activation

The final method exposed by accordion is the activate method. This can be used to programmatically show or hide different drawers. We can easily test this method using a text box and a new button. Change acordion10.html to this:

 <div id="myAccordion"> <span class="corner topLeft"></span><span class="corner topRight"></span><span class="corner bottomLeft"></span><span class="corner bottomRight"></span> <div><a href="#">Header 1</a><div>Wow, look at all this content that can be shown or hidden with a simple click!</div></div> <div><a href="#">Header 2</a><div>Lorem ipsum... </div></div> <div><a href="#">Header 3</a><div>Donec at... </div></div> </div> <p>Choose a drawer to open</p> <input id="choice" type="text"><button id="activate">Activate</button>  <script type="text/javascript" src="jqueryui1.6rc2/jquery-1.2.6.js"></script> <script type="text/javascript" src="jqueryui1.6rc2/ui/ui.core.js"></script> <script type="text/javascript" src="jqueryui1.6rc2/ui/ui.accordion.js"></script> <script type="text/javascript"> //function to execute when doc ready $(function() {  //turn specified element into an accordion $("#myAccordion").accordion();  //add click handler for activate button $("#activate").click(function() {  //get the value from the text box var choice = $("#choice").val();  //open the chosen drawer $("#myAccordion").accordion("activate", choice - 1);  }); }); </script> 

Save this file as accordion11.html. The activate method is used in the same way as the destroy method. It is passed to the accordion() constructor as an argument. Apart from supplying the string “activate”, we also need to tell the accordion which drawer to activate using a number representing the drawer’s index.

Like standard JavaScript arrays, the index numbers for the accordion drawer headings begin with zero. Therefore, to open the correct drawer, we subtract 1 from the figure entered into the text box when we call the activate method.

Summary

The accordion widget allows us to easily implement an object on the page which will show and hide different blocks of content. This is a popular, and much sought after, effect which is implemented by big players on the web today like Apple.

We first saw that the accordion widget doesn’t require any CSS at all in order to function as the behaviour without styling still works perfectly. We also looked at the flora styling, as well as the ease in which custom styles can be added.

We then moved on to look at the configurable properties that can be used with accordion. We saw that we can use these properties to change the behaviour of the widget, such as specifying an alternative heading to be open by default, whether the widget should expand to fill the height of its container, or the event that triggers the opening of a content drawer.

In addition to looking at these properties, we also saw that there are a range of methods which can be called on the accordion to make it do things programmatically. For example, we can easily specify a drawer to open, enable and disable any drawers, or even completely remove the widget and return the mark-up to its original state.

In the next and final part of this article, we will take a look at Built-in types of animation and Custom accordion events.

Liked This Article? Why Not Buy The Book

Build highly interactive web applications with ready-to-use widgets of the jQuery user interface library.

Buy The Book

Learn More…

Your ads will be inserted here by

AdSense Now!.

Please go to the plugin admin page to paste your ad code.

page-5-

Your ads will be inserted here by

AdSense Now!.

Please go to the plugin admin page to paste your ad code.

Your ads will be inserted here by

AdSense Now!.

Please go to the plugin admin page to paste your ad code.

Your ads will be inserted here by

AdSense Now!.

Please go to the plugin admin page to paste your ad code.

page-7-

Your ads will be inserted here by

AdSense Now!.

Please go to the plugin admin page to paste your ad code.

Your ads will be inserted here by

AdSense Now!.

Please go to the plugin admin page to paste your ad code.

Your ads will be inserted here by

AdSense Now!.

Please go to the plugin admin page to paste your ad code.

category-freebie-page-4-

Your ads will be inserted here by

AdSense Now!.

Please go to the plugin admin page to paste your ad code.

Your ads will be inserted here by

AdSense Now!.

Please go to the plugin admin page to paste your ad code.

Your ads will be inserted here by

AdSense Now!.

Please go to the plugin admin page to paste your ad code.

Watermark Tutorial

Your ads will be inserted here by

AdSense Now!.

Please go to the plugin admin page to paste your ad code.


Open up your image and select your desired color for your text watermark, now select the text tool and type your text, fill your page with the text like this.

Once you’ve filled your page press “ctrl + t” to transform it, just rotate it slightly, like this.

Your ads will be inserted here by

AdSense Now!.

Please go to the plugin admin page to paste your ad code.

Now lower the opacity by quite abit as we dont want to spoil the picture. ive lowered mine down to 20% but i think between 10-20% is fine.
thats it all done, now save your image.

Your ads will be inserted here by

AdSense Now!.

Please go to the plugin admin page to paste your ad code.

category-coding-tutorials-page-2-

Your ads will be inserted here by

AdSense Now!.

Please go to the plugin admin page to paste your ad code.

Your ads will be inserted here by

AdSense Now!.

Please go to the plugin admin page to paste your ad code.

Your ads will be inserted here by

AdSense Now!.

Please go to the plugin admin page to paste your ad code.

p-3362

Your ads will be inserted here by

AdSense Now!.

Please go to the plugin admin page to paste your ad code.

O-hai guys :) Today we’ll go shopping in the web interfaces accessories mall ^_~ That is, we’ll learn how to beautify our websites with nice glassy orbs ^^
This is what we’ll be creating:

Okay, so take a bag of chips and a drink and let’s get to work ^^

Step 1:

First, let’s create a new canvas, say 400×400 pixels. Fill it with a dark gray, I chose #09192a. Make a new layer and then set your foreground color to #751900.

Step 2:

Take the Elliptical Marquee tool and holding Shift, draw on your new layer a perfect circle that fills about half the canvas. Take then the Bucket Tool and fill the selection you just created with the #751900 foreground color. Press Ctrl (Cmd on Mac)+D to deselect. Name your layer “Orb Base”.

Step 3:

Moooo-vin’ on. Now make another new layer on top of the “Orb Base” layer and name it “Shadow”. Right-click on it and choose “Create Clipping Mask”.
Once you do that, Ctrl (Cmd)+click on your “Orb Base” layer’s thumbnail in the layers palette to get a selection of it. Take then the Elliptical Marquee tool, and set it on “Substract from Selection”.

Okaaaay, now, click first somewhere top-left of your existing selection, then holding down the Shift key, drag to make a perfect circle with the Elliptical Marquee over your existing selection of the Orb Base, so that in the end you are left with a sort of…half-moon, a semiluna. This might be a bit difficult for beginners, but don’t give up! ^_^

Now, once you have your semiluna (make sure it is decently symmetric and balanced like mine, okay?) remember that layer that we named “Shadow”? Well, make sure it is your “working on” layer (aka, it is a blueish color) and then set your foreground color to #49230f and your background color to #160d07.

Step 4:

Now, take the Gradient tool, make sure it is set to “Foreground to Background” and “Reverse” is NOT ticked, set it to “Radial Gradient” and clicking inside the selection, about at half-width, drag a little distance and then release the mouse button. Now your gradient should be filling the selection, with the foreground (lighter) color to the center and the background (darker) color to the “horns” of the half-moon ^__^
Press Ctrl(Cmd)+D to deselect…….

Step 5:

Aaand…this is where the fun begins ^^
Now you should have: 1 background layer, 1 Orb Base layer, 1 Shadow layer (which we made the “Clipping Mask” of the Orb Base).
Now I’ll take a second and explain what Clipping Masks are, for anyone who doesn’t know. Basically, they are a sort of “servant” of the layer beneath them, their patron-layer if you like. If we have a circle on a patron layer, whatever we draw on the Clipping Mask one will NEVER go out of the boundaries of the patron ^^  Whatever pixels are filled in the patron will be visible in the servant as well, nothing else :)

Back to our orb now. Click the “Orb Base” layer and then click the “New Layer” icon, to create a new layer between your “patron” and your “servant” layers. As you notice, the layer you just created inherits the characteristic of the one above it (Shadow) and becomes NOT a normal layer but a Clipping Mask as well.
Mmkay. That’s exactly what we want, so! Take the Elliptical Marquee tool, and make a perfect circle roughly around all the orange you see.
It doesn’t have to be exact so no worry if it goes a liiittle bit over, like in my screenshot.

Now make sure you have your newly-created layer selected and name it “Bottom Glow”…so it has a name we can identify easily, we don’t want the poor layer to have an identity crisis do we? ^__~

Kay, now!  Set your foreground color to #eb460f and your background color to #8b2c0b .
With the Gradient Tool, click at the lowest point of the selection and holding Shift drag only a little bit upwards. Juuust a little bit, so the colors boundary is visible near the bottom. Don’t deselect!

Step 6:

Keeping your selection, make a new layer and name it “Highlight Bottom” just about the “Bottom Glow” layer. Of course this new layer will be a Clipping Mask too….
Take the Marquee tool and set it to “New Selection -this button is a little bit left than the “Substract from Selection” button we clicked earlier in Step 3 ^_~
This will allow you to move your selection. So, move it a little upwards….and with your “Highlight Bottom” layer as your working one take the gradient tool, click on it’s icon at the top bar near the “New Selection” button and add these settings:

Then once you clicked OK  go back to your selection and positioning your pointer at its bottommost point, press Shift and drag upwardsto approximately a third of the selection’s height. Still, DON’T deselect.

Step 7:

Make a new layer above the Highlight Bottom one, name it “Side Shadows”.
Kay, now go to Select—>Transform Selection.

Squeeze your selection so that it becomes an ellipse..like this:

Step 8:

Now press Ctrl(Cmd)+Shift+I to inverse selection. Take the Gradient tool, set it to Foreground to Transparent, then set your Foreground color to #672f00 .
Set your gradient to Linear Gradient. And on the “Side Shadows” layer, click to the left side of the Orb, and pressing Shift, drag a little to the right. Do the same for the right side, drag to the left in its case though ^^ Like in my screenshot :)
Set your “Side Shadows” layer to Multiply blending mode and lower its opacity to about 80%

Step 9:

Now let’s start giving it highlights ^__^
Create a new layer and name it “Highlights 1″ ………yea, you guessed right, we’re going to have more highlights layers hahaha…
so, name it “Highlights 1″ and set your Foreground color to #ffffcb.
Once you do that, make an oval selection using the Elliptical Marquee tool, on the top-right of the orb, similar to mine:

Take the Gradient Tool and with it set to Foreground to Transparent, hold down Shify key and drag diagonally from the outer-top-right side of the selection to the bottom-lower-left part, like this:

Set it to Linear Dodge blending mode and lower its Fill toabout 70%

Step 10:

Now make a new layer again, name it “Highlights 2″ and Ctrl(Cmd)+click on your Highlights Bottom layer thumbnail in the layers palette to get its selection.
Use the Marquee tool like beore to move it upwards, until its bottommost point is about that half the height of the total orb.
Now with your foreground color set to #ffffcb, take the Gradient tool set to Foreground to transparent, hold Shift and drag from the top to the bottom of the selection. Set your layer to Linear Dodge and lower its fill to about 40%

Step 11:

Make a new layer, name it “Highlights 3″ and taking the Elliptical Marquee draw a perfect circle at the top, covering about 2/3 of the orb, like this:

Now change your foreground color to #ffff71 and with the same gradient settings as before drag from top to bottom. Set the layer to Color Dodge and lower opacity to about 30%

After this….well we just go on with the highlighta, hahaha…let’s see, I promise just a couple more and we’re done with them :)
Make a new layer, name it “Highlights 4″ and with the same Marquee, make a selection similar to the previous, only smaller in diameter. Only this time, make sure that it doesn’t touch the top margin of the orb, but is some 15-20px lower. Using #ffffef as your foreground color, drag as previously from top to bottm of the selection, then set your layer blending mode to Linear Dodge and lower its Fill to 25%
Make a new layer yet again, name it “Highlights 5″ and make an ellipse with the marquee tool, whose top begins where the top of the last circle began but as an ellipse, it is shorter in height, like this:

Your ads will be inserted here by

AdSense Now!.

Please go to the plugin admin page to paste your ad code.

Step 12:

Set your layer to Color Dodge and lower its Fill to 30%
Now let’s take care of some more shadows ^^
Click on your “Highlight Bottom” layer, then click on New Layer icon. Name it “Shadows Center 1″.
Take the gradient too, keep it Foreground to Transparent, but change its style from the top menu to “Reflected Gradient”. As a foreground color, use #6c3000
Position your cursor at about a third of the orb -to the bottom- and drag for about 30 pixels upwards.
Then release the mouse button and set the layer to Multiply, and lower its fill to about 5-8%
New layer again, name it “Shadows Center 2″..or something xD
Ctrl(CMD)+click on your “Highlight Bottom” layer thumbnail to select it, then use the Marquee tool to move the selection upwards about 25px.
Like this:

Using the same color as before, set your gradient to Linear Gradient, Foreground to Tranparent and drag, this time from bottom to top of the selection. Don’t deselect. Set the layer to Multiply and lower Fill to 30%
Make another new layer. Name it “Shadows Center 3″. Move it about 10px upwards. Same gradient as before, fill it from bottom to top, so that the transparency shows at the top.
Set it to Multiply and lower Fill to 35%.

Step 13:

Now let’s add the refining touches ^^
Make a new layer above all others (but make sure it is still a Clipping Mask), name it “Border1″ and get a selection of your Orb Base layer.
Set your foreground color to #38180c, then go to Edit->Stroke, choose 10px and Center.
Click OK then set your layer to 60% Fill.
Now let’s transform this to an ellipse, so go and press Ctrl(Cmd)+T and pull its tip&bottom, so it becomes a vertical ellipse whose top  goes over the margin of the Orb and is not visible anymore, and the sides are the only ones left visible.

Make another new layer, move it under the Border1 layer, get a new selection of the Orb Base, set your foreground color to #160d07 and go to Edit->Stroke, shoose 12px.
Click okay, then set your layer to Linear Burn and lower its Fill to 70%

Now, your Orb should look something like this:

Step 14:

New Layer above all others, but it must still be a clipping mask. Name it “Flare White” . Set your foreground color to #ffffa4 and your backgorund color to #ffb409.
go to the brushes palette and choose a soft, round brush, around 20px in size. Now, see where the most glowy part of bottom half of the orb is? Click once with your airbrush over it.  Now set your layer to Linear Dodge and using Transform, make it an ellipse by pulling the sides and pushing the top/bottom. After that, your orb should look like this:

Step 15:

Click X to reverse your Foreground with your Background colors.
Make a new layer and move it under your “Flare White” layer. Name it “Flare Orange”.
Get a selection of your “Flare White” layer and go to Select–>Modify–>Expand. Choose a value around 4px.
Click OK and then fill your selection with the foreground color, #ffb409.
Set your layer to Overlay blending mode.
Now your image should look like this:

Step 16:

Let’s take care of the borders now, shall we? :)
Set your foreground color to #6a6974.
Make a new layer and move it under ALL the orb layers that you have, so that it is above the background color layer. name it “Ring Small”
Get a selection of your Orb Base layer and go to Edit->Stroke, shoose 14px and Center.
Now click OK and enter the layer’s Blending Options.
Add these settings:

Step 17:

Now make a new layer yet again, move in uner your “Ring Small” layer, name it “Ring Large”and go to Select—>Modify—>Expand, choose a value around 15px.
Now set your Foreground color to #635337 and go to Edit—>Stroke–>about 15-17px.
Now add your layer these settings:

Step 18:

Now your orb should look something like this:

Now get a selection of your “Ring Large” layer and go to the bottom of your Layers palette, click “New Fill or Adjustment Layer” and choose “Photo Filter”.
Choose #ac7a33 as a color and around 60% Density. Make sure “Preserve Luminosity” is ticked.

Now obtain a new selection of your “Ring Large” layer and  go to the same Photo Filter, only this time choose #ec8a00 as color, 56% Density and again, Preserve Luminosity must be ticket. Your orb should now look similar to this:

Step 19:

Kaaay…we’re alllmost done, rejoyce! ^___^

Deselect. Now let’s deal with the blue glow, shall we?
Make a new layer, above the Photo Filters but below the “Ring Small” layer. Name it “Blue Glow”. Choose #277ef5 as your Foreground color. Get a selection of your “Ring Large” layer and take the Gradient tool, st it to “Color to Transparent” and to Linear Gradient and click&drag from right to left over a distance of about 50px on the right side of the large ring.
Do the same on the left side, only drag from left to right.
Set your layer to Hard Light, duplicate it and now your orb should have a fancy contrasting electric blue glow…:

Step 20:

Deselect. Make a new layer…(yea that’s how all the steps seem to start huh) xD;
Yea, like I was saying. Make a new layer and move it on to of your “Rings” layers, so the it right under the “Orb Base” one. Name it “Top Orange Glow”
Ctrl(Cmd)+click on the thumbnail of the “Ring Large” layer, then Shift+Ctrl(Cmd)+click on the thumbnail of the “Ring Small” layer.
Like this, you should have the selections of both layers in one selection ^_^

Riiight, now set you Foreground color to #eaa602 and taking the same gradient tool as before, with the same settings, click above the selection and pressing Shift at the same time drag down for about 100px.
Set your layer to color Dodge and Fill 30%, then duplicate it.
Your orb now:

Step 21:

Now ………….make a new layer! hahaha. Yea, make a new layer on top of the other Rings layers, name it “Bottom Shadow” and set your foreground color to #53442c. Now take the Gradient tool, and drag from bottom upwards for about 100px distance. Deselect. Set layer to Multiply.
Ta-daaaa…now your orb is fancy and sweet like this:

Step 22:

Iiiif you want to add extra fancy to your orb, let’s go give it some rusty texture ^^
Set your Foreground color to#d69308 and take a Spatter 46 brush from your brushes palette. Make a new layer and move it just above the “Ring Large” layer. Name it “Rust”. Obtain a selection of the “Ring Large” and start clicking randomly around with your brush.

Then take the Eraser tool, set its brush to a Spatter 39px and start erasing, randomly again. Leave just a little texture here&there.
Set your layer to Multiply and lower Opacity to 81% and Fill to 89%.

Step 23:

Now go to your Rust layer’s Blending Options, and give it these settings:

Dun-dun-dun-dun..you’re finisheeeddd…Now go and sleep for a week ^______~

Oh, and if you want to add some text to it  like I added to mine,  go ahead ^^ Just give it some Outer Glow and stroke and it’s done, nothing too fancy ^^

Hope you enjoyed and/or found this tutorial useful, see you next time and feel welcome to link me to your results or tell me your opinions :)
Cya :)

Your ads will be inserted here by

AdSense Now!.

Please go to the plugin admin page to paste your ad code.

Console Layout Tutorial

Your ads will be inserted here by

AdSense Now!.

Please go to the plugin admin page to paste your ad code.

Create a new document 900×700. Fill your background with a gradient using the colors #383838 & #1f1f1f. Select the rectangular marquee tool and make a selection at the top of your canvas fill with any color then add these layer styles.

Your header should look something like this.

Now find yourself some pictures of your desired consoles, i used google images, place them at the top right corner of your header and set layer mode to “multiply”.  In the middle of your header add your site title, with these layer styles added.

You should have something like this.

Click your header layer whilst holding the CTRL key on the keyboard to make a selection, now once the selection is loaded create a new layer. Fill this layer with a pattern of your choice. If you dont no how to do patterns check my tutorial pages as ive already written a tutorial on patterns. Add a layer mask to your pattern, using the gradient tool drag a gradient diagonally across your pattern.

Create a new layer, select the rectangular marquee tool and draw a small rectangle the same width as your header, add these layer styles.

You should have something like this.

Your ads will be inserted here by

AdSense Now!.

Please go to the plugin admin page to paste your ad code.

This bar will act as our login & news letter area.

Repeat the same steps above only add these layer styles instead.

You should have something like this.

This will be our main navigation bar. Duplicate your main nav bar layer twice, drag your two duplicated layers under your main nav bar layer. Open up the layer styes menu on both layers and UNTICK “inner glow” & “gradient overlay”. You should now only have 2 layer styles, drop shadow and stroke. Select one of the duplicated layers then select the move tool, press the up arrow on the keyboard 4 TIMES select the other duplicated layer select the move tool and press the down arrow 4 TIMES. You should now have something like this.

Add your navigation text.

Ive also add the search box and login boxes just for an example on how it would look when finished. Ive also added some console logos which i got from google images. Select the rectangular marquee tool and draw out 4 individual boxes under your navigation, add these layers.

You should have something like this.

Create another 3 additional boxes, 2 to the right and 1 along the bottom to serve as our footer, use the same layer styles as above.

Now code it up and add your content, HERES HOW it could look with the content.

Your ads will be inserted here by

AdSense Now!.

Please go to the plugin admin page to paste your ad code.

category-photoshop-tutorials-page-22-

Your ads will be inserted here by

AdSense Now!.

Please go to the plugin admin page to paste your ad code.

Your ads will be inserted here by

AdSense Now!.

Please go to the plugin admin page to paste your ad code.

Your ads will be inserted here by

AdSense Now!.

Please go to the plugin admin page to paste your ad code.

Web Design Layout #9 SiteBuild

Your ads will be inserted here by

AdSense Now!.

Please go to the plugin admin page to paste your ad code.

Hello everybody today il be showing you how to code the web design layout #9 PSD. I recently setup a poll to see which one you all wanted to see as a coded tutorial, and this one won. Thanks to everyone who took part in the submission process.

I promised to do this layout as a 5page full site build BUT ive changed my mind, dont fret though there will be a very intresting complete 5 page website sitebuild coming soon which will also include a screencast. Right lets get started, the first thing you need to do is create a new folder somewhere on your desktop, give it a name. Inside your folder create another folder called “images”. Create a blank CSS & HTML document, save the files as index.HTML and styles.CSS inside your main folder.

Step1

Open up your index file and style sheet in your favourite code editor, im going to be using adobe dreamweaver CS3. The first thing we need to do is set our website title and link our stylesheet.

 <title>Web Design Layout #9 | Welcome...</title> <link href="styles2.css" rel="stylesheet" type="text/css" /> 

Inside our BODY tag we can start to mockup our layout, were going to need a main container which our whole template will sit inside, we then need a DIV for our header, logo and menu. The code for it all looks like this.

 </head> <body>  <div id="container"><!--container starts-->  <div id="header"><!--header starts-->  <div id="logo"><!--logo starts--> </div><!--logo ends-->  </div><!--header ends-->  <div id="menu"><!--menu starts--> </div><!--menu ends-->  </div><!--container ends-->  </body> </html> 

With the top area mocked up we can begin to add some styles to each DIV. But first were going to need a background image and color. Open up your PSD file and hide all your layers apart from the background layer, the wood texture in our header, the navigation bar and our grey box on our background.

Step2

Once you’ve got something like the image above goto “layer > flatten image” (make sure you dont save your PSD file). Select the rectangular marquee tool and make a selection like this.

Step3

Start the selection from the start of one of the grains in the wood texture, then end the selection on another part of a grain.

Step4

Selecting / slicing on the grains will ensure the background image is repeated properly, making the slice in the middle of a grain will cause the background image to have inapropriate lines. Save your background as “bg.PNG” inside your images folder. Open up our CSS file and add 0 margin and padding to the whole document, inside the body tag add your background that you just created. The code looks like this.

 *{ 	padding:0; 	margin:0; }  body { /*--WEBSITE BODY--*/ 	background-image: url(images/bg.png); /*sets background image*/ 	background-repeat: repeat-x; /*repeats background image horizontally*/ 	background-color: #e9e9e9; /*color of our background */ 	font-family: Arial, Helvetica, sans-serif; /*font family*/ } 

Refer to the comments within the style sheet, each style is comment coded on what it does. The next styles we need to add are for our main container, header and logo.

 #container { /*--WEBSITE CONTAINER--*/ 	margin: auto; /*centers our website*/ 	width: 850px; /*gives our website a width of 850px*/ }  #header { /*--HEADER CONTAINER--*/ 	float: left; /*floats our header left*/ 	height: 123px; /*gives our header a height of 123px*/ 	width: 850px; /*gives our header a width of 850px same as our container*/ }  #logo { /*--LOGO CONTAINER--*/ 	float: left; /*floats our logo left*/ 	height: 123px; /*height of the actual image used for the logo*/ 	width: 279px; /*width of the actual image used for the logo*/ } 

To determine the height of our header measure the height of the wood texture used in our PSD file. The logo container’s height will also be the same as the header eles our logo will overlap our navigation. To make the logo goto your PSD file and make a selection like this.

Step5

Once you’ve made the selection goto “layer > flatten image”, then goto “image > crop” save the logo as “logo.PNG” inside your images folder. Goto your HTML file inside the “logo DIV” insert your image.

 <div id="logo"><!--logo starts--> <a href="http://www.hv-designs.co.uk"><img src="images/logo.png" alt="Welcome..." border="0" /></a> </div><!--logo ends--> 

Double check the dimensions of your logo.PNG file and update the height and width of the logo container within the CSS file. Before we add our styles for our menu lets quickly mockup our menu. Create an unordered list with a class of menu-links, then add in your 5 links. For the first link we’ll add a list ID of current. The current ID will basically keep one of the menu items in hover state to show the user what page there on. The code for the menu looks like this.

Your ads will be inserted here by

AdSense Now!.

Please go to the plugin admin page to paste your ad code.

 <div id="menu"><!--menu starts--> <ul class="menu-links"><!--menu links start--> <li id="current"><a href="#">Home</a></li> <li><a href="#">Gallery</a></li> <li><a href="#">Digital Portfolio</a></li> <li><a href="#">Services</a></li> <li><a href="#">Contact Us</a></li> </ul><!--menu links end--> </div><!--menu ends--> 

We style the menu like this.

 #menu { /*--NAVIGATION CONTAINER--*/ 	float: left; /*floats our menu left*/ 	width: 850px; /*gives our menu a width of 850px same as our container*/ 	height: 57px; /*height of our menu*/ }  .menu-links li { /*--NAVIGATION LINKS--*/ 	list-style:none; /*removes bullets from our list*/ 	display:block; /*displays links as a block*/ 	font-size: 14px; /*font size*/ 	float: left; /*floats our links left*/ 	font-weight: bold; /*gives our links a bold look*/ }  .menu-links li#current a { /*--NAVIGATION CURRENT STATE--*/ 	background-image: url(images/menu_hover.png); /*image for the link current state*/ 	background-repeat: no-repeat; /*image doesnt repeat*/ 	background-position: center; /*centers our background image*/ 	color: #ff9833; /*text color*/ }  .menu-links a { /*--NAVIGATION LINKS--*/ 	text-decoration: none; /*removes underscore from our links*/ 	color: #707070; /*sets our link colors*/ 	display: block; /*displays each link as a block*/ 	height: 35px; /*gives our block a height of 35px*/ 	padding-top: 22px; /*adds 22px padding to the top*/ 	padding-right: 17px; /*adds 17px padding right*/ 	padding-left: 17px; /*adds 17px padding left*/ 	text-transform: uppercase; /*transforms text into uppercase*/ }  .menu-links a:hover { /*--NAVIGATION HOVER--*/ 	background-image: url(images/menu_hover.png); /*link hover image*/ 	background-repeat: no-repeat; /*stops hover image repeating itself*/ 	background-position: center; /*sets the position of the background image*/ 	color: #ff9833; /*text color when hovered*/ } 

On the right side of our navigation on our PSD file we had an RSS icon with some text. We can easily achieve this in CSS by simply adding another DIV inside the navigation which is floated right. We’ll need a DIV for our logo then another DIV for the text next to it. Firstly lets create our RSS icon, open up your PSD file and save your RSS icon as a single image called “rss.png”, save the image into your images folder. The code inside our menu DIV will now look like this.

 <div id="menu"><!--menu starts--> <ul class="menu-links"><!--menu links start--> <li id="current"><a href="#">Home</a></li> <li><a href="#">Gallery</a></li> <li><a href="#">Digital Portfolio</a></li> <li><a href="#">Services</a></li> <li><a href="#">Contact Us</a></li> </ul><!--menu links end-->  <div id="rss-text"><!--rss text starts--> <p class="rss-header">Subscribe Via RSS</p> <p class="text-rss">Updates in your reader</p> </div><!--rss text end-->  <div id="rss"><!--rss icon starts--> <a href="#"><img src="images/rss.png" alt="Subscribe" border="0" /></a> </div><!--rss icon ends--> </div><!--menu ends--> 

We then style our RSS DIV’s like this.

 #rss { /*--RSS ICON CONTAINER--*/ 	float: right; /*floats our rss div to the right*/ 	height: 31px; /*gives our rss div a height of 31px exactly the same as the rss icon*/ 	width: 31px; /*gives our rss div a width of 31px exactly the same as the rss icon*/ 	margin-top: 15px; /*adds a top marhin of 15px*/ 	margin-right: 10px; /*adds a right margin of 10px*/ }  #rss-text { /*--RSS TEXT CONTAINER--*/ 	float: right; /*floats our rss text right*/ 	height: 31px; /*gives our div a height of 31px*/ 	margin-top: 15px; /*adds a 15px top margin*/ }  .rss-header { /*--RSS SUBSCRIBE TEXT--*/ 	color: #707070; /*sets color of the subscribe text*/ 	font-weight: bold; /*sets subscribe text to bold*/ 	font-size: 14px; /*adds a font size of 14px*/ }  .text-rss { /*--RSS DESCRIPTION TEXT--*/ 	color: #828282; /*sets the color of our rss description text*/ 	font-size: 11px; /*sets font size of our rss description text*/ } 

Give the HTML a blast in your favourite browser and see how things pan out. The layout has been tested in both IE7 and FF and works fine without any hiccups. The next part of the template we need to mockup is our featured area, for now we’ll be using a static background which will contain our drop shadow, then inside we’ll add our featured image. The mockup for the featured area is relatively simple, we first make a container which will hold our elements. Inside the container we’ll have two DIV’s, one for the text on the left and one for our image on the right.

 <div id="featured"><!--featured starts--> <div id="content-featured"><!--content starts here--> <h1>Portfolio Layout</h1> <p>Lorem ipsum dolor sit amet, consectetur adipiscing elit. Maecenas ac justo vel enim congue accumsan. Fusce ut metus quis lorem consequat mollis. Pellentesque eleifend interdum diam. Phasellus adipiscing ligula sit amet erat consectetur fringilla. Vestibulum viverra eleifend enim. Ut congue pharetra nibh. Suspendisse feugiat, turpis ac ornare ullamcorperd bibendum, dolor. Phasellus at dui. Sed lectus.</p> </div><!--content ends here-->  <div id="content-featured-image"><!--featured image starts--> <img src="images/featured-example.png" alt="Featured Example" /> </div><!--featured image ends--> </div><!--featured ends--> 

In the code above we have our first DIV of featured, this is our container for the featured area. We then have an ID of content-featured, this DIV is for our image description. As you can see from the code above inside the content-featured DIV we have a h1 tag and a big paragraph. We then move onto our image, which is a simple DIV of content-featured-image which contains our sample image. Our sample image does not contain our drop shadow, we need to cut the drop shadow from our PSD file and set it as a background in our CSS file. Our featured image will then go straight over the top. This is what my featured image background looks like.

Step6

The code for our featured area looks like this.

 #featured { /*--FEATURED CONTENT CONTAINER--*/ 	float: left; /*floats our featured div left*/ 	width: 850px; /*adds a width of 850px same as our container*/ 	margin-top: 30px; /*adds a top margin of 30px*/ 	clear: both; /*clears left and right floats*/ }  #content-featured { /*--FEATURED CONTENT TEXT BOX--*/ 	float: left; /*floats our featured text left*/ 	height: 195px; /*gives us a height of 195px*/ 	width: 292px; /*gives us a width of 292px*/ }  #content-featured h1{ /*--FEATURED CONTENT HEADER--*/ 	color: #707070; /*sets our featured area h1 tag text color*/ 	text-transform: uppercase; /*transform our h1 tag to uppercase*/ 	font-family: Impact; /*sets our font family to impact*/ 	font-size: 26px; /*gives our h1 tag a font size of 26px*/ }  #content-featured p{ /*--FEATURED CONTENT BOX TEXT--*/ 	color: #9f9e9e; /*sets our paragraph text color*/ 	font-family: Arial, Helvetica, sans-serif; /*sets our font family for the p tag*/ 	font-size: 10px; /*sets our paragraph font size*/ 	line-height: 18px; /*increases our line height to 18px*/ 	text-align: justify; /*justifys our paragraph*/ }  #content-featured-image { /*--FEATURED CONTENT BACKGROUND--*/ 	height: 241px; /*sets our featured image div height to 241px*/ 	width: 501px; /*sets our featured image width to 501px*/ 	float: left; /*floats left*/ 	margin-left: 35px; /*adds a left margin to 35px*/ 	background-image: url(images/featured-bg.png); /*adds our background image for our featured images*/ 	background-repeat: no-repeat; /*sets background to no repeat*/ 	padding-top: 19px; /*sets top padding to 19px*/ 	padding-left: 22px; /*sets top padding-left of 22px*/ } 

On our PSD file underneath our featured area we have two blocks of text with simple headers. We start with a simple DIV of left and a DIV of right, all the left content in the left DIV and right content in the right DIV. We then create a class for our header tag to sit into and a class for our paragraph. Because we’ve used classes we can apply them to both the left and right content.

 <div id="left"><!--left content starts--> <div class="info-header"> <h1>What can i do for you?</h1> </div>  <div class="information"><!--information starts--> <p>Lorem ipsum dolor sit amet, consectetur adipiscing elit. Maecenas ac justo vel enim congue accumsan. Fusce ut metus quis lorem consequat mollis. Pellentesque eleifend interdum diam. Phasellus adipiscing ligula sit amet erat consectetur fringilla. Vestibulum viverra eleifend enim. Ut congue pharetra nibh. Suspendisse feugiat, turpis ac ornare ullamcorperd bibendum, dolor. Phasellus at dui. Sed lectus.</p> <p>&nbsp;</p> <p> Phasellus adipiscing ligula sit amet erat consectetur fringilla. Vestibulum viverra eleifend enim. Ut congue pharetra nibh. Suspendisse feugiat, turpis ac ornare ullamcorperd bibendum, dolor. Phasellus at dui. Sed lectus. </p> </div><!--information ends--> </div><!--left content starts-->  <div id="right"><!--right content starts--> <div class="info-header"> <h1>Who am i?</h1> </div>  <div class="information"><!--information starts-->  <p>Lorem ipsum dolor sit amet, consectetur adipiscing elit. Maecenas ac justo vel enim congue accumsan. Fusce ut metus quis lorem consequat mollis. Pellentesque eleifend interdum diam. Phasellus adipiscing ligula sit amet erat consectetur fringilla. Vestibulum viverra eleifend enim. Ut congue pharetra nibh. Suspendisse feugiat, turpis ac ornare ullamcorperd bibendum, dolor. Phasellus at dui. Sed lectus.</p> <p>&nbsp;</p> <p> Phasellus adipiscing ligula sit amet erat consectetur fringilla. Vestibulum viverra eleifend enim. Ut congue pharetra nibh. Suspendisse feugiat, turpis ac ornare ullamcorperd bibendum, dolor. Phasellus at dui. Sed lectus. </p> </div><!--information ends--> </div><!--right content ends--> 

The styles for our boxes are.

 .information { /*--CONTENT CONTAINER--*/ 	width: 400px; /*sets a width of 400px*/ 	float: left; /*floats our information class left*/ 	color: #9f9e9e; /*sets our font color for our information class*/ 	font-size: 12px; /*sets our font size*/ 	text-align: justify; /*justify's our text*/ 	line-height: 18px; /*sets a line height of 18px*/ 	margin-right: 25px; /*adds a right margin of 25px*/ }  .info-header { /*--CONTENT BOX TITLE CONTAINER--*/ 	width: 400px; /*sets our header width to 400px same as our information class*/ 	float: left; /*floats left*/ 	margin-right: 25px; /*adds a 15px margin right*/ 	margin-bottom: 10px; /*adds a bottom margin of 10px*/ }  .info-header h1 { /*--CONTENT BOX TITLE--*/ 	color: #ff9833; /*sets our text color*/ 	text-transform: uppercase; /*transforms our text to uppercase*/ 	font-family: Impact; /*sets font family to impact*/ 	font-size: 18px; /*sets font size to 18px*/ 	line-height: 20px; /*increases line height to 20px*/ 	border-bottom-width: 1px; /*adds a bottom border with a width of 1px*/ 	border-bottom-style: solid; /*sets border style to solid*/ 	border-bottom-color: #c9c9c9; /*sets border color*/ }  #left { /*--LEFT CONTENT TEXT BOX--*/ 	float: left; /*floats left*/ 	width: 400px; /*sets a width of 400px*/ 	margin-top: 30px; /*adds a top margin of 30px*/ 	margin-bottom: 40px; /*adds a bottom margin of 40px*/ }  #right { /*--RIGHT CONTENT TEXT BOX--*/ 	float: right; /*floats right*/ 	width: 400px; /*sets a width of 400px*/ 	margin-top: 30px; /*adds a top margin of 30px*/ 	margin-bottom: 40px; /*adds a bottom margin of 40px*/ } 

Now finally for our footer, we need to create the footer outiside our container DIV as the background will be repeating across the screen. Open up your PSD file and make a small selection on your footer area.

Step7

Crop the image then save it as “footer_bg.PNG” inside your images folder. We mock our footer up like this.

 </div><!--container ends-->  <div id="footer"><!--footer starts-->  <div id="footer-content"> <p> Copyright &copy; yoursite.com All Rights Reserved</p> </div>  </div><!--footer ends--> 

Pretty simple, our styles for our footer are.

 #footer { /*--FOOTER CONTAINER--*/ 	background-image: url(images/footer-bg.png); /*sets our footer background8*/ 	background-repeat: repeat-x; /*sets background to repeat horizontally*/ 	clear: both; /*clears left and right floats*/ }  #footer-content { /*--FOOTER CONTENT--*/ 	width: 850px; /*adds a width of 850px same as our container*/ 	margin-top: 50px; /*adds a top margin of 50px*/ 	margin-right: auto; /*sets right margin to auto*/ 	margin-bottom: auto; /*sets bottom margin to auto*/ 	margin-left: auto; /*sets left margin to auto*/ 	padding-top: 50px; /*adds 50px top padding*/ 	padding-bottom: 50px; /*adds bottom padding of 50px*/ 	color: #9F9E9E; /*sets color of footer text*/ 	text-align: center; /*aligns text center*/ } 

Finally give your template a blast in your browser to see how it looks. Thats all from me, dont forget to subscribe via RSS and twitter.

Your ads will be inserted here by

AdSense Now!.

Please go to the plugin admin page to paste your ad code.

2011-04-26-patternedbusinesscard-twitter.com-erichoffman

Your ads will be inserted here by

AdSense Now!.

Please go to the plugin admin page to paste your ad code.

Your ads will be inserted here by

AdSense Now!.

Please go to the plugin admin page to paste your ad code.

Your ads will be inserted here by

AdSense Now!.

Please go to the plugin admin page to paste your ad code.

p-4840

Your ads will be inserted here by

AdSense Now!.

Please go to the plugin admin page to paste your ad code.

This isn’t going to be your typical tutorial in the sense that it’s not so much about technology as it is about design itself. It really doesn’t matter if you know how to use Photoshop or Illustrator if you are doing the wrong things with them. Tools are just tools, and they only ever obey their master’s bidding.

As designers, we’re tasked with crafting the very reputations of the companies, organizations, and individuals that entrust their work to us. That’s a tremendous responsibility, and one I feel most designers tend to take much, much lighter than they ever should.

When you set out to create an identity for a client, you must first understand that client and their customers or the people they work with. What makes them tick? What makes their customers tick? What factors drive the decisions and thought processes of their customers? Why are their customers buying or not buying their goods or services in the first place? To understand these things, you need to spend some time extensively interviewing your client and, if possible, his or her customers.

I cannot possibly stress enough that designing logos and identities has nothing to do with technology. People who know how to use Photoshop or Illustrator are a dime a dozen. Design has absolutely nothing to do with how proficient you are with Photoshop or Illustrator. Anyone can use a hammer. Very few can design the Empire State Building or the Statue of Liberty. Design has everything to do with being able to deeply understand the company or individual who has placed their trust in you to forge their reputation and their image. As such, it’s critical that you not treat this job lightly. Don’t read this tutorial and then go out and create an identity for a company without putting in the due diligence to become great at your craft. It takes years of dedication, discipline, experience and expertise to do that job well. For now, just focus on honing your craft and getting better at what you do. When you become great at what you do, the work will come.

Getting Started

Once you have a crystal clear picture of what type of people you’re working with, and what type of people they want to attract, you can begin the design conceptualization process. The fun part. The brainstorm.

For this stage of the project, I typically turn to paper. You may even want to take a walk, go for a run, or take a hot shower or something. You need to really think about what’s going to best express the very essence of your client in logo form, and that requires equal parts concentrated focus and creativity in the same act.

Once you have your concept, or at least the general direction you want to take your identity project in, it’s time to start sketching. Start with a pen or pencil and a notebook. I use several different Moleskine notebooks for sketching and writing down my ideas, but anything will work. You can even use a napkin, a whiteboard, or a sheet of blank printer paper. Just speed sketch anything that comes to mind. Don’t worry about the art. It’s not a competition. The goal is to express your concept as clearly and simply as possible. You’ll need to iterate through several different variations on your ideas, and for this, paper is key. If you try to do this stage on a computer, or even an iPad, you’ll focus too much on the tool and the implementation of it and nowhere near enough on what you are drawing. You need absolute freedom. You need to be able to quickly draw over top of a sketch, or scribble it out. You need to be able to quickly create ten different versions of a shape in a matter of seconds. That’s not happening on a computer screen.

My actual sketches of the Ministry Rocket Logo (please pardon the terrible iPhone photo)

If you have the opportunity to do this stage with the client present, more power to you. This is a great stage to get their feedback on what concept most closely fits the company’s goals. However, don’t feel like they need to be present by any stretch of the imagination. You may even focus a lot better without them. I know I do.

Once you have your concept whittled down, it’s time to bring it into the digital realm. For this, I typically use a scanner, but even a digital camera would work. You can even use the camera on your phone in a pinch. Keep your sketches well lit and on a flat surface if you opt to use a camera.

Once you get the sketches into the computer, import them into Illustrator, Photoshop, or any tool of your choosing. I cannot stress enough how little importance falls on the tool. I use VectorDesigner, Pixelmator, Acorn, and others all the time. I also use Photoshop and Illustrator. It really doesn’t matter. What matters is that you understand how to use your tool fluently and that you can use it with strong confidence. For the sake of illustration, I’ll be using Illustrator in this tutorial.

You do want to create your logo in a vector app (like Illustrator), as opposed to a raster app (like Photoshop). For that, Illustrator or another vector illustration app is needed. If you create your logo in Photoshop, it won’t be scaleable and editable in the same way it would be if created in a vector app. Logos, by definition, should ideally be infinitely scaleable, and able to be printed on any material in color or black or white.

With your original sketches imported, depending on the complexity of your drawings, you have two choices. You can trace over the sketches to create vector illustrated versions of them, or you can simply re-create them from scratch. For most logos, you may not even need to scan your sketches in at all. Instead, just re-create the graphic using your original sketch as a faithful guide, sitting right there on your desk. This will encourage perfection and symmetry, while trying to stay true to a tracing will often result in imperfection and asymmetry (of course, if this is the goal, then trace by all means).

What I typically do is create only half of the icon, using the pen tool, with no stroke and a fill color, if it’s a symmetrical design, and then ever so slightly overlap the two images so that the two halves are just touching with no background whatsoever visible between the two. Then, I merge the two halves using the “Merge” command in Illustrator’s “Pathfinder” palette, which creates one perfectly symmetrical shape. If it helps you, you can leave the stoke turned on while you’re drawing, and later turn it off before merging your two halves.

This is how the rocket was created.

Typefaces and Fonts

Just to clarify the terminology going in, the word “typeface” is used to describe a family of fonts. For instance, “Helvetica” is a typeface. It is not a font. Referring to it as such is improper and makes you sound like an amateur. “Helvetica Neue Ultralight Extended 23, 48PT” is a font. The “font” is the exact pairing of typeface, variant, weight, and size as used in a design.

Your ads will be inserted here by

AdSense Now!.

Please go to the plugin admin page to paste your ad code.

The typeface you choose is critical to your design. In some cases, you’ll even need to create custom lettering. However, for the sake of illustration and sanity, I’m going to stick with finished typefaces here.

It’s absolutely vital that you have a healthy library of typefaces installed and available for use in design projects. You cannot rationally expect to create great work with terrible resources. Garbage in = garbage out.

There are a number of fantastic foundries out there, producing great new typefaces every day. Many of my personal favorites come from Hoefler & Frere-Jones Foundry. The typefaces used in the Ministry Rocket logo are Knockout (Bantam Flyweight, in all caps) and Leviathan, both by HFJ.

If you’re coming up short on great typeface ideas, or if you are simply in need of some new ones and have no idea where to get started, I cannot possibly recommend Dribbble enough. Anyone can browse the work there, and many of the design pieces submitted there cite which typefaces were used in the design. You’re going to see a ton of Hoefler typefaces there, but there are a lot from other foundries, such as Linotype and others as well.

The typeface you choose should accurately reflect the nature and goals of your client. Fonts say a lot about a design. As Massimo Vignelli said, “You can say ‘I love you!’ in Helvetica, and if you want to be really fancy, you can say it in Helvetica Light. You can say, ‘I hate you!’ in Helvetica, and if you want to say it really loud, you can say it in Helvetica Bold.”

If you were designing a logo for a very conservative investment firm, and you used a really modern, slick typeface, you’d be lying. They aren’t a design firm, they are an investment firm. That should be obvious from the typeface you choose for their logo. Something like Hoefler Text or Baskerville, or even Trajan or Bank Gothic might be appropriate, but surely not Helvetica Neue Ultralight or Avant Garde.

Likewise, you should never use typefaces just because they are trendy, or because you like them. For instance, it would be inappropriate for you to use a vintage typeface for a grocery store just because you thought it looked cool. Using typefaces based sheerly on personal preference is an telltale sign of a designer who doesn’t know how to relate with his or her clients, or who lacks experience in choosing typefaces appropriately. Make those letters count!

Feedback

Yes, you can and should get feedback from your clients. But what are you to do if designing a logo on your own time? What if you’re working on something without a client at all? Or, what if you want to get feedback from skilled people, as opposed to someone who wouldn’t know good design if it hit them in the face? Great feedback is helpful in almost all situations. These are all realistic everyday problems, and fortunately there are many great solutions available.

Dribbble & Forrst

Both of these are invitation-only communities of designers. Forrst tends to be easier to get into, but if you’re already on Dribbble, more power to you. If you don’t already have an account on each of these sites, go set one up right now. I’ll wait. Got em? Great. Let’s continue. In the case of Ministry Rocket, I posted my early comps on Forrst, and was able to get incredibly valuable, precise feedback in mere minutes.

Real-world Feedback

I cannot possibly tell you just how valuable this is. If you are in the middle of nowhere, in the middle of the night, sitting at your Mac, you can get feedback on a design from world-class designers from around the world in mere minutes. You’d be fairly insane not to take advantage of that fact. The design community is here for you, and they are incredibly helpful people.

After feedback.

Client Feedback

It should be your goal to create the perfect design on the first try. This whole idea of designing iterations is a sheer waste of your time and the client’s time as well. Imagine if Walmart asked their contractors to build them three versions of every store, so they could choose their favorite. That would be ridiculous. Yet, somehow, people think this is acceptable behavior in the design contracting profession. It isn’t. This isn’t 3rd grade art class. It isn’t a competition, either. It’s a problem, and there is an ideal solution. It’s your job to find the best one as efficiently as possible.

Paul Rand, one of the greatest designers of our time, who had Steve Jobs as a client, is a champion of this philosophy. When Steve Jobs asked him for three iterations of a logo, Paul told him,

“No. I will not give you three options. I will give you the best solution to your problem, and you will pay me for it whether you like it or not.”

You’d think this would have been considered rude. It wasn’t. Steve was so astonished at the Paul’s professional confidence and design prowess that he gladly accepted the solution, and the two became great lifelong friends. People want to hire someone who knows exactly what they are doing, and why they are doing it. They want someone who can take a job from inception to completion with confidence, skill and professionalism, not some amateur that they need to babysit every step of the way.

If you must use iterations for one reason or another, never give the client a bad option. I’ve tried that route before of giving the client one great choice, a less great choice, and a so-so or even bad choice, hoping they would choose the obvious best one. It doesn’t work. Clients always, without fail, choose the worst option you give them. They aren’t designers, and may even lack the taste needed to create a successful logo altogether. That’s why they hired you in the first place. You are being paid for your skill, experience, and creativity. If you fail to use these things properly, and give the client a bad choice to choose as a result, that’s on you. For this reason, give the client two or three equally fantastic designs, and suggest the best one to them, but make sure you don’t have an inferior option on the table.

Conclusion

Now that you’ve successfully learned how to draft a series of logo comps on paper, move to the digital space and create your initial versions, choose typefaces, and get feedback from other designers and clients, you have the basic elements of knowledge needed to get started. Be patient, and do great work. Constantly seek new inspiration, and above all, never lose your passion!

Your ads will be inserted here by

AdSense Now!.

Please go to the plugin admin page to paste your ad code.

2008-09-09-simple-css-menu

Your ads will be inserted here by

AdSense Now!.

Please go to the plugin admin page to paste your ad code.


Firstly lets create our simple navigation in photoshop, select the rectangular marquee tool and create your navigation, make it about 600 x 50 pixels you can create a fixed size rectangle by changing the style setting at the top of the screen.

Fill your rectangle with any color than add these layer styles to it.

Yout navigation should look like this.

Now using the text tool add your navigation text, of course we will be adding the text to our navigation in html, this is just so we no it looks ok.

Now on our navigation id like to add some sort of a rollover, so select the rectangular marquee tool and create a box under your text layer, im using the color #e1e1e1.

The rollover aint finished yet :) now add to triangle top and bottom of the navigation.

Thats it for the designing part, we will now code it in css to use for a website. You might want to save your PSD file at this point incase you need to use it again. After you have saved it hide your text layer, then goto “layer > merge visable”. Believe it or not we only need two images to create this navigation in css. Zoom in pretty close with the magnify tool then select the rectangular marquee tool and create a selection like this.

The dimensions for the selection are 1pixel wide and 50 pixel’s in height and the selection starts right at the top of the stroke and ends just as your drop shadow disapears. Create a new folder on your desktop called naviagtion, open your folder then create another new folder called “images”. Head back over to photoshop then press “ctrl + c” to copy your selection, then goto “file > new” press ok, your dimentions of selection should automatically be entered into the new dialog box. Just goto “edit > paste”. Now goto “file > save for web & devices” or if your using cs2 it will say “save for the web”. Navigate over to your folder and save it as “silver_nav_background.gif”.

Thats our first image, now lets create our 2nd image create a new document 200×50 pixels. Re-create your mouse over look.

Once you have re-created it goto “file > save for web & devices” or if your using cs2 it will say “save for the web”. Navigate over to your folder and save it as “silver_nav_mouseover.gif”.

Thats all we need to do in photoshop, head over to your naviagtion folder, backout of the images folder then open up notepad. Once it opens just goto “file > save as” and save it as style.css (DONT FORGET TO ADD THE .CSS part in the filename). Open up dreamweaver and create a new HTML document, also got “file > open” and open the style to css text file your prevously created. You should have to two pages open now in dreamweaver, you can switch between the two pages by clicking these two buttons.

Click your HTML page and click “code” to see the code view of that document. You’l be presented with this code.

 <!DOCTYPE html PUBLIC "-//W3C//DTD XHTML 1.0 Transitional//EN" "http://www.w3.org/TR/xhtml1/DTD/xhtml1-transitional.dtd"> <html xmlns="http://www.w3.org/1999/xhtml"> <head> <meta http-equiv="Content-Type" content="text/html; charset=utf-8" /> <title>Untitled Document</title> </head>  <body> </body> </html> 

We can leave all that just change the title where it says “Untitled Document”, Change to what ever you want il call mine navigation tutorial. Inbetween the “BODY” tags mark out your naviagtion to do this we add our starting DIV tags and create our text and links.

 	<div class="silver"> 	<div id="nav"> 	<ul> 	<li><a href="http://www.hv-designs.co.uk" title="Home" class="current">Home</a></li> 	<li><a href="http://www.hv-designs.co.uk" title="Button 2">Button 2</a></li> 	<li><a href="http://www.hv-designs.co.uk" title="Button 3">Button 3</a></li> 	<li><a href="http://www.hv-designs.co.uk" title="Button 4">Button 4</a></li> 	<li><a href="http://www.hv-designs.co.uk" title="Button 5">Button 5</a></li> 	</ul> 	</div> 	</div> 

Your ads will be inserted here by

AdSense Now!.

Please go to the plugin admin page to paste your ad code.

You will notice in the HTML code above in the 1st link there is a “class=current” this means when you change pages the rollover will stay active for that specific page. You will have to add the class to each link on there own pages. We have also got to add some css in the style sheet for it to work.

You webpage should look like this in dreamweaver at this stage.

Thats all we need for the naviagtion, we just need to add one more bit of code. Inbetween the “HEAD” tags add this little bit of code.

 <link rel="stylesheet" href="style.css" type="text/css" /> 

This snippet of code attches our style sheet to the HTML document. You HTML document should now look like this.

 <!DOCTYPE html PUBLIC "-//W3C//DTD XHTML 1.0 Transitional//EN" "http://www.w3.org/TR/xhtml1/DTD/xhtml1-transitional.dtd"> <html xmlns="http://www.w3.org/1999/xhtml"> <head> <meta http-equiv="Content-Type" content="text/html; charset=utf-8" /> <title>Navigation Tutorial | HV-Designs.co.uk</title> </head>  <body>  	<div class="silver"> 	<div id="nav"> 	<ul> 	<li><a href="http://www.hv-designs.co.uk" title="Home" class="current">Home</a></li> 	<li><a href="http://www.hv-designs.co.uk" title="Button 2">Button 2</a></li> 	<li><a href="http://www.hv-designs.co.uk" title="Button 3">Button 3</a></li> 	<li><a href="http://www.hv-designs.co.uk" title="Button 4">Button 4</a></li> 	<li><a href="http://www.hv-designs.co.uk" title="Button 5">Button 5</a></li> 	</ul> 	</div> 	</div>  </body> </html> 

Save your HTML file as index.html in your naviagtion folder on your desktop. Now open your CSS file and add this at the very top of your file.

 body { margin-left: 0px; margin-top: 20px; margin-right: 0px; margin-bottom: 0px; } 

This bit of css sets the margins around the page also known as the “BODY”, we want our navigation to go right to the end of our browser so it looks nice and neat, the only margin we need is the top margin which is set at 20pixels. Now add this underneath your body item.

 /* ---------------------- silver nav ---------------------- */ .silver #nav{ position:relative; display:block; height:50px; font-size:11px; font-weight:normal; background:transparent url(images/silver_nav_background.gif) repeat-x top left; font-family:Arial,Verdana,Helvitica,sans-serif; text-transform:uppercase; } 

The code above means.

position:relative = The position property places an element in a static, relative, absolute or fixed position.
display:block = The element will be displayed as a block-level element, with a line break before and after the element.
height:50px = Height of the navigation, this needs to be changed if your navigation images arn’t 50 pixels high.
font-size:11px = Sets the size of the text to 11pixels.
font-weight:normal = bold or not.
background:transparent url(images/silver_nav_background.gif) repeat-x top left = This part is IMPORTANT as it sets our navigation background image in our case the image we created within photoshop.
font-family:Arial,Verdana,Helvitica,sans-serif = Fonts to use.
text-transform:uppercase = Text is all in capitals.

Your navigation should now look like this.

Now add,

 .silver #nav ul{ margin:0px; padding:0; list-style-type:none; width:auto; } 

The code above means.

margin:0px = Margin around the unordered list.
padding:0 = Padding around the unordered list.
list-style-type:none = The listStyle property sets all list properties in one declaration.
width:auto = Wdith of the unordered list is set to auto so the its centered no matter what size the browser window is.

Now add,

 .silver #nav ul li{ display:block; float:left; margin:0 1px 0 0; } .silver #nav ul li a{ display:block; float:left; color:#3A3A3A; text-decoration:none; padding:14px 22px 0 22px; height:28px; } 

A breakdown of the above styles listed below.

display:block = The element will be displayed as a block-level element, with a line break before and after the element.
float:left = The float property sets where an image or a text will appear in another element.
color:#3A3A3A = The color of our text in a normal state.

And finally add,

 .silver #nav ul li a:hover,.silver #nav ul li a.current{ color:#333333; background:transparent url(images/silver_nav_mouseover.gif) no-repeat top center; } /* ---------------------- END silver nav ---------------------- */ 

This is where we set our mouseover image and activate the “current” class that i was talking about at the start of the tutorial. If you save your style sheet and open your HTML file you should have something like this *(CHECK LINK BELOW)*

VIEW FINISHED MENU.

Your ads will be inserted here by

AdSense Now!.

Please go to the plugin admin page to paste your ad code.

Quickie: Valentines Wallpaper

Your ads will be inserted here by

AdSense Now!.

Please go to the plugin admin page to paste your ad code.

Good evening welcome to another tutorial by hv-designs, this is just a quick tutorial for you all to try for valentines day.

Create a wallpaper for your loved one and secretly set it as there desktop background. ;) You can download the PSD for this tutorial by using the button above the PSD is free to download. Right lets get started, create a new document the size you want your wallpaper to be im using 800×600 pixels just for the purpose of this tutorial. Double click your bacground layer to unlock it. Apply the gradient overlay using the settings below.

Set the color #ff5ba6 as your forground then select the custom shapes tool. Search among the shapes and find “registration target 2″ (see image below) if you dont see as many shapes as me then click the little black arrow in the top right hand corner and goto “all”.

Drag the shape out as big as you can, when you get to the point your mouse wont go no further just stop and press “CTRL + T” then resize again. Right click with the pen tool and goto fill path. You should have something like this.

Add a layer mask to your shapes layer, select the gradient tool with a radial gradient. Set your forground color to white and background color to black. Drag from the middle of your shape outwards. The effect your looking is this.

With the custom shapes tool select the heart shape, drag it out in the middle of your canvas.

Add these layer styles to your heart shape.

Your ads will be inserted here by

AdSense Now!.

Please go to the plugin admin page to paste your ad code.

You should have something like this.

Duplicate your big heart, resize and rotate slighly and move nicley infront of the big heart.

Add your little cupid symbols to your canvas, there is a cupid.PNG file in the PSD download that you are free to use. Place the symbols either side of the hearts, one at the top and one at the bottom. Set there layer opacity to 35%.

Add your valentines text using a nice romantic font (also included in the PSD download).

The layer styles for the text are as follows.

Select the paint brush tool and select the crosshatch brush if you dont see the crosshatch brush click the little black arrow and goto “assorted brushes”.

Toggle the brush pallette and use these settings.

Now with your brush randomly brush your sparkles over your canvas. Your final image should look something like this.

Dont forget to subscribe to our twitter and RSS feeds. Many thanks for reading see you next time. :)

Your ads will be inserted here by

AdSense Now!.

Please go to the plugin admin page to paste your ad code.

category-jquery-tutorials-page-2-

Your ads will be inserted here by

AdSense Now!.

Please go to the plugin admin page to paste your ad code.

Your ads will be inserted here by

AdSense Now!.

Please go to the plugin admin page to paste your ad code.

Your ads will be inserted here by

AdSense Now!.

Please go to the plugin admin page to paste your ad code.

Share This Icon

Your ads will be inserted here by

AdSense Now!.

Please go to the plugin admin page to paste your ad code.

Hello welcome to another tutorial by hv-designs, in this tutorial il show you how to make a simple stylish “share this icon” you mainly see icons like this on blogs to promote posts and stuff. Now you can add one to your blog.

Lets get started create a new document 496 x 496 pixels. Use your prefered background color, ive choses a nice light blue gradient background.

Select the custom shapes tool from the sidebar menu.

Select the sheild shape from the custom shapes libary, change to “shape layers” (see image below).

Using “shape layers” will retain the shapes quality when needed to resize your document at a later stage. Drag your sheild onto your canvas then add these layer styles.

You should have something like this.

Your ads will be inserted here by

AdSense Now!.

Please go to the plugin admin page to paste your ad code.

Select the pen tool, change from “shape layers” to “paths”, create a path like this.

Right click in the middle of your canvas and goto “fill path”, make sure you have the color white selected and that you’ve create a new layer. Select the new layer (so the layer turns blue) then holding the CTRL key on the keyboard click your sheild layer. You should have loaded a selection, now goto “select > inverse” then press the delete key on the keyboard. Set the new layers opacity to about 23%, label your layer as “sheild shine”.

Head back into the custom shapes libary and select the heart shape, draw out your heart shape in the middle of you sheild, fill with any color then add these layer styles.

You should have something like this.

Using the pen tool once more make two selections (one at a time) like the image below. Use the same method as when we create the shine for the sheild.

Fill the selections with the color white then set layer opacity to 20%.

Select the type tool and simple add a plus sign to the heart.

Thats it all done, now just merge your layers (bar the background layer) and resize as you wish. Thanks for reading…. dont forget to subscrive to our RSS feeds and TWITTER. Till next time, have a good day.

Your ads will be inserted here by

AdSense Now!.

Please go to the plugin admin page to paste your ad code.

2009-10-20-web-design-layout-11-

Your ads will be inserted here by

AdSense Now!.

Please go to the plugin admin page to paste your ad code.

Good evening everyone, today il be showing you how to make a colorful web design company layout. The website features multiple enlightening colors and a simplistic navigation with a 3D hover.

Creating Our Document & Guides

Create a new document 1200 x 1055 pixels with a white background.

Step1

Once you’ve created your document we need to create two guides. Go to “view > new guide” enter the settings below.

Step2

Repeat the steps above only this time use the settings below.

Step3

Now select the gradient tool with a linear gradient, set your foreground color to #e6f7ff and background color to #ffffff. Drag the gradient over your canvas starting from the top and ending towards the middle.

Step4

Creating The Website Title

Select the text tool with the font verdana, set the font size to 30pt then set the color to #92a6a6. Add your website title at the top of the canvas.

Step5

Once you’ve created your title text add the following layer styles.

Step6

Step7

You should have something like this.

Step8

Creating The Search Field

Select the rounded rectangle tool with a radius of 10px.

Step9

On the right side of the canvas inline with the website title create a long rounded rectangle.

Step10

Once you’ve created your rectangle add the following layer styles.

Step11

Step12

You should have something like this.

Step13

Were now going to create a 3D search button, create a rounded rectangle with a radius of 10px, create the rectangle about 80 x 50 pixels.

Step14

Using the rectangular marquee make a rectangle over the top half of the rectangle. Fill the rectangle the same layer as the rounded rectangle.

Step15

Duplicate the rounded rectangle then rotate the duplicated layer 180 degrees by going to “edit > transform > rotate 180″. Finally, place the shapes next to each other making sure there level

Step16

Make a selection around the bottom half of the duplicated shape using the rectangular marquee tool. Once you’ve made a selection, hit the delete key.

Step17

Align the duplicated shape next to the orginal shape, making sure they are not directly overlapping. Once moved into place, Ctrl + click your duplicated shape layer’s thumbnail within the layers window to load a selection around it.

Step18

Select the orginal shapes layer then hit the delete key to remove the selection. Repeat the steps above for the other side of the shape then finally you should have something like this.

Step19

Now add these layer styles to your shape.

Step20

Step21

Your ads will be inserted here by

AdSense Now!.

Please go to the plugin admin page to paste your ad code.

Resize and place your shape over your search field.

Step22

On a new layer below your shape create two small circles where either side where the shape bends out. Finally label the tab like shape with the word search.

Step23

Creating The Navigation

Create a big rounded rectangle 850 x 250 pixels, fill the rectangle with the color white then add a 1 pixel stroke using the color #cfeaea.

Step24

Using the same methods as we did for our 3D part on the search field, do the same for the rectangle you just created. The rectangle will be a featured area and navigation all rolled into one.

Step25

Adding A Splash Of Color

Using the rounded rectangle with a radius of 5 px create another rectangle inside the bigger rectangle you just created. Fill the rectangle with any color.

Step26

Now add a gradient overlay using the settings below.

Step27

You should have something like this.

Step28

Click your multicolored rectangle whilst holding down the CTRL key on the keyboard, this should load a selection. Create a new layer then go to “filter > render > clouds”.

Step29

Now go to “filter > artistic > underpainting”, use the settings below.

Step30

Were now going to add abit of blur, go to “filter > blur > motion blur”. Make sure your selection is still active or else the motion blue will evade the rectangle and cover the bigger rectangle, which we dont want.

Step31

Finally set the opacity to 50% and layer blending mode to “vivid light”. You should have something like this.

Step32

Using the text tool add some nice looking text, if you add a heading like on mine add an outer glow to it using the default settings. Finish off by creating like a shine effect using the pen tool.

Step33

Creating The Service Boxes

Using the rounded rectangle tool with a radius of 10px create 3 boxes next to each other totalling 850 pixels, be sure to leave a gap inbetween each rectangle.

Step34

Fill the rectangles with any color then add these layer styles.

Step35

Step36

Im now going to use a few icons from “wefunction” to build up my service’s sections. Im going to start by adding a little icon then a heading, the color of the heading will picked from the colorfull featured area using the eye dropper tool.

Step37

After the heading im going to add a short paragraph using lorem ipsum text, after the paragraph im going to create a short list using the circle tick icon from wefunction as the list bullet. Im then going ti finish off the services section by creating a read more button, created with the rounded rectangle tool.

Step38

Creating The Main Content Box

Once again with the rounded rectangle tool create a full size rectangle with a width of 850px, fill the rectangle with the color #e7f7ff then add a 1 pixel stroke using the color #d5f0fc.

Step39

Add the little home icon from the wefunction icon set to the top left corner of the rectangle, next to it add your welcome message. Finally fill the rectangle with your dummy text.

Step40

Creating The Footer

Finish off the layout with a plain white small round rectangle underneath the main content rectangle, add a 1 pixel stroke to the footer using the color #d5f0fc. Finally add your copyright information to the footer.

Step41

The Finished Layout

Thats it all done, heres the final product.

Step42

Final Note

Thanks for reading through my tutorial, hope you enjoyed it. Dont forget to re-tweet and digg this turtorial, your help and support is much appreciated. Cheers…

Your ads will be inserted here by

AdSense Now!.

Please go to the plugin admin page to paste your ad code.

Anime Style Background Tutorial

Your ads will be inserted here by

AdSense Now!.

Please go to the plugin admin page to paste your ad code.


Create a new document what ever size you prefer to work with, il be using 800 x 600, set your forground color to white and background color to black. Then do the following steps
“filter > render > clouds”
“filter > render > difference clouds”
“image > adjustments > invert”
“image > adjustments > levels”
When the levels window opens up drag the small arrow in the middle to the right. Like this.

Now go to “filter > blur > motion blur” set amount of pixels to 999 then press “ctrl + F” to apply same effect again. You should have something like this.

Now lets add some color, press “ctrl + u” put a tick in the colorize box at the bottom then use the sliders to select your color. Now duplicate your layer and set the new layer to “color dodge” you might find the color to be abit bright or nasty looking, if you do just colorize the 2 layers with “ctrl + u” you will be suprised the difference to colors can make. Heres my end result and the two colors i used.

Your ads will be inserted here by

AdSense Now!.

Please go to the plugin admin page to paste your ad code.

Both colors combined equals

Your ads will be inserted here by

AdSense Now!.

Please go to the plugin admin page to paste your ad code.

VPS Is Now Live

Your ads will be inserted here by

AdSense Now!.

Please go to the plugin admin page to paste your ad code.


Hello, well the VPS server went live today and the site transfered over fine from what i can see, i havent checked everything but i think its all in working order.

Ive had to close the shop for some updates, but that will be back on as soon as possilable. The only things we have lost from what i can see are a few comments that was posted last night and yestday day time. So if your comment isnt there i apoligize.

There might be abit of inactivity from me regarding tutorials and comments due to me getting everything sorted. Just give me a day or two, or even three to get everything back to normal.

Your ads will be inserted here by

AdSense Now!.

Please go to the plugin admin page to paste your ad code.

Many Thanks

Regards

Admin

Your ads will be inserted here by

AdSense Now!.

Please go to the plugin admin page to paste your ad code.

Wrinkled Up Paper Tutorial

Your ads will be inserted here by

AdSense Now!.

Please go to the plugin admin page to paste your ad code.


BEFORE YOU START DOWNLOAD THE PATTERN FILE HERE
place it into your adobe directory E.G (C:Program FilesAdobeAdobe Photoshop CS2PresetsPatterns).

Create a new document 500×500 pixels, select the color “d2d2d2″ then select the “rectangle tool” or press the letter “U” then draw out a rectangle. Make it look like a small A4 peice of paper. Now right click the layer that has been created and goto “blending options” and goto pattern overlay. then take the following steps.

1. click pattern overlay,
2. click the arrow next to the pattern selction
3. click the little arrow for extra options
4. click color paper

here is the image that the numbers corrospond to. (hope ive made easy enough to understand).

Now when the new set of patterns are loaded into photoshop scroll down and select the notebook pattern (see image below).

If you followed the above correctly you should have something like below.

Now lets add our wrinkles, create a new document 500×500 pixels select the color black and a light grey, then select the gradient tool. Change the mode to “difference”

Your ads will be inserted here by

AdSense Now!.

Please go to the plugin admin page to paste your ad code.

Now just drag random gradients on your canvas all on the same layer till you get an effect like this.

Once you have a effect like above (baring in mind it wont be the exact same as mine) goto “filter > stylize > emboss” use standard settings. You should have something like this.

Now “right-click” your background layer and select “layer from background” and click ok to the box that comes up, now click the layer while holding the “ctrl” key on the keyboard, this will select it now copy “edit > copy” or “ctrl + c”.

Now divert back to you piece of paper your prevously made and click on the “SECOND” box on your layer whilst holding down “ctrl”.

This will select your paper, Now goto “edit > paste into” or press “shift + ctrl + v”. The new layer that has been created set the layer mode to “hard light”. Now give it a drop shadow and a black 1 pixel stroke and your done, it should look like this.

Heres just a little pile of paper i made using this tutorial.

Your ads will be inserted here by

AdSense Now!.

Please go to the plugin admin page to paste your ad code.

category-photoshop-tutorials-page-7-

Your ads will be inserted here by

AdSense Now!.

Please go to the plugin admin page to paste your ad code.

Your ads will be inserted here by

AdSense Now!.

Please go to the plugin admin page to paste your ad code.

Your ads will be inserted here by

AdSense Now!.

Please go to the plugin admin page to paste your ad code.

category-csshtml-tutorials-page-2-

Your ads will be inserted here by

AdSense Now!.

Please go to the plugin admin page to paste your ad code.

Your ads will be inserted here by

AdSense Now!.

Please go to the plugin admin page to paste your ad code.

Your ads will be inserted here by

AdSense Now!.

Please go to the plugin admin page to paste your ad code.

2011-09-07-hv-tumblr-theme-pt-iii-

Your ads will be inserted here by

AdSense Now!.

Please go to the plugin admin page to paste your ad code.

Today I am proud to bring you guys Pt. III of the HV-Tumblr Theme Series. This episode in the series we will finally begin coding up our document. In order to create the perfect Tumblr Theme you need to make sure that your HTML is full stable with filler content before starting to add the Tumblr tags and removing things we don’t need, which is what we will be doing today! Let’s get started…

So, first thing is first, I am going to save us a bunch of time. Instead of wasting your time by showing you what you need to slice up for our document I will just provide the images. It is pretty obvious, especially in this design, to see that we are only going to be slicing up a few images, and the rest we will do with CSS.

Download Image Files

Alright, let’s get started coding up our main page to HTML. The first thing we are going to want to do is set up our folder layout. Create a new folder on your desktop and name it whatever you want. Now, within the folder, we are going to set up an images folder. Copy and paste the images that you downloaded above into the images folder and we are ready to rock and roll.

Open up your favorite text editor, or the editor that you choose/have to use, and right away save your document as index.html. That get’s that out of the way and makes sure that we have at least our open document and saved.

As I said earlier this tutorial, since it’s not the most important part of why I am writing this series, will be a pretty quick tutorial. We are going to be hitting everything in series, and all the numbers that you need are provided in your PSD document (which are provided in Part 1 of this series) so I am not going to explain where the numbers come from to save us both time.

Now, let’s start our first section.

Header and Logo

Alright, for our logo we are going to want to set it up to use just a text based logo. In the conclusion of this series though I will show you a few tips for adding an image via Tumblr custom forms. Anyway, let’s set up our CSS for our header and logo.

 body { 	background-color: #cecece; 	margin: 0px; } p, h1, h2, h3, h4, img, a { 	margin: 0px; 	padding: 0px; 	text-decoration: none; } .header_container { 	background-image: url(images/header_background.png); 	background-repeat: repeat-x; 	height: 100px; 	width: auto; } #header { 	height: 100px; 	width: 1024px; 	margin-right: auto; 	margin-left: auto; } #logo { 	float: left; 	height: 40px; 	width: 185px; 	margin-top: 20px; 	margin-left: 55px; } #logo h1 { 	font-family: "Francois One"; 	margin: 0px; 	color: #a2d9ff; 	font-size: 32px; } #logo h1 a { 	color: #a2d9ff; 	font-size: 32px; 	text-decoration: none; } #askme { 	background-image: url(images/ribbon.png); 	background-repeat: no-repeat; 	height: 54px; 	width: 37px; 	float: right; 	margin-right: 55px; } 

We have, of course, set up a simple CSS reset and our body information, but we also set up our header and logo information, as well as the quick little CSS setup for the ask me ribbon we put in this design. The thing I want to point out quickly is the reason I have a header container and and then a header class. When you are working with a design like this, and using a background image, you want to split up anything that needs to be repeated, but still has areas that need to be contained, you want to make the repeatable background its own container.

Sweet! Now let’s move on to actually setting up the html. As you can guess we will have a bunch of div tags inside of the main header_container div.

 <div class="header_container">   <div id="header">     <div id="logo">       <h1><a href="#">HV-Designs</a></h1>     </div>     <a href="#" id="askme"></a>   </div> </div> 

Content

Alright, let’s go ahead and set up our content now. We will have our content container, which will keep everything centered on the screen, and then we will be setting up our left content container, which will hold all of our posts.

 .content { 	height: auto; 	width: 970px; 	margin-right: auto; 	margin-left: auto; 	clear: both; } .leftcontent { 	float: left; 	height: auto; 	width: 635px; 	border-right-width: 1px; 	border-right-style: solid; 	border-right-color: #c0c0c0; } .postcontainer { 	float: left; 	height: auto; 	width: 585px; 	margin-bottom: 45px; } 

We have all our containers ready to set up, now we have to get them ready for our posts. The html will have open divs for now, until we finish the posts, so don’t freak out when I don’t close the tags I am providing you.

 <div class="content">   <div class="leftcontent">     <div class="postcontainer"> 

Alright, time to set up the CSS for our first post type. We will be including the note and date ribbon CSS as well, which we will be using on every post. We will also be setting up our tags for the first time, but that will also be used in every single post.

 .ribboncontainer { 	float: left; 	height: 100px; 	width: 70px; 	margin-top: 25px; } .dateribbon { 	background-image: url(images/date_timeribbon.png); 	background-repeat: no-repeat; 	height: 40px; 	width: 70px; 	float: left; } .dateribbon h2 { 	color: #a2d9ff; 	font-family: Oswald; 	font-size: 14px; 	text-align: center; 	margin-left: 7px; 	margin-top: 7px; } .noteribbon { 	background-image: url(images/date_timeribbon.png); 	background-repeat: no-repeat; 	height: 40px; 	width: 70px; 	float: left; 	margin-top: 20px; } .noteribbon h2 { 	color: #FFFFFF; 	font-family: Oswald; 	font-size: 9px; 	text-align: center; 	margin-left: 7px; 	margin-top: 10px; 	} #photopost { 	float: left; 	height: 415px; 	width: 510px; 	background-color: #FFF; 	border: 1px solid #c0c0c0; } #photo { 	float: left; 	height: 315px; 	width: 480px; 	margin: 14px; 	border: 1px solid #000; } #photocaption { 	float: left; 	height: auto; 	width: 480px; 	margin-right: 14px; 	margin-left: 14px; 	font-family: Verdana; 	font-size: 16px; } #photocaption a { 	color: #de5400; 	text-decoration: none; } #photocaption a:hover { 	color: #1da3ff; } .tags { 	background-image: url(images/tags.png); 	background-repeat: no-repeat; 	background-position: left; 	float: right; 	height: 19px; 	width: 150px; 	padding-left: 25px; 	margin-top: 10px; 	margin-right: 15px; 	font-family: Verdana; 	color: #989797; 	font-size: 12px; 	clear: both; 	margin-bottom: 10px; } 

Pretty simple stuff but you will notice that I put everything in its own container. I do it because it makes everything flow a little bit better, but I also do it because it’s just something I have to do (OCD) or I feel like my code is just random nonsense. If you are going to be using containers for everything I would recommend shorthanding your CSS and condensing it as much as possible. Don’t know how to do that? Don’t worry, we have a tutorial coming out for that pretty quick like.

Alright, now that I have shamelessy promoted a future post, it’s time to actually move into our HTML.

       <div class="ribboncontainer">         <div class="dateribbon">           <h2>Jan 10</h2>         </div>         <div class="noteribbon">           <h2>129 Notes</h2>         </div>       </div>       <div id="photopost">         <div id="photo"><img src="images/photopost.png" width="480" height="315" /></div>         <div id="photocaption">This will be a photo caption here, with a <a href="#">link</a> included to wherever you want. Its also clickable.</div>         <div class="tags">Photos, Beach, Sand</div>       </div>     </div> 

Your ads will be inserted here by

AdSense Now!.

Please go to the plugin admin page to paste your ad code.

So, we put in the exact text and photo from our PSD file and closed up the post container tag and are ready to rock and roll into the next step. Now that we have our staple CSS classes set up for each of our posts all we have to do is pull all the sizes, colors, borders, etc from our PSD document and basically transfer them over to our document. Be ready for a huge chunk of CSS:

 #quotepost { 	float: left; 	height: 155px; 	width: 510px; 	background-color: #FFF; 	border: 1px solid #c0c0c0; 	background-image: url(images/quotes_background.png); 	background-repeat: no-repeat; } #quote { 	float: left; 	height: auto; 	width: 480px; 	margin-right: 14px; 	margin-left: 14px; 	font-family: Verdana; 	font-size: 18px; 	font-weight: bold; 	color: #de5400; 	margin-top: 30px; } #quoteauthor { 	float: right; 	height: 25px; 	width: 200px; 	margin-right: 14px; 	margin-left: 14px; 	font-family: Verdana; 	font-size: 18px; 	font-weight: bold; 	color: #000; 	margin-top: 10px; 	text-align: right; } #textpost { 	float: left; 	height: auto; 	width: 510px; 	background-color: #FFF; 	border: 1px solid #c0c0c0; } #text h1 { 	color: #DE5400; 	margin-bottom: 15px; 	font-size: 26px; } #text p { 	margin-bottom: 15px; } #text { 	float: left; 	height: auto; 	width: 480px; 	margin-right: 14px; 	margin-left: 14px; 	font-family: Verdana; 	font-size: 14px; 	color: #000; 	margin-top: 30px; } #linkpost { 	float: left; 	height: auto; 	width: 510px; 	background-color: #FFF; 	border: 1px solid #c0c0c0; 	background-image: url(images/quotes_background.png); 	background-repeat: no-repeat; } #linkdescription { 	float: left; 	height: auto; 	width: 480px; 	margin-right: 14px; 	margin-left: 14px; 	font-family: Verdana; 	font-size: 18px; 	font-weight: bold; 	color: #de5400; 	margin-top: 30px; } #link { 	float: left; 	height: 25px; 	width: 250px; 	margin-left: 14px; 	font-family: Verdana; 	font-size: 18px; 	font-weight: normal; 	color: #000; 	margin-top: 10px; 	text-align: right; } #audiopost { 	float: left; 	height: auto; 	width: 510px; 	background-color: #FFF; 	border: 1px solid #c0c0c0; 	background-image: url(images/quotes_background.png); 	background-repeat: no-repeat; } #albumart { 	float: left; 	height: 120px; 	width: 120px; 	margin: 10px; } #audio_container { 	float: left; 	height: auto; 	width: 500px; 	margin-right: 14px; 	font-family: Verdana; 	font-size: 13px; 	color: #000; 	margin-top: 10px; } .audioplayer { 	background-image: url(images/audioplayer.png); 	background-repeat: no-repeat; 	float: left; 	height: 35px; 	width: 210px; 	margin-top: 10px; } #audiotext { 	height: auto; 	width: 350px; 	float: left; 	margin-top: 20px; } #videopost { 	float: left; 	height: auto; 	width: 510px; 	background-color: #FFF; 	border: 1px solid #c0c0c0; } #videopost h1 { 	color: #DE5400; 	font-size: 26px; 	font-family: Verdana; 	margin-left: 15px; 	margin-top: 15px; 	} #video { 	float: left; 	height: 300px; 	width: 365px; 	margin-right: 72px; 	margin-left: 72px; 	font-family: Verdana; 	font-size: 14px; 	color: #000; 	margin-top: 30px; 	background-image: url(images/video.png); 	background-repeat: no-repeat; 	margin-bottom: 10px; } 

And simply repeat the same process from our first post we set up and we are good to go:

 <div class="postcontainer">       <div class="ribboncontainer">         <div class="dateribbon">           <h2>Jan 10</h2>         </div>         <div class="noteribbon">           <h2>129 Notes</h2>         </div>       </div>       <div id="quotepost">         <div id="quote">You are part of the Rebel Alliance and a traitor. Take her away!</div>         <div id="quoteauthor">-Darth Vader</div> <div class="tags">Photos, Beach, Sand</div>       </div>     </div>     <div class="postcontainer">       <div class="ribboncontainer">         <div class="dateribbon">           <h2>Jan 10</h2>         </div>         <div class="noteribbon">           <h2>129 Notes</h2>         </div>       </div>       <div id="textpost">         <div id="text">           <h1>This is a text post of some sort!</h1>           <p>Lorem ipsum dolor sit amet, consectetur adipiscing elit. Nulla nunc nisi, viverra eu ultrices a, tincidunt et eros. Ut convallis malesuada imperdiet. Mauris interdum dapibus tristique. Phasellus nec diam massa. Donec pharetra pellentesque purus, nec consectetur turpis viverra vel. Sed dictum lobortis velit quis feugiat. Vivamus consectetur odio vel dolor vulputate pulvinar. Sed commodo porta volutpat. Cras varius elementum condimentum. </p>           <p>Cras iaculis, sapien vel congue pellentesque, felis eros tincidunt neque, nec aliquam justo nibh vitae lorem. Nunc vulputate scelerisque accumsan. Nullam pellentesque, orci ut varius eleifend, eros neque mattis lorem, sed faucibus sem ipsum vulputate dui. Nulla consectetur urna id erat dictum non viverra eros pretium. Sed lobortis porttitor nisi vel elementum. Fusce accumsan massa quis sem eleifend quis condimentum lectus bibendum. Donec eget risus ligula, sit amet </p>         </div>         <div class="tags">Photos, Beach, Sand</div>       </div>     </div>     <div class="postcontainer">       <div class="ribboncontainer">         <div class="dateribbon">           <h2>Jan 10</h2>         </div>         <div class="noteribbon">           <h2>129 Notes</h2>         </div>       </div>       <div id="linkpost">         <div id="linkdescription">Awesome Photoshop Tutorials, Tips and Tricks!</div>         <div id="link">- http://hv-designs.co.uk</div> <div class="tags" id="links">Photos, Beach, Sand</div>       </div>     </div>     <div class="postcontainer">       <div class="ribboncontainer">         <div class="dateribbon">           <h2>Jan 10</h2>         </div>         <div class="noteribbon">           <h2>129 Notes</h2>         </div>       </div>       <div id="audiopost">       <div id="audio_container">       <div id="albumart"><img src="images/albumart.png" width="118" height="118" /></div>         <div class="audioplayer"></div>         <div id="audiotext">           <p>Lorem ipsum dolor sit amet, consectetur adipiscing elit. Nulla nunc nisi, viverra eu ultrices a, tincidunt et eros. Ut convallis malesuada imperdiet. Mauris interdum dapibus tristique. Phasellus nec diam massa</p>         </div>       </div> <div class="tags">Photos, Beach, Sand</div>       </div>     </div>     <div class="postcontainer">       <div class="ribboncontainer">         <div class="dateribbon">           <h2>Jan 10</h2>         </div>         <div class="noteribbon">           <h2>129 Notes</h2>         </div>       </div>       <div id="videopost">       <h1>This is your video caption </h1>       <div id="video">Content for  id "video" Goes Here</div>       <div class="tags">Photos, Beach, Sand</div>       </div>     </div>   </div> 

That nice chunk of HTML was brought to you by filler content. Make sure all your div tags are closed off, which they are if you copied the html :)

Right Container

Alright, let’s get started on the right container. The first thing we want to do is open up our Photoshop Document and get our CSS ready by pulling all the information we need from the PSD. Here is our css:

 .rightcontainer { 	float: left; 	height: 830px; 	width: 310px; 	padding-left: 20px; } .authorinfo_container { 	float: left; 	height: 120px; 	width: 305px; 	background-image: url(images/dots_spacer.png); 	background-repeat: no-repeat; 	background-position: bottom; } #authorimage { 	float: left; 	height: 75px; 	width: 75px; 	border: 1px solid #c0c0c0; 	background-color: #FFF; 	padding: 5px; } #authorinformation { 	height: 55px; 	width: 175px; 	float: left; 	margin-left: 20px; 	font-family: Verdana; 	font-size: 12px; 	color: #1da3ff; } #authorinformation h1 { 	font-family: "Francois One"; 	color: #222333; 	font-size: 24px; 	margin: 0px; } #socialnetworkcontainer { 	float: left; 	height: 25px; 	width: 115px; 	margin-left: 40px; 	margin-top: 15px; } #facebook { 	background-image: url(images/socialmedia_sprite.png); 	background-repeat: no-repeat; 	background-position: left; 	float: left; 	height: 20px; 	width: 20px; 	margin-right: 5px; } #gowalla { 	background-image: url(images/socialmedia_sprite.png); 	background-repeat: no-repeat; 	background-position: -20px; 	float: left; 	height: 20px; 	width: 20px; 	margin-right: 5px; 	margin-left: 5px; 	} #twitter { 	background-image: url(images/socialmedia_sprite.png); 	background-repeat: no-repeat; 	background-position: -41px; 	float: left; 	height: 20px; 	width: 20px; 	margin-right: 5px; 	margin-left: 5px; 	} #wordpress { 	background-image: url(images/socialmedia_sprite.png); 	background-repeat: no-repeat; 	background-position: right; 	float: left; 	height: 20px; 	width: 20px; 	margin-right: 5px; 	margin-left: 5px; 	} .pages { 	float: left; 	height: 30px; 	width: 305px; 	background-image: url(images/dots_spacer.png); 	background-repeat: no-repeat; 	background-position: bottom; 	font-family: "Francois One"; 	font-size: 18px; 	color: #b5b5b5; 	text-align: center; 	padding-top: 5px; } .pages a { 	color: #b5b5b5; } .pages a:hover { 	color: #DE5400; } .search_container { 	height: 70px; 	width: 295px; 	float: left; 	margin-left: 10px; 	margin-top: 25px; 	background-image: url(images/dots_spacer.png); 	background-position: bottom; 	background-repeat: no-repeat; } #search { 	float: left; 	height: 45px; 	width: 225px; 	background-color: #afafaf; 	border-top-style: none; 	border-right-style: none; 	border-bottom-style: none; 	border-left-style: none; 	font-family: Verdana; 	font-size: 14px; 	color: #FFF; 	padding-left: 15px; } #button { 	background-image: url(images/search_button.png); 	background-repeat: no-repeat; 	float: left; 	height: 47px; 	width: 45px; 	text-indent: -999in; 	border-top-style: none; 	border-right-style: none; 	border-bottom-style: none; 	border-left-style: none; 	background-color: #AFAFAF; } .twitter_container { 	float: left; 	height: 330px; 	width: 305px; 	background-image: url(images/dots_spacer.png); 	background-repeat: no-repeat; 	background-position: bottom; 	margin-top: 20px; } #twitterheader { 	background-image: url(images/twitterbird_icon.png); 	background-repeat: no-repeat; 	background-position: left; 	width: 245px; 	height: 45px; 	float: left; 	padding-left: 60px; 	font-family: "Francois One"; 	color: #1da3ff; 	font-size: 22px; 	padding-top: 10px; 	margin-bottom: 15px; } #tweet { 	float: left; 	height: auto; 	width: 295px; 	background-image: url(images/dots_spacer.png); 	background-repeat: no-repeat; 	background-position: bottom; 	padding-bottom: 20px; 	font-family: Verdana; 	font-size: 12px; 	color: #000; 	margin-left: 5px; 	margin-bottom: 15px; } .followingcontainer { 	float: left; 	height: 155px; 	width: 305px; 	background-image: url(images/dots_spacer.png); 	background-repeat: no-repeat; 	background-position: bottom; 	margin-top: 20px; 	} .followingcontainer h1 { 	font-family: "Francois One"; 	color: #222333; 	font-size: 24px; 	margin-top: 0px; 	margin-right: 0px; 	margin-bottom: 10px; 	margin-left: 0px; 	} .followimage { 	float: left; 	height: 32px; 	width: 32px; 	background-color: #232434; 	border: 3px solid #FFF; 	margin-top: 5px; 	margin-right: 5px; 	margin-bottom: 5px; } 

Great! Let’s go ahead now and start on our CSS for the Author Information area. We need to open up our right container DIV and then place our Author Information stuff in there. Here is our html:

   <div class="rightcontainer">     <div class="authorinfo_container">       <div id="authorimage"><img src="images/ai_holder.png" width="76" height="76" /></div>       <div id="authorinformation">         <h1>Aaron Nichols</h1>         <p>Web and Graphic Designer</p>       </div>       <div id="socialnetworkcontainer">         <div id="facebook"></div>         <div id="gowalla"></div>         <div id="twitter"></div>         <div id="wordpress"></div>       </div>     </div> 

Now, we have used divs for our social networking right now because the code will change substantially as we move forward into coding this to Tumblr. If you are wanting to keep this as an HTML version template all you have to do is replace

withYou may need to change up a few things in the CSS and, of course, you will need to put in the right link and id for whatever social network you are using.

Ok, let;s move onto our pages and search area. In our HTML version this will again be very basic because as we move to Tumblr we will go into more detail and will need to change stuff up, but we can’t do anything until our HTML is stable.

Place this directly after our previous html:

  <div class="pages"><a href="#">My Website</a> </div>     <div class="pages"><a href="#">About Me</a> </div>     <div class="search_container">       <label for="search"></label>       <input type="text" name="search" id="search" />       <input type="submit" name="button" id="button" value="Submit" />     </div> 

Now, let’s move forward onto our twitter area. In our HTML version this will consist, mostly, of filler content until we move forward into coding for Tumblr so I will provide you with the basic HTML.

 <div class="twitter_container">       <div id="twitterheader">Keep Updated With Twitter</div>       <div id="tweet">Posted a new snap to dribbble with a preview of next weeks freebie, check it out and be sure to check the full size -- http://drbl.in/biSW     </div>     <div id="tweet">Posted a new snap to dribbble with a preview of next weeks freebie, check it out and be sure to check the full size -- http://drbl.in/biSW     </div>     <div id="tweet">Posted a new snap to dribbble with a preview of next weeks freebie, check it out and be sure to check the full size -- http://drbl.in/biSW     </div>     </div> 

And, finally, to finish off our tutorial we will be adding our following area. When you see this bit of code you will probably freak out because it’s ugly but don’t worry about it right now. We have to make this code look super ugly right now to get our html stable.

 <div class="followingcontainer">       <h1>I'm Following These Guys</h1>       <div class="followimage"></div>       <div class="followimage"></div>       <div class="followimage"></div>       <div class="followimage"></div>       <div class="followimage"></div>       <div class="followimage"></div>       <div class="followimage"></div>       <div class="followimage"></div>       <div class="followimage"></div>       <div class="followimage"></div>       <div class="followimage"></div>       <div class="followimage"></div>       <div class="followimage"></div>       <div class="followimage"></div>       </div>   </div> </div> </body> </html> 

CONCLUSION

That finishes off the tutorial! I know that it was a long time coming and there was a lot to it, but just wait until we move forward onto coding this to a tumblr theme. You will see a huge messy bunch of code (this tutorial) become an amazing bunch of code transformed into a theme.

Let us know what you thought in the comments or on Facebook.

Your ads will be inserted here by

AdSense Now!.

Please go to the plugin admin page to paste your ad code.