All posts by admin

Premium Icons

Your ads will be inserted here by

AdSense Now!.

Please go to the plugin admin page to paste your ad code.

16 Free premium icon sets from around the internet all free to download and use, post also includes 12 icon tutorials.


Fresh Addon Icon Set

01

Bright Free Icon Set

02

Nurture Social Icon Set

03

Aquaticus Icon Set

04

Candy Milk Icon Set

05

Web Injection Icon Set

06

Function Free Icon Set

07

Star Trek Icon Set

08

Project Icon Set

09

Woothemes ultimate Icon Set

10

Old School Icon Set

11

Baggy Icon Set

12

Futuristica Icon Set

13

Coquette Pt4 Icon Set

14

Classy Icon Set

Your ads will be inserted here by

AdSense Now!.

Please go to the plugin admin page to paste your ad code.

15

Aesthetica V2 Icon Set

16


Selection Of Icon Tutorials


The Making Of An Icon

17

Carbon Style Icon

18

Professional Tecnique For Creating Icons

19

7 Principles Of Effective Icon Design

20

Military Icon Tutorial

21

Custom Hard Drive Icon

22

CS3 Style Icons

23

Itune Icon

24

Compact Disc Icon

25

Dock Icon Folder

26

USB Portable Speaker Icon

27

Share This Icon

28

Hope you enjoyed this article, dont forget to subscribe via RSS and promote this post by using the share and enjoy icons below. Your support is much appreciated.

Your ads will be inserted here by

AdSense Now!.

Please go to the plugin admin page to paste your ad code.

Games Layout #6

Your ads will be inserted here by

AdSense Now!.

Please go to the plugin admin page to paste your ad code.

Hello, welcome to tutorial 204, in this tutorial we’ll be creating a gaming layout with sort of metal feeling to it. We’ll be using simple indented lines and dots to make some parts look like metal panels with rivets.


Start up photoshop and create a new document 1000 x 1200 pixels. With the paint bucket tool fill your background with the color #e6e6e6.

Step1

Select the rectangular marquee tool and create a rectangle at the top spanning the width of your canvas but only about 30 pixels in height. Fill the rectangle with any color.

Step2

Add these layer styles to complete the step.

Step3

Step4

Using the type tool add some navigation links to the top rectangle, on the right side of the navigation add an RSS icon.

Step5

Inbetween the RSS icon and the actual navigation links add a separator. To make the separator you need to zoom in pretty close, select the rectangular marquee tool then make a line spanning 1 pixels in width. Fill the first line with the color #808080 move the selection over 1 pixel and fill it again with #6b6b6b. The lightest color is always first, if your making a horizontal separator then the lightest line is always at the bottom.

Step6

Select the rectangular marquee tool once again and create another rectangle underneath the top navigation, the new rectangle should be about 130 pixels in height and should span the width of the canvas. Fill the rectangle with any color then add these layer styles.

Step7

Step8

You should have something like this.

Step9

Ontop of the big rectangle you just created add your website title/name into the top left corner, im using a font called “bankgothic”. Once you’ve added your text add a simple inner shadow using the settings below.

Step10

You should have something that looks like this.

Step11

On the left side of the website title add a separator line using the rectangular marquee tool.

Step12

On the left and right side of the separator add two 4 pixel squares on top of each other by using the rectangular marquee tool. Use a shade of grey for the top square and the color white for the 2nd square. Place the squares so there corners sort of overlap, see the image below for detail.

Step13

The little squares when zoomed out will look like rivet indents. Repeat the above steps for each side of the website title.

Step14

On the right side of the header were going to add a search. Using the rectangular marquee tool create a smallish rectangle. Fill with the color #cfcfcf then add these layer styles.

Step15

Step16

You should have something like this.

Step17

Inside the rectangle you just created, create another one leaving about 3-5 pixels all the way around. Fill the new rectangle with any color then add these layer styles.

Step18

Step19

You should have something like this.

Step20

Your ads will be inserted here by

AdSense Now!.

Please go to the plugin admin page to paste your ad code.

Find yourself a magnifying glass icon, im using the one from wefunction. Place the magnifying glass next the the rectangles.

Step21

Using your desired cutting tool delete the part of the rectangles still showing past the search boxes. You should have something like this.

Step22

Remember the separator and rivet indents we created earlier?, we need to create one more for the end of the search field. Your header should now be complete.

Step23

Now for our main navigation, select the rectangular marquee tool and create a rectangle underneath your header spanning the whole width of your canvas. Fill with any color then add these layer styles.

Step24

Step25

Step26

Ontop of the navigation add your navigation text, you should have something like this.

Step27

Ive left the first navigation link in the color white as were going to add a hover state to the button. Select the rectangle tool or the rectangular marquee tool, make a selection around the first navigation link. Fill the selection with any color then add these layer styles.

Step28

Step29

You should have something like this.

Step30

Thats our navigation complete, now lets work on our featured area, select the rectangular marquee tool once again and create a big rectangle. Fill with any color then add these layer styles.

Step31

Step32

Step33

You should have something like this.

Step34

Inside the rectangle you need to add your featured image with a description and title. Place the image on the left and the description on the right, inbetween the two items add the separator and 4 rivet indents. Use the steps previously written above for the rivets and separator. Then underneath your description add a pagination and read more button.

Step35

Using the rectangular marquee tool again create another box underneath your featured area. Copy and paste the layer styles from your featured box over to your new box. Open up the layer styles option, on the gradient overlay place a tick in the box on reverse.

Step36

Inside the box add your content box title, underneath your content box title add a horizontal separator with two rivet indents either side.

Step37

Use the steps above to create more content boxes as needed.

Step38

Add your dummy content to each of your content and sidebar boxes.

Step39

Now for the footer, duplicate your header, the rivet indents on the left and right sides along with the two separators. Drag them down to the bottom of your canvas. Add all your footer information inside the footer to complete the layout.

Step40

Your layout should now be complete and look something like this.

Finished

Thanks for reading, dont forget to subscribe via RSS and twitter. Your support is much appreciated.

Your ads will be inserted here by

AdSense Now!.

Please go to the plugin admin page to paste your ad code.

SB-Designs UK

Your ads will be inserted here by

AdSense Now!.

Please go to the plugin admin page to paste your ad code.


In the past couple of weeks ive been busy re-designing and helping re-develop a website called SB-Designs, finally the website is now complete and in full swing. SB-Designs is a website / graphic design company based in the West Midlands. They specialise in building quality websites at affordable prices for small businesses and individuals.

Your ads will be inserted here by

AdSense Now!.

Please go to the plugin admin page to paste your ad code.

They also offer other services like graphic design, ecommerce and email marketing, Some of you guys also might be intrested to hear they offer PSD to HTML from as little as £80 which is quite cheap.

Anyway enough said get yourself over there and see what they can do for you.

Your ads will be inserted here by

AdSense Now!.

Please go to the plugin admin page to paste your ad code.

23 Stunning Photo Effects

Your ads will be inserted here by

AdSense Now!.

Please go to the plugin admin page to paste your ad code.

Todays article features 23 photo effects, you’ve proberbly seen most of them knocking about sometime or other but still worth another look.


Textures & Uneven Surfaces

01

Twisting Water Photo Manipulation

02

Smoke Fading Effect

03

Retro Comic Book

04

Ghosting

05

Cutaway Illustration

06

Warhol Pop Art

07

Dynamic Lighting

08

3D Photo

09

Slick Dusky Lighting

10

HDR

11

Iphone Light Beams

Your ads will be inserted here by

AdSense Now!.

Please go to the plugin admin page to paste your ad code.

12

Pencil Sketch

13

Stencil Art

14

Pop Art

15

Selective Sepia

16

Sincity Effect

17

HDR

18

Dark Light

19

Blue Prints

20

Light Your House On Fire

21

Halftone Dots

22

Sketch

23

Thanks for reading this article, dont forget to subscribe via rss and twitter to stay informed of future articles and tutorials.

Your ads will be inserted here by

AdSense Now!.

Please go to the plugin admin page to paste your ad code.

Your PROject FREE Template

Your ads will be inserted here by

AdSense Now!.

Please go to the plugin admin page to paste your ad code.


Your free 5 page template

* 5 Pages (contact form does not work).
* jQuery jFlow slider.
* Valid HTML.
* Valid CSS.
* Yours to use for free, providing hv-designs credit link is in the footer.

Your-PROJECT-PSD-Website-Template


Your ads will be inserted here by

AdSense Now!.

Please go to the plugin admin page to paste your ad code.


License and Attribution

This layout is licensed under the Creative Commons license and can be used for personal purposes ONLY. Attribution is needed and is always appreciated.

Your ads will be inserted here by

AdSense Now!.

Please go to the plugin admin page to paste your ad code.

jQuery & jFlow

Your ads will be inserted here by

AdSense Now!.

Please go to the plugin admin page to paste your ad code.

Good evening everybody in todays tutorial we’ll be dabbling into some jquery. We’ll be intergrating a jQuery plugin called jFlow into a website.


Before we start this tutorial your going to need a few things:

– Jquery 1.2.6.Pack (download here).
– Jquery jFlow Plugin 1.0 (download here).
– A website ready template to add jflow into.

If you want to read up about the jflow plugin there website is HERE. If your asking yourself “why is he using jquery 1.2.6?” then the answer to your question is because i couldnt get jflow to work with the new libary. (just speaking from experience). Although i do believe there is a jflow 1.2 version which might work.

Once you have all your files open up your template in your code editor. Navigate to your templates main folder, create a new folder called “js” then copy and paste the jflow and jquery 1.2.6 file into the folder. Open up your index.html and link the two files in the head section by your style sheet.

1
2
<script src="js/jquery-1.2.6.pack.js" type="text/javascript"></script>
<script src="js/jquery.flow.1.1.min.js" type="text/javascript"></script>

Underneath the two linked js files add this chunk of javascript.

1
2
3
4
5
6
7
8
9
<script type="text/javascript">
$(function() {
$("div#controller").jFlow({
slides: "#slides",
width: "900px",
height: "250px"
});
});
</script>

Without the chunk of code above your slides will not slide. The width and height are required, if you remove the height the slides will work in firefox but will not in internet explorer. The width of my slides on my template are 900px wide and 250px in height, you will have to adjust these 2 values according to your own design. Lets look at the code above in more deatil.

Firstly we have a div of #myController this is the div where all the controllers will be nested. we then have a div of #slides this is the div where all your sliding divs are nested in. we then have width this can be specified in px or % as is a required style. We then have height this can be specified in px and is also required.

Lets take alook at my featured area in which we’ll be placing the slides. Il be using the “Your PROject” template i made in a previous tutorial. The code looks like this.

1
2
3
4
5
6
7
8
9
10
11
12
13
14
15
16
17
<div id="featured"><!--FEATURED CONTENT STARTS-->
<div class="featured-text"><!--FEATURED TEXT STARTS-->
<h1 class="featured">featured text here 01</h1>
<p>Lorem ipsum dolor sit amet, consectetur adipiscing elit. Vivamus porttitor est et ante euismod vel euismod tortor ornare. Quisque turpis augue, iaculis vel luctus non, dapibus a ante. Quisque vitae turpis augue. Nulla facilisi.  Continue Reading...</p>
</div><!--FEATURED TEXT ENDS-->
<div id="featured-image01"><!--FEATURED IMAGE STARTS-->
<div class="featured-buttons"><!--NEXT AND PREVIOUS BUTTONS STARTS-->
<div class="featured-btn">
<img src="images/next_btn.png" alt="Next"  />
<div class="featured-btn"><img src="images/prev_btn.png" alt="Previous" />
</div>
</div>
</div><!--NEXT AND PREVIOUS BUTTONS END-->
</div><!--FEATURED IMAGE ENDS-->
</div><!--FEATURED CONTENT ENDS-->

The mockup above looks like this.

Your ads will be inserted here by

AdSense Now!.

Please go to the plugin admin page to paste your ad code.


Step1

Above the featured area DIV tag we need to add our jflow controllers copy and paste the code below, above your featured area code.

1
2
3
4
5
<div id="controller" class="hidden">
<span class="jFlowControl">No 1</span>
<span class="jFlowControl">No 2</span>
<span class="jFlowControl">No 3</span>
</div>

My main featured area has a main container called featured, rename this to slides. Also rename the style in the style sheet to slides. At the very bottom of your style sheet we need to add the style to hide our other two slides. We can do this by adding the style below.

1
2
3
.hidden {
    display: none; /*hides our 2nd and 3rd featured slides*/
}

In our featured area under the slides div we need to add a blank div. At the end of our featured content we need to close the div. The code looks like this.

1
2
3
4
5
6
7
8
9
10
11
12
13
14
15
16
17
18
19
20
21
<div id="slides"><!--FEATURED CONTENT STARTS-->
<div><!--STARTS SLIDE #1-->
<div class="featured-text"><!--FEATURED TEXT STARTS-->
<h1 class="featured">featured text here 01</h1>
<p>Lorem ipsum dolor sit amet, consectetur adipiscing elit. Vivamus porttitor est et ante euismod vel euismod tortor ornare. Quisque turpis augue, iaculis vel luctus non, dapibus a ante. Quisque vitae turpis augue. Nulla facilisi.  Continue Reading...</p>
</div><!--FEATURED TEXT ENDS-->
<div id="featured-image01"><!--FEATURED IMAGE STARTS-->
<div class="featured-buttons"><!--NEXT AND PREVIOUS BUTTONS STARTS-->
<div class="featured-btn">
<img src="images/next_btn.png" alt="Next"  />
<div class="featured-btn"><img src="images/prev_btn.png" alt="Previous" />
</div>
</div>
</div><!--NEXT AND PREVIOUS BUTTONS END-->
</div><!--FEATURED IMAGE ENDS-->
</div><!--ENDS SLIDE #1-->
</div><!--FEATURED CONTENT ENDS-->

Your next two slides or how ever many you will have to being with another empty div and end with a div so for example your slides would look like this.

1
2
3
4
5
6
7
8
9
10
11
<div><!--STARTS SLIDE #1-->
FIRST SLIDE CONTENT
</div><!--ENDS SLIDE #1-->
<div><!--STARTS SLIDE #2-->
SECOND SLIDE CONTENT
</div><!--ENDS SLIDE #2-->
<div><!--STARTS SLIDE #3-->
THIRD SLIDE CONTENT
</div><!--ENDS SLIDE #3-->

Inside our featured content area we also have two images, the images are a left and right arrow.

1
2
<div class="featured-btn"><img src="images/next_btn.png" alt="Next"  /></div>
<div class="featured-btn"><img src="images/prev_btn.png" alt="Previous" /></div>

On each button we need to add a new class associated with jflow. The classes are.

1
2
class="jFlowNext"
class="jFlowPrev"

The jFlowNext classes will make the slide go left, the jFlowPrev will slide the content right. We have to add both classes into our featured area. The next class will go on our next button and the prev class will go on our previous button. Like this.

1
2
<div class="featured-btn"><img src="images/next_btn.png" alt="Next" class="jFlowNext"  /></div>
<div class="featured-btn"><img src="images/prev_btn.png" alt="Previous" class="jFlowPrev" /></div>

Once you’ve done that upload your template and see how it looks. If you wanted to make it slightly easier to read in your code you could place each slide in a php file then include them into your template. To view the finished product click the button below.

Thats all, hope you’ve enjoyed this tutorial any problems dont hesitate to ask. The template will be free to download soon so keep your eyes peeled.


Your ads will be inserted here by

AdSense Now!.

Please go to the plugin admin page to paste your ad code.

Your PROject Pt.3: 4 Additional Pages

Your ads will be inserted here by

AdSense Now!.

Please go to the plugin admin page to paste your ad code.

Hello welcome to part 3 of the your PROject template. Today we’ll be creating 4 extra pages to go with our template.


Right lets get started, goto your folder wherr your template is copy your index.html file then paste it into the same directory. Rename the copied index.html file to services.html, then open it up in your code editor. Locate the code between the end div tag for the header all the way down to the container ends div. Highlight it all and hit the delete key, basically all’s were doing is removing the content area. This is what your code should look like once deleted.

1
2
3
4
5
6
7
8
9
10
11
12
13
14
15
16
17
18
19
20
21
22
23
24
25
26
27
28
29
30
31
32
33
34
35
36
37
38
39
40
41
42
43
44
45
46
47
48
49
50
51
52
53
54
55
56
57
58
59
60
61
62
63
<div id="container"><!--CONTAINTER STARTS-->
<div id="header"><!--HEADER STARTS-->
<div id="top-elements"><!--TOP ELEMENTS START-->
<div id="logo"><!--LOGO STARTS-->
<img src="images/logo.png" alt="Welcome To Your PROject" />
</div><!--LOGO ENDS-->
<div id="nav-bar"><!--NAVIGATION STARTS-->
<ul class="navlinks">
<li class="current"><a href="index.php">Home</a></li>
<li><a href="services.php">Services</a></li>
<li><a href="products.php">Products</a></li>
<li><a href="testimonials.php">Testimonials</a></li>
<li><a href="contact.php">Contact Us</a></li>
</ul>
</div><!--NAVIGATION ENDS-->
</div><!--TOP ELEMENTS END-->
<div id="featured"><!--FEATURED CONTENT STARTS-->
<div class="featured-text"><!--FEATURED TEXT STARTS-->
<h1 class="featured">featured text here 01</h1>
<p>Lorem ipsum dolor sit amet, consectetur adipiscing elit. Vivamus porttitor est et ante euismod vel euismod tortor ornare. Quisque turpis augue, iaculis vel luctus non, dapibus a ante. Quisque vitae turpis augue. Nulla facilisi.  Continue Reading...</p>
</div><!--FEATURED TEXT ENDS-->
<div id="featured-image01"><!--FEATURED IMAGE STARTS-->
<div class="featured-buttons"><!--NEXT AND PREVIOUS BUTTONS STARTS-->
<div class="featured-btn">
<img src="images/next_btn.png" alt="Next"  />
<div class="featured-btn"><img src="images/prev_btn.png" alt="Previous" />
</div>
</div>
</div><!--NEXT AND PREVIOUS BUTTONS END-->
</div><!--FEATURED IMAGE ENDS-->
</div><!--FEATURED CONTENT ENDS-->
</div><!--HEADER ENDS-->
THIS IS WHERE YOUR NEW CODE WILL GO
</div><!--CONTAINER ENDS-->
<div id="footer"><!--FOOTER STARTS-->
<div id="footer-content"><!--FOOTER CONTENT STARTS-->
<p>Copyright &copy; your project | All Rights Reserved</p>
<p>Design By <a href="http://www.richard-carpenter.co.uk">Richard Carpenter</a></p>
<p>&nbsp;</p>
<p>
<a href="http://jigsaw.w3.org/css-validator/check/referer">
<img style="border:0;width:88px;height:31px"
src="http://jigsaw.w3.org/css-validator/images/vcss-blue"
alt="Valid CSS!" />
</a><a href="http://validator.w3.org/check?uri=referer"><img
src="http://www.w3.org/Icons/valid-xhtml10-blue"
alt="Valid XHTML 1.0 Transitional" height="31" width="88" /></a>
</p>
</div><!--FOOTER CONTENT ENDS-->
</div><!--FOOTER ENDS-->

We can now begin to add our modified layout for our services page. We’ll be mocking it up in the same way as we did for our main page boxes, only this time the box will be 900px wide. We mock it up like this.

1
2
3
4
5
6
7
<div class="services"><!--BOX STARTS-->
<div class="services-inside">
<h2>a content title here</h2>
<h2 class="boxtitle2">May 20, 2009</h2>
<p>SOME TEXT HERE</p>
</div>
</div><!--BOX ENDS-->

As you can see the code is pretty much the same as our main page code only difference is we’ve renamed the div’s. The css is also pretty much the same.

1
2
3
4
5
6
7
8
9
10
11
12
13
14
15
16
17
18
19
20
21
/* ----------SERVICE'S PAGE STYLES---------- */
.services {
    float: left;
    border: 1px solid #121212;
    margin-bottom: 15px;
    float: left;
    width: 898px;
}
.services-inside {
    background-color: #0c0c0c;
    border: 1px solid #030303;
    float: left;
    width: 876px;
    padding: 10px;
}
.services-inside p {
    padding-top: 10px;
}

Depending on what you actually want on your services page you’ll have to add in the extra styles. So if you wanted a list on the services page with some images then you’d have to style them under the “SERVICE’S PAGE STYLES” in the style sheet. Here is the code for my services page with images and a simple list.

1
2
3
4
5
6
7
8
9
10
11
12
13
14
15
16
17
18
19
20
21
22
23
24
<div class="services"><!--BOX STARTS-->
<div class="services-inside">
<h2>a content title here</h2>
<h2 class="boxtitle2">May 20, 2009</h2>
<p>Lorem ipsum dolor sit amet, consectetur adipiscing elit. Donec iaculis porttitor massa eu scelerisque. Pellentesque habitant morbi tristique senectus et netus et malesuada fames ac turpis egestas. Mauris eget metus orci, et venenatis turpis. Quisque felis velit, sollicitudin ac pellentesque vehicula, fermentum ut velit. <strong><em><a href="#">Etiam tellus ipsum, posuere nec molestie in, ultrices vel enim</a></em></strong><a href="#">.</a> Donec vel est orci. Donec diam leo, fringilla sit amet vehicula eu, dictum quis elit.</p>
<p>&nbsp;</p>
<h2>Services</h2>
<p>Lorem ipsum dolor sit amet, consectetur adipiscing elit. Donec iaculis porttitor massa eu scelerisque. Pellentesque habitant morbi tristique senectus et netus et malesuada fames ac turpis egestas. Mauris eget metus orci, et venenatis turpis.</p>
<ul class="service-list">
<li>Service #1 - Lorem ipsum dolor sit amet, consectetur adipiscing elit.</li>
<li>Service #2 - Lorem ipsum dolor sit amet, consectetur adipiscing elit.</li>
<li>Service #3 - Lorem ipsum dolor sit amet, consectetur adipiscing elit.</li>
<li>Service #4 - Lorem ipsum dolor sit amet, consectetur adipiscing elit.</li>
<li>Service #5 - Lorem ipsum dolor sit amet, consectetur adipiscing elit.</li>
</ul>
<h2>&nbsp;</h2>
<h2>another header goes here</h2>
<p>Lorem ipsum dolor sit amet, consectetur adipiscing elit. Donec iaculis porttitor massa eu scelerisque. Pellentesque habitant morbi tristique senectus et netus et malesuada fames ac turpis egestas. Mauris eget metus orci, et venenatis turpis. Lorem ipsum dolor sit amet, consectetur adipiscing elit. Donec iaculis porttitor massa eu scelerisque. Pellentesque habitant morbi tristique senectus et netus et malesuada fames ac turpis egestas. Mauris eget metus orci, et venenatis turpis.</p>
<img src="thumbnails/01.gif" alt="01" width="200" height="170" class="service-img" /><img src="thumbnails/02.gif" alt="02" width="200" height="170" class="service-img" /><img src="thumbnails/03.gif" alt="03" width="200" height="170" class="service-img" /><img src="thumbnails/04.gif" alt="04" width="200" height="170" class="service-img" />
<p>Lorem ipsum dolor sit amet, consectetur adipiscing elit. Donec iaculis porttitor massa eu scelerisque. Pellentesque habitant morbi tristique senectus et netus et malesuada fames ac turpis egestas. Mauris eget metus orci, et venenatis turpis. Lorem ipsum dolor sit amet, consectetur adipiscing elit. Donec iaculis porttitor massa eu scelerisque. Pellentesque habitant morbi tristique senectus et netus et malesuada fames ac turpis egestas. Mauris eget metus orci, et venenatis turpis.</p>
</div>
</div><!--BOX ENDS-->

You’ll now have to style the img tag’s and list’s in your stylesheet which looks like this.

1
2
3
4
5
6
7
8
9
10
11
12
13
14
15
16
17
18
.service-list li{
    padding-left: 10px;
    font-size: 0.7em;
    color: #FFFFFF;
    margin-left: 40px;
    line-height: 18px;
    margin-top: 10px;
    margin-bottom: 10px;
}
.service-img {
    padding: 5px;
    background-color: #000000;
    border: 1px solid #383838;
    margin-left: 6px;
    margin-top: 10px;
    margin-bottom: 5px;
}

My services page looks like this.

Step1

So basically when creating your new pages depending on what you have in there will determine what styles you will need in your style sheet otherwise you can re-use styles we have already set. Thats our services page done, lets start on our products page. Copy your services.html file and paste a copy in the main directory, rename the file to products.html then open it in your code editor. Keep all the classes associated with the services page as we can reuse them for this page just remove all the content inbetween them.

Once you’ve removed all the content from the classes you should have something like this. (just remember if you change anything in the services page css it will automatically change on the products page also. You can get around this by using the same styles but change the class ID’s.)

1
2
3
4
5
6
7
<div class="services"><!--BOX STARTS-->
<div class="services-inside">
<h2>product #1 here</h2>
<h2 class="boxtitle2">product short info</h2>
CONTENT HERE
</div>
</div><!--BOX ENDS-->

For the products page i think we’ll have 3 boxes, to do this all’s we need to do is copy and paste the code above 2 times.

1
2
3
4
5
6
7
8
9
10
11
12
13
14
15
16
17
18
19
20
21
22
23
<div class="services"><!--BOX #1 STARTS-->
<div class="services-inside">
<h2>product #1 here</h2>
<h2 class="boxtitle2">product short info</h2>
CONTENT HERE
</div>
</div><!--BOX ENDS-->
<div class="services"><!--BOX #2 STARTS-->
<div class="services-inside">
<h2>product #1 here</h2>
<h2 class="boxtitle2">product short info</h2>
CONTENT HERE
</div>
</div><!--BOX ENDS-->
<div class="services"><!--BOX #3 STARTS-->
<div class="services-inside">
<h2>product #1 here</h2>
<h2 class="boxtitle2">product short info</h2>
CONTENT HERE
</div>
</div><!--BOX ENDS-->

All’s thats needed now is to stick some content inside each box. The content you choose to display and how you display it will determine what styles you have to put inside your style sheet. For instance if you look at the code below you’ll see what ive put in my three product boxes.

1
2
3
4
5
6
7
8
9
10
11
12
<div class="services"><!--BOX #1 STARTS-->
<div class="services-inside">
<h2>product #1 here</h2>
<h2 class="boxtitle2">product short info</h2>
<p><img src="thumbnails/03.gif" alt="Product Sample" width="200" height="170" class="imgfloat-right" />Lorem ipsum dolor sit amet, consectetur adipiscing elit. Donec iaculis porttitor massa eu scelerisque. Pellentesque habitant morbi tristique senectus et netus et malesuada fames ac turpis egestas. Mauris eget metus orci, et venenatis turpis. Quisque felis velit, sollicitudin ac pellentesque vehicula, fermentum ut velit. <strong><em><a href="#">Etiam tellus ipsum, posuere nec molestie in, ultrices vel enim</a></em></strong><a href="#">.</a> Donec vel est orci. Donec diam leo, fringilla sit amet vehicula eu, dictum quis elit.</p>
<ul class="service-list">
<li>Service #1 - Lorem ipsum dolor sit amet, consectetur adipiscing elit.</li>
<li>Service #2 - Lorem ipsum dolor sit amet, consectetur adipiscing elit.</li>
<li>Service #3 - Lorem ipsum dolor sit amet, consectetur adipiscing elit.</li>
</ul>
</div>
</div><!--BOX ENDS-->
1
2
3
4
5
6
7
8
9
10
11
12
<div class="services"><!--BOX #2 STARTS-->
<div class="services-inside">
<h2>product #2 here</h2>
<h2 class="boxtitle2">product short info</h2>
<p><img src="thumbnails/01.gif" alt="Product Sample" width="200" height="170" class="imgfloat-left" />Lorem ipsum dolor sit amet, consectetur adipiscing elit. Donec iaculis porttitor massa eu scelerisque. Pellentesque habitant morbi tristique senectus et netus et malesuada fames ac turpis egestas. Mauris eget metus orci, et venenatis turpis. Quisque felis velit, sollicitudin ac pellentesque vehicula, fermentum ut velit. <strong><em><a href="#">Etiam tellus ipsum, posuere nec molestie in, ultrices vel enim</a></em></strong><a href="#">.</a> Donec vel est orci. Donec diam leo, fringilla sit amet vehicula eu, dictum quis elit.</p>
<ul class="service-list">
<li>Service #1 - Lorem ipsum dolor sit amet, consectetur adipiscing elit.</li>
<li>Service #2 - Lorem ipsum dolor sit amet, consectetur adipiscing elit.</li>
<li>Service #3 - Lorem ipsum dolor sit amet, consectetur adipiscing elit.</li>
</ul>
</div>
</div><!--BOX ENDS-->
1
2
3
4
5
6
7
8
9
10
11
12
<div class="services"><!--BOX #3 STARTS-->
<div class="services-inside">
<h2>product #1 here</h2>
<h2 class="boxtitle2">product short info</h2>
<p><img src="thumbnails/03.gif" alt="Product Sample" width="200" height="170" class="imgfloat-right" />Lorem ipsum dolor sit amet, consectetur adipiscing elit. Donec iaculis porttitor massa eu scelerisque. Pellentesque habitant morbi tristique senectus et netus et malesuada fames ac turpis egestas. Mauris eget metus orci, et venenatis turpis. Quisque felis velit, sollicitudin ac pellentesque vehicula, fermentum ut velit. <strong><em><a href="#">Etiam tellus ipsum, posuere nec molestie in, ultrices vel enim</a></em></strong><a href="#">.</a> Donec vel est orci. Donec diam leo, fringilla sit amet vehicula eu, dictum quis elit.</p>
<ul class="service-list">
<li>Service #1 - Lorem ipsum dolor sit amet, consectetur adipiscing elit.</li>
<li>Service #2 - Lorem ipsum dolor sit amet, consectetur adipiscing elit.</li>
<li>Service #3 - Lorem ipsum dolor sit amet, consectetur adipiscing elit.</li>
</ul>
</div>
</div><!--BOX ENDS-->

Each box contains a short paragraph, an image floated either left or right and again a small list. We can use the orginal P tag styles from our style sheet already, aswell as the list we already styled inside services section. All’s we need to style are some image left and right float options so we can float our product images either left or right. We can do this by adding the following css into our stylesheet.

1
2
3
4
5
6
7
8
9
10
11
12
13
14
15
16
17
18
19
20
21
22
23
/* ----------PRODUCT'S PAGE STYLES---------- */
.imgfloat-left {
    float:left;
    padding: 5px;
    background-color: #000000;
    border: 1px solid #383838;
    margin-right: 6px;
    margin-bottom: 6px;
    margin-top: 6px;
    margin-left: 6px;
}
.imgfloat-right {
    float:right;
    padding: 5px;
    background-color: #000000;
    border: 1px solid #383838;
    margin-left: 6px;
    margin-bottom: 6px;
    margin-top: 6px;
    margin-right: 6px;
}

Save your work and test your template in your browser. Here’s how mine looks.

Your ads will be inserted here by

AdSense Now!.

Please go to the plugin admin page to paste your ad code.


Step2

Copy and paste the services page again, only this rename the file to testimonials.html. Remove ALL the content between the header ending div and container ending div. Were now going to make a new mockup but using some of the same styles. In the testimonials area we’ll have boxes the same as our products page but at the bottom of each box we’ll have some star ratings. The code looks like this.

1
2
3
4
5
6
7
8
9
10
11
<div class="testimonial"><!--BOX STARTS-->
<div class="testimonial-inside">
<h2>customer #1</h2>
<h2 class="boxtitle2">Thomas davis</h2>
<p>Lorem ipsum dolor sit amet, consectetur adipiscing elit. Donec iaculis porttitor massa eu scelerisque. Mauris eget metus orci, et venenatis turpis. Quisque felis velit, sollicitudin ac pellentesque vehicula, fermentum ut velit. </p>
<div class="rating">
<img src="images/star.png" alt="1" /><img src="images/star.png" alt="2" /><img src="images/star.png" alt="3" /><img src="images/star.png" alt="4" /><img src="images/star.png" alt="5" />
</div>
</div>
</div><!--BOX ENDS-->

We now need to style everything, we’ll use the same styles as our services page classes, but we’ll use the class testimonial instead. We’ve also created a new class called rating which will be for our stars. The css looks like this.

1
2
3
4
5
6
7
8
9
10
11
12
13
14
15
16
17
18
19
20
21
22
23
24
25
26
27
28
29
30
31
32
33
34
/* ----------TESTIMONIAL'S PAGE STYLES---------- */
.testimonial {
    float: left;
    border: 1px solid #121212;
    margin-bottom: 15px;
    float: left;
    width: 898px;
    margin-right: 25px;
    background-color: #0c0c0c;
}
.testimonial-inside {
    background-color: #0c0c0c;
    border: 1px solid #030303;
    float: left;
    width: 876px;
    padding: 10px;
}
.testimonial-inside p {
    padding-top: 10px;
}
.rating {
    float: left;
    height: 18px;
    width: 876px;
    margin-top: 10px;
}
.rating img{
    float: right;
}

You can now copy and paste the code for each box underneath each other to create more testimonial boxes. Just change the information inside each box. My testimonials page looks like this.


Step3

Copy and paste your services page once more then rename to contact.html, also on this page we’ll be using the services page classes.

1
2
3
4
5
6
7
<div class="services"><!--BOX STARTS-->
<div class="services-inside">
<h2>contact us</h2>
<h2 class="boxtitle2">get in touch using the contact form below</h2>
CONTENT HERE
</div>
</div><!--BOX ENDS-->

Inside the contact page were going to need a form and maybe a short paragraph with some info. On the text fields that we use we’ll assign some classes which will enable us to style the form and text boxes etc… via our style sheet.

1
2
3
4
5
6
7
8
9
10
11
12
13
14
15
16
17
18
19
20
21
22
23
24
25
26
27
28
29
30
31
<div class="services"><!--BOX STARTS-->
<div class="services-inside">
<h2>contact us</h2>
<h2 class="boxtitle2">get in touch using the contact form below</h2>
<p>Lorem ipsum dolor sit amet, consectetur adipiscing elit. Donec iaculis porttitor massa eu scelerisque. Pellentesque habitant morbi tristique senectus et netus et malesuada fames ac turpis egestas. Mauris eget metus orci, et venenatis turpis. Quisque felis velit, sollicitudin ac pellentesque vehicula, fermentum ut velit. Donec vel est orci. Donec diam leo, fringilla sit amet vehicula eu, dictum quis elit. </p>
<form id="contact" name="contact" method="post" action="">
  <label>
  <input name="textfield" type="text" class="textfield" id="textfield" value="Name:" size="45" />
  </label>
  <br />
  <label>
  <input name="textfield2" type="text" class="textfield" id="textfield2" value="E-Mail:" size="45" />
  </label>
  <br />
  <label>
  <input name="textfield3" type="text" class="textfield" id="textfield3" value="Subject:" size="45" />
  </label>
  <br />
  <label>
  <textarea name="textarea" cols="45" rows="10" class="textbox" id="textarea">Information:</textarea>
  </label>
  <br />
  <label>
  <input name="button" type="submit" class="form-button" id="button" value="Submit" />
  </label>
  <label>
  <input name="button2" type="reset" class="form-button" id="button2" value="Reset" />
  </label>
</form>
</div>
</div><!--BOX ENDS-->

The css for our contact form looks like this.

1
2
3
4
5
6
7
8
9
10
11
12
13
14
15
16
17
18
19
20
21
22
23
24
25
26
27
28
/* ----------CONTACT PAGE STYLES---------- */
.textfield, .textbox {
    background-color: #000000;
    border: 1px solid #383838;
    padding: 2px;
    margin-top: 5px;
    margin-bottom: 5px;
    color: #CCCCCC;
    font-style: italic;
}
.form-button {
    background-color: #000000;
    border: 1px solid #383838;
    padding: 4px;
    color: #CCCCCC;
    margin-right: 5px;
    font-size: 0.8em;
}
#contact {
    margin-top: 10px;
    width: 300px;
    float: left;
    margin-right: 10px;
    margin-bottom: 10px;
}

Your contact page should now look something like this.


Step4

All your pages should now be set and in working order. Before your template goes live you’ll have to change the links in your navigation, you will also have to set the ID of current for each individual page link. So for example if your on the contact page the link for your contact page in your navigation should have an ID of current. If your on the index page your index page should have an ID of current.

Thats all for this tutorial you should now have a good idea of how to create a 5page website. Its not as hard as some people think, once you’ve coded the main page its just as simple as copy and paste for the others. Dont forget to subscribe via rss and twitter also please could you promote this post along with many of my others. Thats it till next time, look out for the next tutorial when we’ll be intergrating a jquery plugin called jflow for our featured area.

Other Parts To This Project

Download The FREE Template

You can download the FREE CSS Template by clicking HERE.

Your ads will be inserted here by

AdSense Now!.

Please go to the plugin admin page to paste your ad code.

My PROject Pt.2: PSD To HTML

Your ads will be inserted here by

AdSense Now!.

Please go to the plugin admin page to paste your ad code.

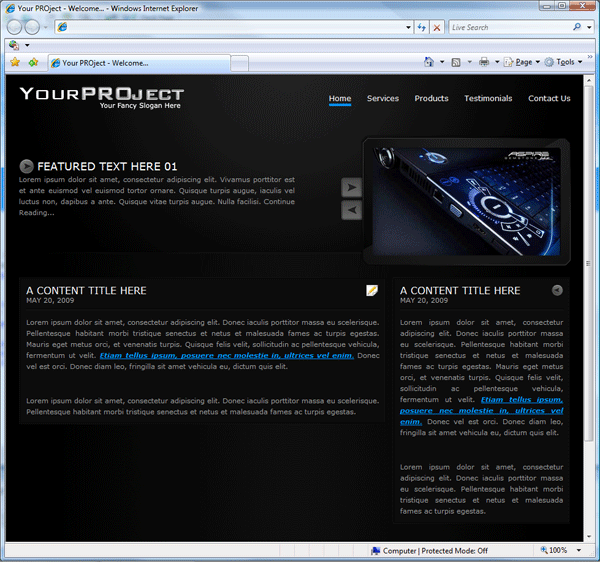
Hello welcome to part 2 of the 5 page template series. Today we’ll be converting our PSD into a one page working CSS template. In part 3 we’ll begin to add our additional pages.


Right lets get started, the first thing you need to do is create a blank HTML and blank CSS file inside a folder called “your project”, save your blank HTML file as index.html and your blank CSS file as styles.css. Also inside your folder create an empty folder called images.
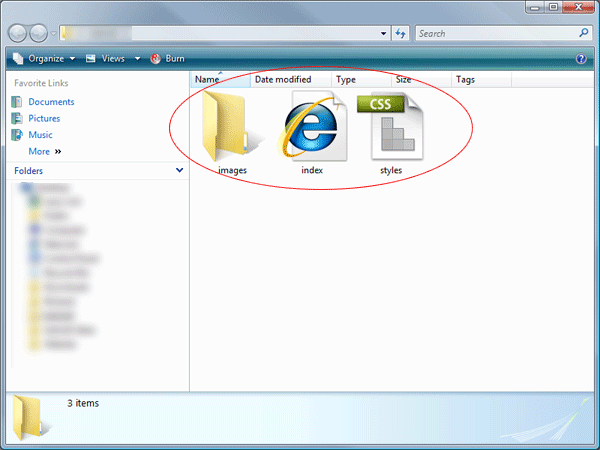
Step1

Open up your blank HTML file and add your website title inbetween the title tag, underneath the title tag link your css file.

1
2
3
4
5
6
7
8
9
10
11
12
<!DOCTYPE html PUBLIC "-//W3C//DTD XHTML 1.0 Transitional//EN" "http://www.w3.org/TR/xhtml1/DTD/xhtml1-transitional.dtd">
<html xmlns="http://www.w3.org/1999/xhtml">
<head>
<meta http-equiv="Content-Type" content="text/html; charset=utf-8" />
<title>Your PROject - Welcome...</title>
<link href="styles.css" rel="stylesheet" type="text/css" />
</head>
<body>
</body>
</html>

We can now start to mockup the top half of our layout, we start with a container div, this will be the big box our website lives in. Everything we create will go inside this container div.

1
2
3
4
5
6
7
8
9
10
11
12
13
14
15
16
17
18
<!DOCTYPE html PUBLIC "-//W3C//DTD XHTML 1.0 Transitional//EN" "http://www.w3.org/TR/xhtml1/DTD/xhtml1-transitional.dtd">
<html xmlns="http://www.w3.org/1999/xhtml">
<head>
<meta http-equiv="Content-Type" content="text/html; charset=utf-8" />
<title>Your PROject - Welcome...</title>
<link href="styles.css" rel="stylesheet" type="text/css" />
</head>
<body>
<div id="container"><!--CONTAINTER STARTS-->
EVERYTHING GOES INBETWEEN HERE
</div><!--CONTAINER ENDS-->
</body>
</html>

Our next div will be our header div.

1
2
3
4
5
6
7
<div id="container"><!--CONTAINTER STARTS-->
<div id="header"><!--HEADER STARTS-->
</div><!--HEADER ENDS-->
</div><!--CONTAINER ENDS-->

Inside our header div we need to add our website logo and navigation. Ive chosen to also wrap the logo and navigation in another div called top-elements, ive done this because i dont want any alignment / postioning issues when we code the featured area. So our code now looks like this.

1
2
3
4
5
6
7
8
9
10
11
12
13
14
15
16
17
<div id="container"><!--CONTAINTER STARTS-->
<div id="header"><!--HEADER STARTS-->
<div id="top-elements"><!--TOP ELEMENTS START-->
<div id="logo"><!--LOGO STARTS-->
</div><!--LOGO ENDS-->
<div id="nav-bar"><!--NAVIGATION STARTS-->
</div><!--NAVIGATION ENDS-->
</div><!--TOP ELEMENTS END-->
</div><!--HEADER ENDS-->
</div><!--CONTAINER ENDS-->

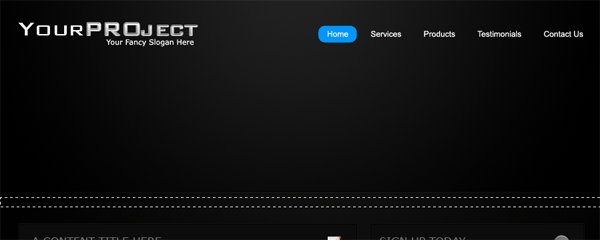
Before we start to add our styles in the style sheet we need to create a few images from our PSD file. Open up your PSD file in photoshop, hide all the layers associated with the featured area then make a selection like this.
 

Step2

Make sure you select the background underneath the divider line, the selection should also be the whole width of your canvas (900px). Save the file as “bg.png” inside your images folder. You also need to make a selection around your website logo.

Step3

Get your selection around the logo has tight as you can get it. Copy and paste your logo to a new canvas with a transparant background then save the image as “logo.png”. We now also need the background in the header, so make a selection around the top part of the header including the divider line.

Step4

You dont have to use the big image if you dont want to, if you prefer you can use a chunk of the background and repeat it then code the divider line seperatly. Right now we have some images to work with lets begin to add our css styles, head over to your css style sheet and add the following code. (refer to commented code for each style)

1
2
3
4
5
6
7
8
9
10
11
12
13
14
15
16
17
18
19
20
21
22
23
24
25
26
27
28
29
30
31
32
33
34
35
36
37
38
39
40
41
42
43
44
45
46
47
48
49
50
51
52
53
54
55
56
57
58
59
60
61
62
63
64
65
66
67
68
69
70
71
72
73
74
75
76
77
78
79
80
81
82
83
84
85
86
87
88
89
90
91
92
93
94
95
96
97
98
99
100
101
102
103
104
105
106
107
108
109
110
111
112
113
114
115
116
117
118
119
120
121
122
123
124
125
126
127
128
129
130
131
132
133
134
135
136
137
138
139
140
141
142
143
144
145
/* ----------MAIN BODY STYLES---------- */
* {
    margin: 0px; /*sets 0 margin to the whole website*/
    padding: 0px; /*sets 0 padding to the whole website*/
}
body {
    font-family: Verdana, Arial, Helvetica, sans-serif; /*website font family*/
    background-color: #000000; /*website background color*/
    color: #999a9a; /*website default text color*/
    background-image: url(images/bg.png); /*our background image*/
    background-repeat: repeat-y; /*repeats background image along the Y axis*/
    background-position: center; /*centers our background*/
}
a:link {
    color: #0096FF; /*color of our hyperlinks*/
}
a:visited {
    color: #FFFFFF; /*color of visited hyperlinks*/
}
a:hover {
    color: #FFFFFF; /*color of the hyperlink when hovered over*/
}
a:active {
    color: #0096FF; /*color of our active links*/
}
p {
    font-size: 0.7em; /*sets default paragraph text size*/
    line-height: 18px; /*sets default paragraph line height*/
    text-align: justify; /*justifys our paragraphs*/
}
h1 {
    color: #727372; /*color of our H1 tag*/
    text-transform: uppercase; /*sets all H1 tags to uppcase*/
    font-size: 1.2em; /*sets H1 font size*/
    font-weight: normal; /*sets H1 font weight to normal*/
}
h2 {
    color: #FFFFFF; /*color of our H2 tag*/
    text-transform: uppercase; /*sets all H2 tags to uppcase*/
    font-size: 1em; /*sets H2 font size*/
    font-weight: normal; /*sets H2 font weight to normal*/
}
h3 {
    color: #727372; /*color of our H3 tag*/
    text-transform: uppercase; /*sets all H3 tags to uppcase*/
    font-size: 0.9em; /*sets H3 font size*/
    font-weight: normal; /*sets H3 font weight to normal*/
}
h4 {
    color: #727372; /*color of our H4 tag*/
    text-transform: uppercase; /*sets all H4 tags to uppcase*/
    font-size: 0.8em; /*sets H4 font size*/
    font-weight: normal; /*sets H4 font weight to normal*/
}
img {
    border:none; /*removes borders from images*/
}
.float-left {
    float:left; /*class for float left*/
}
.float-right {
    float:right; /*class for float right*/
}
/* ----------MAIN CONTAINER STYLES---------- */
#container {
    width: 900px; /*width of our container*/
    margin-top: 0px; /*sets top margin to 0*/
    margin-right: auto; /*sets right margin to auto which centers our website*/
    margin-left: auto; /*sets left margin to auto which centers our website*/
}
/* ----------HEADER STYLES---------- */
#header {
    background-image: url(images/hd_bg.png); /*sets our header background image*/
    background-repeat: no-repeat; /*sets our background to no repeat*/
    float: left; /*floats our header left*/
    width: 900px; /*gives our header a width of 900px*/
}
#top-elements {
    float: left; /*floats top elements left*/
    width: 900px; /*sets our top elements width to 900px*/
    padding-top: 20px; /*gives our top elements a padding of 20px*/
}
/* ----------LOGO STYLES---------- */
#logo {
    float: left; /*floats our logo left*/
    height: 37px; /*gives our logo a height of 37px same as our logo image*/
    width: 270px; /*sets our logo div's height to 270px same as our logo image*/
}
/* ----------NAVIGATION STYLES---------- */
#nav-bar {
    float: right; /*floats our navigation right*/
    height: 29px; /*gives our navigation a height of 29px*/
    padding-top: 8px; /*gives our navigation top padding*/
    margin-bottom: 40px; /*gives our navigation a bottom margin*/
}
.navlinks ul {
    margin: 0px; /*gives our unordered list 0 margin*/
    padding: 0px; /*gives our unordered list 0 padding*/
}
.navlinks li {
    display: inline; /*displays our navigation links inline*/
    list-style-type: none; /*removes bullets points from our navigation*/
    padding-left: 20px; /*gives our navigation list items left padding*/
}
.navlinks li a {
    text-decoration: none; /*removes bottom line from nav links*/
    font-size: 12px; /*sets navigation font size*/
    color: #FFFFFF; /*sets navigation link color*/
    padding-bottom: 2px; /*gives our navigation links bottom padding*/
}
.navlinks li a:hover {
    border-bottom-width: medium; /*gives links a medium thickness bottom border*/
    border-bottom-style: solid; /*makes the bottom border line solid*/
    border-bottom-color: #0096ff; /*sets the color of the border*/
}
.navlinks li.current a{
    border-bottom-width: medium; /*gives links a medium thickness bottom border*/
    border-bottom-style: solid; /*makes the bottom border line solid*/
    border-bottom-color: #0096ff; /*sets the color of the border*/
}

Loads of css, believe it or not but that huge chunk isnt even half of the css file. In the css code above we have set our header tags up to H4, we’ve added the styles for our hyperlinks and some minor styles for images and paragraphs all pretty straight forward stuff. We have also set our styles for our container, logo and navigation, so now we can start adding our items to our header. Head over to your index.html file, inbetween the logo start and ending div insert your logo as an image. Inbetween the start and ending nav-bar div add a simple unorder list with a class of navlinks. The code looks like this.

1
2
3
4
5
6
7
8
9
10
11
12
13
<div id="logo"><!--LOGO STARTS-->
<img src="images/logo.png" alt="Welcome To Your PROject" />
</div><!--LOGO ENDS-->
<div id="nav-bar"><!--NAVIGATION STARTS-->
<ul class="navlinks">
<li class="current"><a href="index.php">Home</a></li>
<li><a href="services.php">Services</a></li>
<li><a href="products.php">Products</a></li>
<li><a href="testimonials.php">Testimonials</a></li>
<li><a href="contact.php">Contact Us</a></li>
</ul>
</div><!--NAVIGATION ENDS-->

Notice in our style sheet the navigation should have a medium solid blue line underneath each link. If you test your layout in firefox and internet explorer you will see that internet explorer doesnt have the bottom line. We now have to do some cross browser styles to make it work. Open up a blank notepad file and save it as “ie.css” inside your main folder. Opne up the ie.css file inside your code editor, inside this file we need to add all our little fixes for internet explorer. To fix our little navigation problem we need to add these styles.

1
2
3
4
5
6
7
.navlinks li a:hover {
    position: relative;
}
.navlinks li.current a{
    position: relative;
}

Before we go ahead and test out our layout again we need to link our ie.css file in our index.html file, when we link the ie.css file we dont do it in the normal way we basically want to insert a statment which says “if im using internet explorer overwrite the following styles”. We can do that by adding this bit of code inside the head section of our index.html file.

1
2
3
<!--[if IE 7]>
<link href="ie.css" rel="stylesheet" type="text/css" />
<![endif]-->

Save your work and test your layout in firefox and internet explorer, the navigation should now work as planned. Also in our navigation code you will notice the “home” link has an ID of current this ID of current will basically keep the link hover styling for that specific page, so if your on the home page the medium solid blue line will stay under the link “home” when we create our additional pages later on we’ll need to remove the ID of current from the home link and add it to another link which ever page your making next.

Your ads will be inserted here by

AdSense Now!.

Please go to the plugin admin page to paste your ad code.

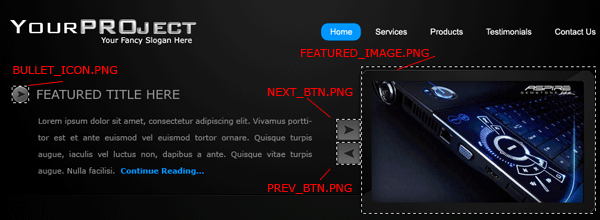
Moving on… we now have to code up our featured section, head over to your PSD file, the images we need to slice are the little bullet point in the featured title area, our featured image with frame, our left button and our right button.
 

Step5

Save all images separatly on transparant backgrounds within your images folder. We can now begin to add our div’s for our featured area. Add the following code underneath our ending div for our top elements but above our header ending div. Ive also added dummy text and titles for our featured area.

1
2
3
4
5
6
7
8
9
10
11
12
13
14
15
16
17
</div><!--TOP ELEMENTS END-->
<div id="featured"><!--FEATURED CONTENT STARTS-->
<div class="featured-text"><!--FEATURED TEXT STARTS-->
<h1 class="featured">featured text here 01</h1>
<p>Lorem ipsum dolor sit amet, consectetur adipiscing elit. Vivamus porttitor est et ante euismod vel euismod tortor ornare. Quisque turpis augue, iaculis vel luctus non, dapibus a ante. Quisque vitae turpis augue. Nulla facilisi.  Continue Reading...</p>
</div><!--FEATURED TEXT ENDS-->
<div id="featured-image01"><!--FEATURED IMAGE STARTS-->
<div class="featured-buttons"><!--NEXT AND PREVIOUS BUTTONS STARTS-->
<div class="featured-btn"><img src="images/next_btn.png" alt="Next"  /></div>
<div class="featured-btn"><img src="images/prev_btn.png" alt="Previous" /></div>
</div><!--NEXT AND PREVIOUS BUTTONS END-->
</div><!--FEATURED IMAGE ENDS-->
</div><!--FEATURED CONTENT ENDS-->
</div><!--HEADER ENDS-->

We can now style our featured content area using the following styles. (please refer to commented code for each style).

1
2
3
4
5
6
7
8
9
10
11
12
13
14
15
16
17
18
19
20
21
22
23
24
25
26
27
28
29
30
31
32
33
34
35
36
37
38
39
40
41
42
43
44
45
46
47
48
49
50
51
52
53
54
55
56
57
58
59
60
61
62
63
64
/* ----------FEATURED CONTENT STYLES---------- */
#featured {
    float: right; /*floats our featured area right*/
    width: 900px; /*gives our featured area a width of 900px*/
    margin-bottom: 20px; /*gives our featured area a bottom margin*/
}
.featured-text {
    float: left; /*floats our featured text left*/
    width: 450px; /*sets our featured text box width*/
    margin-top: 40px; /*gives our featured text box a top margin*/
}
#featured-text p {
    font-size: 0.7em; /*sets our featured text paragraph font size*/
    line-height: 24px; /*sets our featured text line height*/
    text-align: justify; /*justifys our paragraphs*/
    padding-top: 10px; /*adds top padding to our featured text paragraph*/
}
#featured-image01 {
    float: right; /*floats our featured images rights*/
    width: 449px; /*gives our featured images a fixed width same as our images*/
    background-repeat: no-repeat; /*stops images from repeating*/
    background-position: right; /*sets background position right*/
    height: 214px; /*gives our featured image a fixed height same as our images*/
}
#featured-image01 {
    background-image: url(images/featured_image.png); /*our featured image #1*/
}
h1.featured {
    color: #FFFFFF; /*sets featured H1 color*/
    text-transform: uppercase; /*transforms featured H1 tag to uppercase*/
    font-size: 18px; /*sets font size of featured H1 tag*/
    background-image: url(images/bullet_icon.png); /*addeds our bullet image to our featured H1 tag*/
    background-repeat: no-repeat; /*stops bullet from repeating*/
    padding-left: 30px; /*adds padding to the left of our featured H1 tag*/
    line-height: 24px; /*sets featured H1 tag's line height*/
}
#featured-image {
    float: right; /*floats our featured image right*/
    width: 449px; /*sets our featured image width same dimensions as our featured image*/
    background-image: url(images/featured_image.png); /*adds a featured image as a background*/
    background-repeat: no-repeat; /*stops featured image repeatsing*/
    background-position: right; /*sets our featured image backgroud position*/
    height: 214px; /*adds a fixed height same dimensions as our featured image*/
}
.featured-btn {
    height: 34px; /*adds a fixed height*/
    width: 34px; /*adds a fixed width*/
    cursor: pointer; /*sets cursor to point cursor*/
}
.featured-buttons {
    height: 144px; /*sets fixed height*/
    width: 34px; /*sets fixed width*/
    margin-left: 75px; /*adds left margin*/
    padding-top: 70px; /*adds top padding*/
}

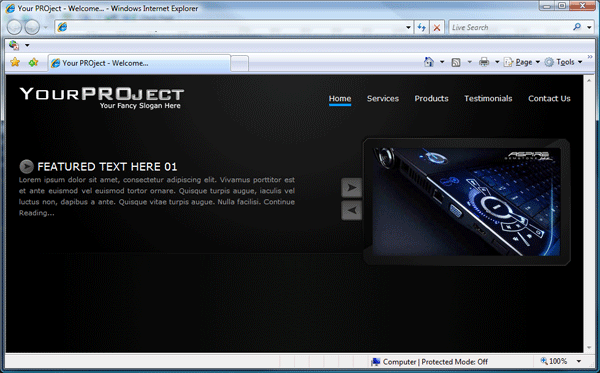
Test your layout inside your browser and see how it looks i have something like this.
 

Step6

Time to move onto our main content area, we’ll be start with the left content first. The boxes for our content will all be made using css. If you look at the PSD file you will see the boxes have two strokes in two different colors we can accomplish this by creating a div with one of the borders, then inside that div create another div slightly smaller with the other border added. We mock it up like this.

1
2
3
4
5
6
7
8
9
10
11
<div id="content-left"><!--CONTENT AREA STARTS-->
<div class="box"><!--BOX STARTS-->
<div class="box-inside">
<h2 class="boxtitle1">a content title here</h2>
<h2 class="boxtitle2">May 20, 2009</h2>
<p>SOME TEXT HERE</p>
</div>
</div><!--BOX ENDS-->
</div><!--CONTENT AREA ENDS-->

The styles for our left content area look like this.

1
2
3
4
5
6
7
8
9
10
11
12
13
14
15
16
17
18
19
20
21
22
23
24
25
26
27
28
29
30
31
32
33
34
35
36
37
38
39
40
41
42
43
44
45
46
47
/* ----------CONTENT LEFT STYLES---------- */
#content-left {
    float: left; /*floats left*/
    width: 600px; /*adds a fixed width*/
    padding-bottom: 40px; /*adds bottom padding*/
}
.box {
    float: left; /*floats left*/
    width: 498px; /*adds a fixed width*/
    border: 1px solid #121212; /*adds a 1 px colored border*/
    margin-bottom: 15px; /*adds a bottom margin*/
    width: 490px; /*adds a fixed width*/
}
.box-inside {
    background-color: #0c0c0c; /*adds a background color*/
    border: 1px solid #030303; /*adds a 1px colored border*/
    float: left; /*floats left*/
    width: 576px; /*adds a fix width */
    padding: 10px; /*adds padding all the way around*/
}
.box-inside p {
    padding-top: 10px; /*adds top padding*/
}
.boxtitle1 {
    color: #FFFFFF; /*text color*/
    text-transform: uppercase; /*transforms text to uppercase*/
    font-size: 1em; /*sets font size*/
    font-weight: normal; /*sets font weight*/
    background-image: url(images/post_icon.png); /*adds our right icon to our header*/
    background-repeat: no-repeat; /*stops icon repeating*/
    background-position: right; /*positions background right*/
}
.boxtitle2 {
    color: #aaaaaa; /*sets font color*/
    text-transform: uppercase; /*transforms text to uppercase*/
    font-size: 0.7em; /*sets font size*/
    background-image: url(images/divider.png); /*adds our divider image*/
    background-repeat: repeat-x; /*repeats our divider image horizontally*/
    background-position: bottom; /*positions divider at the bottom*/
    padding-bottom: 10px; /*adds bottom padding*/
}

If you look at the class “boxtitle1″ you will see it has a background image of “post_icon.png”, this is the little paper icon in the right side of content box. Cut the icon from your PSD and save it as “post_icon.png”, You will also need to cut out the divider from underneath sample header. Thats all you need to do for the left content, if you want more boxes all’s you need to do is copy all the code from the class “box” then paste it underneath. Alter the content as needed. So two boxes would looks like this.

1
2
3
4
5
6
7
8
9
10
11
12
13
14
15
16
17
18
19
<div id="content-left"><!--CONTENT AREA STARTS-->
<div class="box"><!--BOX STARTS-->
<div class="box-inside">
<h2 class="boxtitle1">a content title here</h2>
<h2 class="boxtitle2">May 20, 2009</h2>
<p>SOME TEXT HERE</p>
</div>
</div><!--BOX ENDS-->
<div class="box"><!--BOX STARTS-->
<div class="box-inside">
<h2 class="boxtitle1">a content title here</h2>
<h2 class="boxtitle2">May 20, 2009</h2>
<p>SOME TEXT HERE</p>
</div>
</div><!--BOX ENDS-->
</div><!--CONTENT AREA ENDS-->

We code and style the sidebar in exactly the same way, only difference is the widths will be alot smaller and you need to use a different icon.

1
2
3
4
5
6
7
8
9
10
11
<div id="content-right"><!--CONTENT AREA STARTS (sidebar)-->
<div class="sidebar"><!--BOX STARTS-->
<div class="sidebar-inside">
<h2 class="sidebar-title1">a content title here</h2>
<h2 class="sidebar-title2">May 20, 2009</h2>
<p>CONTENT HERE</p>
</div>
</div><!--BOX ENDS-->
</div><!--CONTENT AREA ENDS (sidebar)-->

The css looks like this.

1
2
3
4
5
6
7
8
9
10
11
12
13
14
15
16
17
18
19
20
21
22
23
24
25
26
27
28
29
30
31
32
33
34
35
36
37
38
39
40
41
42
43
44
/* ----------CONTENT RIGHT (sidebar) STYLES---------- */
#content-right {
    float: right; /*floats right*/
    width: 290px; /*sets a fixed width*/
    margin-left: 10px; /*adds a left margin*/
    padding-bottom: 40px; /*adds bottom padding*/
}
.sidebar {
    float: left; /*floats left*/
    width: 287px; /*adds a fixed width*/
    border: 1px solid #121212; /*adds a 1 px colored border*/
    margin-bottom: 15px; /*adds a bottom margin*/
    float: left; /*floats left*/
}
.sidebar-inside {
    background-color: #0c0c0c; /*sets background color*/
    border: 1px solid #030303; /*adds a 1px colored border*/
    float: left; /*floats left*/
    width: 266px; /*sets a fixed width*/
    padding: 10px; /*adds padding all the way around*/
}
.sidebar-inside p {
    padding-top: 10px; /*adds top padding*/
}
.sidebar-title1 {
    background-image: url(images/sidebar_bullet.png); /*adds our sidebar bullet icon*/
    background-repeat: no-repeat; /*stops background from repeating*/
    background-position: right; /*positions background right*/
}
.sidebar-title2 {
    color: #aaaaaa; /*sets text color*/
    text-transform: uppercase; /*transforms text to uppercase*/
    font-size: 0.7em; /*sets font size*/
    background-image: url(images/divider.png); /*adds our divider image*/
    background-repeat: repeat-x; /*repeats divider imaage horizontally*/
    background-position: bottom; /*positions background bottom*/
    padding-bottom: 10px; /*adds bottom padding*/
}

Step8

Now for our footer,…. we need to create our footer outside of our container div as were having the footer span across the hole browser. You will need two images for the footer, the first one will be the last 1 – 2 pixels from the edge of the canvas and the other one will be the whole footer image containing our radial gradient image.

Step8

We then mock up our footer like this.

1
2
3
4
5
6
7
8
9
10
11
</div><!--CONTAINER ENDS-->
<div id="footer"><!--FOOTER STARTS-->
<div id="footer-content"><!--FOOTER CONTENT STARTS-->
<p>Copyright &copy; your project | All Rights Reserved</p>
<p>Design By <a href="http://www.richard-carpenter.co.uk">Richard Carpenter</a></p>
</div><!--FOOTER CONTENT ENDS-->
</div><!--FOOTER ENDS-->
</body>
</html>

We then add our footer css styling like this.

1
2
3
4
5
6
7
8
9
10
11
12
13
14
15
16
17
18
19
20
21
22
23
/* ----------FOOTER STYLES---------- */
#footer {
    background-image: url(images/footer_bg.png); /*adds our footer background image*/
    background-repeat: repeat-x; /*repeats background horizontally*/
    height: 140px; /*adds a fixed height*/
    clear: both; /*clears both floats*/
    margin-top: 40px; /*adds a top margin*/
}
#footer-content {
    background-image: url(images/footer_contentbg.png); /*adds our footer background image*/
    background-repeat: no-repeat; /*stops background repeating*/
    margin: auto; /*centers our footer*/
    height: 90px; /*adds a fixed height*/
    width: 900px; /*adds a fixed width*/
    clear: both; /*clear's both floats*/
    padding-top: 50px; /*adds top padding*/
}
#footer-content p {
    text-align: center; /*aligns text center*/
}

Your first page should now be completed, watch out for the 3rd part where we’ll be creating additional pages. Subscribe to our RSS feeds to stay updated. See you next time.

Other Parts To This Project


Download The FREE Template

You can download the FREE CSS Template by clicking HERE.

Your ads will be inserted here by

AdSense Now!.

Please go to the plugin admin page to paste your ad code.

Your PROject Pt.1

Your ads will be inserted here by

AdSense Now!.

Please go to the plugin admin page to paste your ad code.

Hello welcome to another tutorial series. In this series we’ll be creating a website in photoshop then later on code it into a 5 page template. We’ll also be adding a nice jquery slide effect for our featured content section using JFlow.


lets get started firstlt create a new document 900 x 1090 pixels with a black background. Select the rectangular marquee tool and create a box at the top. Fill the box with a radial gradient using the colors #202121 and #000000.

Step1

At the very bottom of the rectangle create two 1 pixle lines ontop of each other spanning the width of your canvas.

Step2

Add a layer mask to your lines layer. With the gradient tool and a reflected gradient start from the middle and drag towards the edge of the canvas. Make sure forground is white and background color is black. The edges of your lines should blend into the background. You should have something like this.

Step3

In the top left hand corner add your website title and slogan. Ive chosen to add a few layer styles to the 2nd word in my title. The layer styles are as follows.

Step4

Step5

Step6

You should have something like this.

Step7

On the same level as your website title towards the right hand side add a simple navigation using the rounded rectangle to create a hover state. The color of the blue hover is #0096ff.

Step8

Underneath the website title add some featured content text with a title. Next to the title make a simple little icon/bullet point and place it next to the title.

Step9

On the right side of the header create a rounded rectangle, just big enough to fit inside the space provided. Make the rectangle over lap the header at the bottom.

Step10

Fill your selection with a radial gradient using the same technique as we did for the header background. Once you’ve filled your selection with the radial gradient add these layer styles.

Step11

Step12

You should now have something like this.

Step13

Ontop of the rounded rectangle make a selection like the image below using either the pen tool or the polygonal lasso tool.

Step14

Fill the selection with the color white then set layer opacity to 6%. Next find an image you want to use as your featured image. Im using an image of the acer gemstone blue laptop. Resize your image to fit inside the rounded rectangle leaving a good 10-15px all the way around.

Step15

Your ads will be inserted here by

AdSense Now!.

Please go to the plugin admin page to paste your ad code.

Once you’ve postioned your image add this inner shadow.

Step16

Using the rounded rectangle tool with a radius of 5pixels create two small buttons with arrows facing left and right.

Step17

The reason why the arrows are more to the left on the buttons is because the buttons will be tucked underneath our featured image. The layer styles for the buttons are as follow.

Step18

Step19

Step20

Tuck your buttons underneath your featured image.

Step21

Using the rectangular marquee tool make a selection from the two 1 pixel lines we created down to the rest of the canvas. Fill the selection in the same way we did our header background image. (radial gradient).

Step22

Select the rectangular marquee tool once again and create a selection underneath all the header elements.

Step23

Fill the selection with any color then add these layer styles.

Step24

Step25

Step26

Now we have our content box begin to add some dummy content. We’ll start off with a simple header in capitals, underneath the header add a simple time/date stamps.

Step27

Underneath the header and time/date stamp create those two 1pixel lines on top of each other again. (divider). Stretch the divider lines across the content box leaving about 10-15px either side.

Step28

Underneath the divider line begin to add your dummy content/images to your content box. Use the steps above to create more content boxes as needed.

Step29

Now for the footer, create a selection spanning the width of your canvas. Fill the selection with a reflected gradient using the colors #202020 & #111110. Duplicate your site title and slogan then move it down towards the left hand side of the footer. Add your copyright info on the right. When you’ve finished your footer you should have something like this.

Step30

Heres the finished result

finished

Hope you’ve enjoyed this tutorial, dont forget to subscribe via rss and twitter. Also please spend 2 minutes and promote this post using the icons below. Your help and support is much appreciated. Many Thanks.

Other Parts To This Project

Download The FREE Template

You can download the FREE CSS Template by clicking HERE.

Your ads will be inserted here by

AdSense Now!.

Please go to the plugin admin page to paste your ad code.

11 Free Web Templates

Your ads will be inserted here by

AdSense Now!.

Please go to the plugin admin page to paste your ad code.

Small selection of FREE CSS Templates and the odd FREE premium wordpress theme. Ive search the internet for hours and these are the only decent worth while free templates id recommend.


Frozen Age


Snow Glass


Impress


Squick


Forte Blue


Jewelry Shop

Your ads will be inserted here by

AdSense Now!.

Please go to the plugin admin page to paste your ad code.


Floral Impact


Liqidity Graph


Business Events


Green Web


Web Application


Your ads will be inserted here by

AdSense Now!.

Please go to the plugin admin page to paste your ad code.

Bloopress WordPress Theme

Your ads will be inserted here by

AdSense Now!.

Please go to the plugin admin page to paste your ad code.


Bloopress WordPress Theme

*Please refer to the read me file within the zip file for usuage.*

Your ads will be inserted here by

AdSense Now!.

Please go to the plugin admin page to paste your ad code.

License and Attribution

This layout is licensed under the Creative Commons license and can be used for personal purposes ONLY. No attribution is needed but it is always appreciated.

Your ads will be inserted here by

AdSense Now!.

Please go to the plugin admin page to paste your ad code.

JQuery Toggle

Your ads will be inserted here by

AdSense Now!.

Please go to the plugin admin page to paste your ad code.

Hello welcome to another tutorial, today il be showing you how to intergrate a toggle feature for your wordpress comments.


Lets face it blogs/websites nowadays can be very large in terms of the amount of content they have on display, especially if your using some kind of blogging software like wordpress where people can leave a comment at the bottom of every article. Wouldnt it be good if you could collapse your comments area into a little button?? well today il show you how to accomplish it. Im going to be doing this tutorial using the wordpress default theme, but should pretty much the same for every blog. The first thing we need to do is create a simple button in photoshop. Create a new canvas 27×54 pixles, theres enough canvas space with those dimensions to get two 27×27 buttons on. You need to create two buttons,

- The first button will be for the un-toggled state.
– The second button will be the toggled state.

Heres my two simple buttons.

Step1

Once you’ve created your two buttons save them inside the wordpress themes images folder. Ive called mine “toggle_button.png”.

Goto your theme directory and open up the “style.css”, “single.php”, “header.php” and “comments.php” files. Open up a blank notepad document and save the blank notepad document as “toggle.js” inside a folder called “js” inside your wordpress themes folder. You need to download the jquery libary file you can get that HERE once you’ve downloaded it make sure its inside your “js” folder, then rename the file to just “jquery.js”. inside your “header.php” file locate the code where your style sheets are.

Step2

Underneath all the style sheets link your js files.

1
2
3
4
5
6
7
8
9
10
11
12
13
14
15
16
17
18
19
20
<!DOCTYPE html PUBLIC "-//W3C//DTD XHTML 1.0 Transitional//EN" "http://www.w3.org/TR/xhtml1/DTD/xhtml1-transitional.dtd">
<html xmlns="http://www.w3.org/1999/xhtml" <?php language_attributes(); ?>>
<head profile="http://gmpg.org/xfn/11">
<meta http-equiv="Content-Type" content="<?php bloginfo('html_type'); ?>; charset=<?php bloginfo('charset'); ?>" />
<title><?php wp_title('&laquo;', true, 'right'); ?> <?php bloginfo('name'); ?></title>
<link rel="stylesheet" href="<?php bloginfo('stylesheet_url'); ?>" type="text/css" media="screen" />
<link rel="alternate" type="application/rss+xml" title="<?php bloginfo('name'); ?> RSS Feed" href="<?php bloginfo('rss2_url'); ?>" />
<link rel="alternate" type="application/atom+xml" title="<?php bloginfo('name'); ?> Atom Feed" href="<?php bloginfo('atom_url'); ?>" />
<!--START JS FILES-->
<script type="text/javascript" src="<?php bloginfo('template_directory'); ?>/js/jquery.js"></script>
<script type="text/javascript" src="<?php bloginfo('template_directory'); ?>/js/toggle.js"></script>
<!--END JS FILES-->
<link rel="pingback" href="<?php bloginfo('pingback_url'); ?>" />
<style type="text/css" media="screen">

Remember…. because your using wordpress you cant link your js files in the same way as if it were a CSS template unless your js files live outside the themes folder. So instead of a normal link we have to use the wordpress PHP template directory tag. Were all done with the header.php file now so save and close. Head over to your “single.php” file, within the single.php file you need to locate this chunk of code.

1
2
3
<?php comments_template(); ?>
<?php endwhile; else: ?>

Above the first line we need to add a simple H2 tag saying leave a comment.

1
2
3
4
<h2>Leave a comment</h2>
<?php comments_template(); ?>
<?php endwhile; else: ?>

We then need to add another H2 tag but with a class of toggle underneath our first H2 tag.

1
2
3
4
5
6
7
<h2>Leave a comment</h2>   
<h2 class="toggle</h2> 
<?php comments_template(); ?>
<?php endwhile; else: ?>

Inside our H2 tag with a class of toggle we can add some dynamic wordpress code from the comments.php file, which will basically say “No. of comments on name of post”. The php code for this is in the comments.php file. Open it up and locate this chunk of code.

Your ads will be inserted here by

AdSense Now!.

Please go to the plugin admin page to paste your ad code.


Step3

Copy the code from the comments.php file inbetween the H2 class of toggle in the single.php fie.

1
2
3
4
5
6
7
<h2>Leave a comment</h2>   
<h2 class="toggle"><a href="#"><?php comments_number('No Responses', 'One Response', '% Responses' );?> to &#8220;<?php the_title(); ?>&#8221;</a></h2>
<?php comments_template(); ?>
<?php endwhile; else: ?>

Now we dont want the bit of code we just copied to be displayed twice so in the comments.php file remove the code.

1
<h3 id="comments"><?php comments_number('No Responses', 'One Response', '% Responses' );?> to &#8220;<?php the_title(); ?>&#8221;</h3>

Underneath our H2 class of toggle we need to create a simple container for our comments to sit into, so we add a class of comments_container, end the DIV underneath the php comments template code.

1
2
3
4
5
6
7
8
9
10
11
<h2>Leave a comment</h2>   
<h2 class="toggle"><a href="#"><?php comments_number('No Responses', 'One Response', '% Responses' );?> to &#8220;<?php the_title(); ?>&#8221;</a></h2>
<div class="comments_container">
<?php comments_template(); ?>
</div>
<?php endwhile; else: ?>

We now need to style our new elements, add the styles right at the bottom of style.css. Please refer to the commented code for each style description.

1
2
3
4
5
6
7
8
9
10
11
12
13
14
15
16
17
18
19
20
21
22
23
24
25
26
27
28
29
30
31
32
33
34
35
36
37
38
39
40
41
/*--- TOGGLED COMMENTS --- */
h2.toggle {
    height: 27px; /*ADDS A HEIGH OF 27PX SAME AS OUR IMAGE*/
    line-height: 28px; /*ADDS 28PX LINE HEIGHT TO CENTER THE HEADER NEXT TO THE IMAGE*/
    width: 450px; /*WIDTH OF 450PX SAME AS OUR WORDPRESS DIV*/
    font-size: 20px; /*FONT SIZE OF 20PX*/
    font-weight: normal; /*FONT-WEIGHT NORMAL*/
    float: left; /*FLOATS OUR HEADER LEFT*/
    background-image: url(images/toggle_button.png); /*OUR PHOTOSHOP BUTTON IMAGE*/
    background-repeat: no-repeat; /*STOPS OUR BUTTON FROM REPEATING*/
    cursor: pointer; /*MAKES THE CURSOR CHANGE TO A POINT CURSOR ON MOUSE OVER*/
    margin-bottom: 5px; /*ADDS 5PX MARGIN TO THE BOTTOM*/
    padding-left: 40px; /*ADDS 40PX LEFT PADDING WHICH SHIFTS OUR HEADER TEXT AWAY FROM OUR IMAGE*/
    margin-top: 10px; /*ADDS A TOP MARGIN OF 10PX*/
    margin-right: 0px;
    margin-left: 0px;
    padding-top: 0px;
    padding-right: 0px;
    padding-bottom: 0px;
}
h2.toggle a {
    color: #417db2; /*COLOR OF OUR TEXT LINK*/
    text-decoration: none; /*REMOVES UNDERSCORE FROM THE LINK*/
    display: block; /*DISPLAYS LINK AS A BLOCK ELEMENT*/
}
h2.togglr a:hover {
    color: #417db2; /*TEXT COLOR OF OUR LINK ON MOUSE OVER*/
}
h2.active {
    background-position: left bottom; /*SHIFTS OUR PHOTOSHOP BUTTON IMAGE DOWN TO REVEAL OUR OTHER IMAGE*/
}
.comments_container {
    overflow: hidden; /*HIDES ITEMS WHICH OVERFLOW THE CONTAINER*/
    width: 450px; /*GIVES CONTAINER A WIDTH OF 450PX SAME AS OUR WORDPRESS DIV*/
    clear: both; /*CLEARS BOTH FLOATS LEFT & RIGHT*/
}

Once you’ve added the styles open up your toggle.js file and paste in this bit of jquery.

1
2
3
4
5
6
7
8
9
10
11
12
13
14
15
16
17
18
19
$(document).ready(function(){
//AUTO COLLAPSE'S TOGGLED ELEMENT
$(".comments_container").hide();
//CHANGES THE BUTTON FROM OPEN TO CLOSED AND VIS-VERSA
$("h2.toggle").toggle(function(){
$(this).addClass("active");
}, function () {
$(this).removeClass("active");
});
//SLIDES CONTAINER UP AND DOWN ON CLICK
$("h2.toggle").click(function(){
$(this).next(".comments_container")
.slideToggle("slow");
});
});

Save all your files and test it out. Heres a quick video of it in action.


Thanks for reading, good luck implementing into your website, Dont forget to share this post using the panel below. Till next time….

Your ads will be inserted here by

AdSense Now!.

Please go to the plugin admin page to paste your ad code.

Freaky Photoshop

Your ads will be inserted here by

AdSense Now!.

Please go to the plugin admin page to paste your ad code.

Good evening all today were going to explore the sick world of photo manipulation. This article contains some of the most realistic horror photo manipulations. *WARNING* View at your own risk.


Eye Spy

Image01

Friendly Fire

Image02

Half The Zombie I Used To Be

Image03

Miss Deadlock

Image04

My Fears Have Become Phobias

Image05

Perfect Death By SentencedXIII

Image06

Ripped Away

Image07

Shinybinary’s Horror

Image08

Why So Freaking Serious?

Image09

Witch

Image10

Zombie Manip

Image11

Bacarath

Your ads will be inserted here by

AdSense Now!.

Please go to the plugin admin page to paste your ad code.

Image12


Tutorials & Resources


Devils Eye

Image13

Creating A Zombie

Image14

Transform Into An Alien

Image15

Bloody Saw Blade

Image16

Crack & Peel

Image17

Wounds

Image18

Bloody Method

Image19

Killer Portraits

Image20

Dark Book

Image21

Turning Into An Alien

Image22

Zombie Tutorial

Image23

Your ads will be inserted here by

AdSense Now!.

Please go to the plugin admin page to paste your ad code.

Simplistic Portfolio

Your ads will be inserted here by

AdSense Now!.

Please go to the plugin admin page to paste your ad code.


Quite a while ago i thought id make a template for theme forest, unfortunetly they didnt accept it. After trying about 5 times and it still getting rejected (even though i changed everything they asked) ive decided to offer it your guys for free. Its a 4 page simplistic portfolio layout which features valid css and xhtml and a jquery slider, see read me file for details.

enjoy.

Main Page

About Page

Your ads will be inserted here by

AdSense Now!.

Please go to the plugin admin page to paste your ad code.

Portfolio Page

Contact Page

License and Attribution

This layout is licensed under the Creative Commons license and can be used for personal purposes ONLY. No attribution is needed but it is always appreciated.

Your ads will be inserted here by

AdSense Now!.

Please go to the plugin admin page to paste your ad code.

Car Layout #5

Your ads will be inserted here by

AdSense Now!.

Please go to the plugin admin page to paste your ad code.

Good evening everybody, today i’ll be showing you how to create a car club style layout. We’ll be using two stock images and combining the two to make a cool composition.


Create a new document 1000 x 1200 pixels and fill your background with the color #0e0e0e. Your now going to need this stock image Resize your stock with the free transform tool (CTRL + T) make the stock the same width as your canvas. Place the stock at the very top of your canvas.

Step1

Dont worry about it looking really big at the moment as we’ll be moving it and making it smaller later. Goto “filter > sharpen > sharpen” to sharpen the image. Your now going to need this stock image Open up the need for speed wallpaper stock in photoshop, with your prefered cutting tool cut around the image of the car, then copy and paste it onto your orginal canvas.

Step2

Create a new layer below your car layer, with the pen tool create a selection like this. Notice how the selection is roughly in the same angle as the side of the car, and is also just a fraction below the wheels.

Step3

Fill your selection with the color #0e0e0e then goto “filter > blur > guassian blur”. Blur by 1.0 pixels and set layer opacity to 90%.

Step4

With your desired cutting tool make a selection around the side of the car. We need to make a reflection in the floor of the car, obviously flipping the car vertically wont work as the angle makes it that little bit more arkward.

Step5

Copy and paste the selection to a new layer then goto “edit > transform > flip vertically”. Line up the front of the car.

Step6

Goto “edit > transform > distort”. Using the left middle anchor point distort the image so both front and back wheels are touching the orginal’s wheels.

Step7

Drag the reflection layer underneath your car layer, select the pen tool or the polygonal lasso tool and make a selection in the gap between the top car and the reflection.

Step8

Create a new layer underneath your reflection layer and fill the selection with the color #0e0e0e.

Step9

Hide all your layers apart from the reflection layer and the layer with the shadow you just made on. Goto “layer > merge visable” this should merge both layers together, unhide all other layers. Set the reflections layer’s opacity to about 50-58%, add a layer mask then drag a linear gradient from the bottom of the reflection upwards. You may need to undo and redo a couple of times to get the right effect. Were looking to get a nice subtle reflection. Heres mine.

Step10

Add a layer mask to your background stock image, drag a radial gradient over the top.

Step11

Duplicate your background stock image, set the duplicated stock images blend mode to pin light. HIDE your background layer then goto “layers > merge visable”, all your reflection, car and shadow layers should now be merged into one layer. Unhide your background layer, then move your car upwards towards the top of you canvas, leaving enough space for some text at the top. Add a layer mask to your car layer and drag a linear gradient over the BOTTOM. You should have something like this.

Step12

Select the rounded rectangle tool with a radius of 15px create a small box above your car, fill your rectangle with the color black.

Step14

Add this stroke to your rounded rectangle layer then set opacity to about 76%.

Step13

Your ads will be inserted here by

AdSense Now!.

Please go to the plugin admin page to paste your ad code.

Inside the box add your website title. The color code for the green i used is #68994d.

Step15

Select the rectangle tool or the rectangular marquee tool and create a white rectangle the width of the canvas underneath your car.

Step16

Add these layer styles to your navigation bar.

Step17

Step18

Create another white rectangle half the height of the navigation, set opacity to 3% and place at the top of the navbar. Label your navbar to finish this step.

Step19

Inbetween each link item add a small divider. Once you’ve added the dividers merge all divider layers together and add a layer mask. Drag a reflected gradient over them using white as your forground.

Step20

Merge your navigation layer and navigation shine layer, duplicate it then flip it horizontally. Move your duplicated layer underneath its orginal, then shift the navigation down underneath its orginal. Add a layer mask to your duplicated layer and drag a linear gradient over the bottom.

Step21

Merge all your navigation layers together as one, apart from the text. Add a layer mask over the merged layer. Using a reflected gradient with your forground set to white, start from the middle of the navigation and drag towards either the left or the right of the canvas. The result will be your navigation blending into the background on both left and right sides. You might not get the desired first time, just undo and redo untill you get the best result for you.

Step22

Using the rectangle tool or the rectangular marquee tool create a small rectangle underneath your navigation. Add these layer styles to your rectangle.

Step17

Step18

Step23

Underneath your rectangle create another one, but make it taller. Fill the 2nd rectangle with the color #080808 and apply a 1pixel stroke using the color #181818.

Step24

Inside the box add some dummy content.

Step25

Using the steps and styles listed above create more boxes, as many as you desire. On the right side of the canvas create slighty bigger rectangles for bigger content.

Step26

For the footer we duplicate our navigation bar, flip it vertically then drag towards the bottom of our canvas. Select a small selection of the navigation spanning the whole wide of the canvas. Press CTRL + T and drag the selection down. Add your footer info to complete the effect.

Step27

Thats it all done, heres what mine looks like.

finished

Hope you’ve enjoyed this tutorial, dont forget to subscribe via RSS and twitter. Also please share and enjoy this post by using the box below. Many thanks for your help and support. Much appreciated.

Your ads will be inserted here by

AdSense Now!.

Please go to the plugin admin page to paste your ad code.

Sliding Jquery Menu

Your ads will be inserted here by

AdSense Now!.

Please go to the plugin admin page to paste your ad code.

Hi there welcome to another tutorial, in this tutorial il show you how to create a sliding menu button using jquery. You can see the effect in action over on the PSDtuts webpage in the top right hand corner.

Oh yes and before i forget you can download the source files for free using the button above.

When the button is clicked it rolls out a box full of links, when the button is clicked again it rolls back in. This can be done using jquery and in this tutorial il show you how to do it. Right lets get started, firstly lets get our button done out the way so we can then focus on the code. Open up photoshop and create a new document with your desired size of button, your button can be any size your wish. Im using a size of 182 x 32 pixels, double click your background layer and add a simple gradient overlay.

On the right hand side of your button add a little white arrow and a vertical divider. The divide consists of two colors #302f2f & #252525.

On the left side add your little icon and some text, i dont think i need to go into too much detail on the button design, as you’ll make your own to suit your own site. Heres how mine looks. (save your button image into your images folder)

Now for the exciting bit open up notepad and save a blank notepad document as styles.css, save the file into a folder called sliding menu on your desktop. Once saved close notepad, open up your folder “sliding menu” create two new folders one called js and another called images. Goto the main jquery webpage and download the jquery libary “jquery-1.3.1.min.js” rename the file to just “jquery” and stick it into the folder js. Open up dreamweaver and create a new HTML file save the file straight away inside your sliding menu folder. (filename for the HTML file doesnt matter call it what you like, sliding_menu.html might be a good idea.) Now your in dreamweaver click the code view tab.

The most import thing we need to do first is reference our javascript and css files we do this by typing this chunk of code within the “HEAD TAGS”.

<link href="style.css" rel="stylesheet" type="text/css" />
<script type="text/javascript" src="js/jquery.js"></script>
<script type="text/javascript" src="js/slider.js"></script>

You will notice there are 3 files we have referenced styles.css, jquery.js and a third slider.js (but i havent got a slider.js file i hear you cry.) We need to create that now, open up notepad and save a blank notepad document as slider.js, save it inside your js folder. Open up your slider.js file inside dreamweaver and type out the code below.

$(document).ready(function () {
    $('img.menu_class').click(function () {
	$('ul.the_menu').slideToggle('medium');
    });
});

Your ads will be inserted here by

AdSense Now!.

Please go to the plugin admin page to paste your ad code.

Let me explain the code above the 1st line means when the document is loaded run the function in our case the sliding menu. The next line means once an image with a class of menu_class is clicked the menu will slide which brings me down to line 3. The menu will toggle down at a medium speed. You can change the speed if you wish from slow, medium or fast. The second and third line are important as they hold key elements refering to our CSS file which is img.menu_class and ul.the_menu. We havent wrote these yet but will do when we begin to write out our menu. Head over to your HTML in the code view so we can begin to write out our menu.

<img src="images/button.png" width="184" height="32" class="menu_class" />
<ul class="the_menu">
<li><a href="#">A Website #1</a></li>
<li><a href="#">A Website #2</a></li>
<li><a href="#">A Link #1</a></li>
<li><a href="#">A Link #2</a></li>
<li><a href="#">A Website #3</a></li>
<li><a href="#">A Website #4</a></li>
<li><a href="#">A Link #3</a></li>
<li><a href="#">A Link #4</a></li>
</ul>

The first bit of code you see is a simple image which is our button, we specify the width and height of our button we also give it a class. The class will be the images unique anchor point for the js file which we have already wrote. The class also lets us apply any styles via css using the class .menu_class. After that we have a simple unordered list. If we take alook at our menu in our browser this is how it looks.

Open up your CSS file in dreamweaver. Lets set a few style for the main part of our document.

body {
	font-family:Arial, Helvetica, sans-serif;
	font-size:12px;
	background-color: #333333;
}

Just some simple text and background styling is needed, set your font family and desired font size, ive also changed the background from white to a darkish grey color. The next bit of styling were going to add is for the ordered and unordered lists, were also going to apply a border to our button image, you may do your border in photoshop on the actual image but i find it best to add it using CSS as changing abit of code is easier then opening up photoshop to change it.

ul, li {
	margin:0;
	padding:0;
	list-style:none;
}

.menu_class {
	border:1px solid #1c1c1c;
}

The next bit of css styling refers to the menu that drops down once the button is clicked.

.the_menu {
	display:none;
	width:300px;
	border: 1px solid #1c1c1c;
}

In these styles you can change the width of the open menu, mine has a width of 300px but this can be what ever you like. Ive also given it a 1px border the same as our button. The next bit of styling refers to the background color of our rolled out navigation and also the text colors, sizes and hovers.

.the_menu li {
	background-color: #302f2f;
}

.the_menu li a {
	color:#FFFFFF;
	text-decoration:none;
	padding:10px;
	display:block;
}

.the_menu li a:hover {
	padding:10px;
	font-weight:bold;
	color: #F00880;
}

The_menu li is the color of the background when the navigation is rolled out, the text in the navigation links wont have any line underneath them as we have used text-decoration:none, we have also spaced out our links by adding 10px paddinig all the way around our links we also want to display the links in a block. The hover styles are pretty simple, padding the same as the last style, font weight bold = bold text and the color changed to a pinkish color. Thats it for the styles you menu should be ready to test. Heres mine.

Just a quick point on positioning, dont use div align to center or right align your button as the rollout will not be aligned up properly, if you want to align your menu button properly wrap it in its own div and position div how you see fit.

See what you can come up with, maybe add some icons to your list objects. Thanks for reading, dont forget to subscribe VIA rss and twitter.

Your ads will be inserted here by

AdSense Now!.

Please go to the plugin admin page to paste your ad code.

Business Layout #3

Your ads will be inserted here by

AdSense Now!.

Please go to the plugin admin page to paste your ad code.

In this tutorial il show you how to make a really simple clean business layout.


Create a new document 1000×960 pixels with a white background, at the very top of the canvas create a rectangle the width of the canvas and about 80 or so pixels in height, fill with the color #e9eacf. Do the same again but make the rectangle 3 times as big, fill with the color #62c0e6. You should have something like this.

Using the rectangular marquee tool create a selection as seen in the image below.

Make sure the rectangle comes level with the 1st color. Fill the selection with any color then add these layer styles.

Do the same again only create a rectangle on the blue color. Make sure the rectangle is the same height as the blue line and the same width as the rectangle created above.

Fill the selection with any color then add this layer style.

You should have some thing like this.

On the white part of the canvas do the same again, make the rectangle quite big this time, but still keep it the same width as the others. We need to make this one fairly big this time as were going to be blending it in with the white background. Fill the selection with any color.

Add these layer styles.

Create a new layer UNDERNEATH all your boxes, select the rectangular marquee tool and create a selection as tall as you want, but the same width as your other boxes.

Fill this selection with the color black, then goto “filter > blur > guassian blur” blur by 2pixels, set layer opacity to 35%. Add a layer mask to the layer, using a linear gradient drag from the bottom where your rectangle ends, upwards. This should blend in the drop shadow.

On the blue rectangle, select the pen tool and create a shape like this.

Your ads will be inserted here by

AdSense Now!.

Please go to the plugin admin page to paste your ad code.

Fill the selection with the color white then set layer opacity to 5%.

Duplicate the layer and shift it upwards abit. When the shape goes over the blue line you may need to cut the top off so you dont see it on the top rectangle.

Duplicate the shapes twice more, then flip or rotate them to create a look your happy with, heres mine.

Once you are happy with the look, go ahead and add your website title, slogan and logo. Add these at the top in the 1st rectangle, also add your navigation to the right side.

Now find yourself an image of a laptop, remove the background from the laptop then stick it into the blue area of the layout on the right.

Now the laptop could do with having a reflection of itself, just to add a little bit of detail to the whole thing. Duplicate your laptop layer, move the duplicated layer underneath its orginal. DONT flip it just move it downwards untill the bottom half is identical.

Add a layer mask to the duplicate layer, then add a layer mask. Drag a linear gradient over the bottom of the front of the laptop, once your happy right click your layer mask and goto “apply mask”. then do the same for the side of the laptop. Now find yourself some an image of a butterfly, remove the background then add it also to the blue part of the layout.

On the left side of the blue rectangle add some text about your business.

The next part in the tutorial is too fill the white content with information about your business, the reason why i havent gone into great detail is because ive only used text and a couple of images and the tools ive used are only the text tool.

Once you’ve added your content you should have something like this.


Once you’ve added your content you should have something like this.

Your ads will be inserted here by

AdSense Now!.

Please go to the plugin admin page to paste your ad code.

NFS Pro Street, Stencil Tutorial

Your ads will be inserted here by

AdSense Now!.

Please go to the plugin admin page to paste your ad code.

Create a new document your prefered size im using 530×200 pixels, start off with a black background. Select the “rounded rectangle tool” and draw out a rectangle similar to below.

Fill with the color #bcdf4f and add a 4 pixel black “stroke” (you wont actually see the stroke at this time, obviously).

Now goto “edit > transform > distort”, select the left middle anchor point and drag downwards, you should have something like this.

Select the type tool and add your text, the font i am using is called “mactype”, color the 1st word white and 2nd word black. Right click your text layer(s) and goto “rasterize” then do the same as above “edit > transform > distort”, and distort to the same angle as your rectangle.

Now “hide” your background layer and make a selection like this.

Copy & paste to a new layer. Add the 4 pixel black stroke to the new shape and also a black color overlay. Align the shape with your green one, you should have something like this.

Your ads will be inserted here by

AdSense Now!.

Please go to the plugin admin page to paste your ad code.

Using your prefered cutting tool cut off the end of your black side rectangle.

Restore your background layer, then create a new layer above it (under everything eles) goto your paint brush tool, then at the top (1)open up your brush pallet, select the little (2)black arrow and select dry media. If you cant see the set of dry media brushes select load brushes (3).

Once you’ve clicked dry media brushes, select the very bottom brush with its original size. (number 4 on the image above). Now with the color #bde050 start to spray around your rectangle.

Create a new layer and add a darker shade of green. Try and mix it in with the ligher green.

Then do the same as above but using the color white.

</p

Your ads will be inserted here by

AdSense Now!.

Please go to the plugin admin page to paste your ad code.

Portfolio Web Layout #3 Tutorial

Your ads will be inserted here by

AdSense Now!.

Please go to the plugin admin page to paste your ad code.


Create a new document 820×700, color background #89887c. Select the rounded rectangle tool and draw out a rectangle leaving about 100pixels at the bottom. Color the rectangle with a gradient using the colors #c4c5b6 & #ebebe2, add a 2 pixel white stroke to your rectangle. You should have something like this.

Select the rectangular marquee tool and draw out to rectangles the same width as your rounded rectangle, color the 1st rectangle the color #f0f0f0 and the second rectangle #e5e5e5. You should have something like this.

Merge the two rectangles together and add a 1pixel white stroke to it. You should have something like this. (see link below).

CLICK HERE TO SEE RESULT SO FAR.

Select your type tool and add some text to your navigation.

Create a new layer and select the “pencil tool” select a 1 pixel brush and draw two 1 pixel lines inbetween your text on your navigation. Use the colors #d9d9d9 and #ffffff.

You should have something like this (see link below)

CLICK HERE TO SEE RESULT SO FAR.

For this next part your going to need some “nature brushes”, a great site for some free brushes isbrusheezy. Once you have your brushes select one and add them above your navigation.

Your ads will be inserted here by

AdSense Now!.

Please go to the plugin admin page to paste your ad code.

I used a total of 2 brushes to create the effect above.

Now add your site title, ive added a gradient overlay, drop shadow and a stroke, the effects used are very easy to create, all the options are standard apart from colors, just choose what ever works best.
You should have something like this (see link below)

CLICK HERE TO SEE RESULT SO FAR.

Now lets add our content boxes, select the rounded rectangle tool, draw out a small rectangle color it with the color #e7e7d8 and add a 1 pixel stroke to it using the color #c2c2b4.

Now duplicate your navigation bar and drag over the top of your content box at the top. (be sure to drag the layer over your content box layer).

Click your content box layer whilst hold the the key “CTRL” on the keyboard to make a selection. Select the duplicated nav bar layer and goto “select > inverse” then hit the delete key. You should be left with this.

Press “ctrl + t” to enter free transform mode, just make your content box header abit smaller, and change the layers stroke to the same as the content box. Add more boxes to suit your style following the steps above, You should end up with something like this.

CLICK HERE TO SEE RESULT SO FAR.

And with some content it could look like this.

Your ads will be inserted here by

AdSense Now!.

Please go to the plugin admin page to paste your ad code.