Your ads will be inserted here by
AdSense Now!.
Please go to the plugin admin page to paste your ad code.
Hello welcome to another tutorial by hv-designs, in this tutorial we’ll be creating and coding a login form concealed within a sliding panel, the sliding panel itself will expand once clicked, revealing the content within.
The first thing you need to do is mockup your slide panel in photoshop, ive used the header from my gaming layout 6 tutorial. Ive replaced the top navigation bar with a thin grey bar about 2-3 pixels in height. Ive then created a button in the middle of the grey bar using the rounded rectangle tool. Heres what mine looks like.

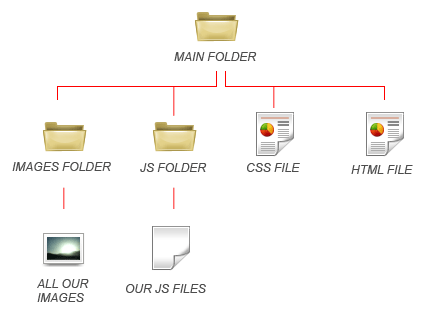
For the purposes of this tutorial you may download and use the PSD ive created, you can download the PSD “HERE“. Create a new folder on your desktop called “what ever you want” inside this folder create another two folders called “images” and “js”. Open up a blank notepad document and goto “file > save as”, save the blank document as “styles.css” inside your main folder. Save another blank document as “panelslide.js” only this time save it inside your “js folder”.


Goto the main jquery website and download jquery, save the file into your “js” folder. Open up your favourite code editor and create a blank HTML file, save the file as index.html inside your main folder. Now lets link our css file and js files, place the following code into the head of your html document.
|
1
2
3
4
5
6
|
<!--STYLE SHEETS--><link href="styles.css" rel="stylesheet" type="text/css" /><!--JS FILES--><script src="js/jquery.js" type="text/javascript"></script><script src="js/panelslide.js" type="text/javascript"></script> |
Now lets begin to mark-up the top part of the website and the sliding panel, the mark-up is pretty short and sweet. Start off with a div of “container”, inside the div container add another div called “header”.
|
1
2
3
4
5
6
|
<div id="container"><!--CONTAINER STARTS--><div id="header"><!--HEADER STARTS--></div><!--HEADER ENDS--></div><!--CONTAINER ENDS--> |
Inside the div header add another div id of “slide-panel”, all the content for the sliding panel should be inserted within the slide-panel div.
|
1
2
3
4
5
6
7
8
9
10
11
12
13
|
<div id="container"><!--CONTAINER STARTS--><div id="header"><!--HEADER STARTS--><div id="slide-panel"><!--SLIDE PANEL STARTS-->SLIDE PANEL CONTENT HERE</div><!--SLIDE PANEL ENDS--></div><!--HEADER ENDS--></div><!--CONTAINER ENDS--> |
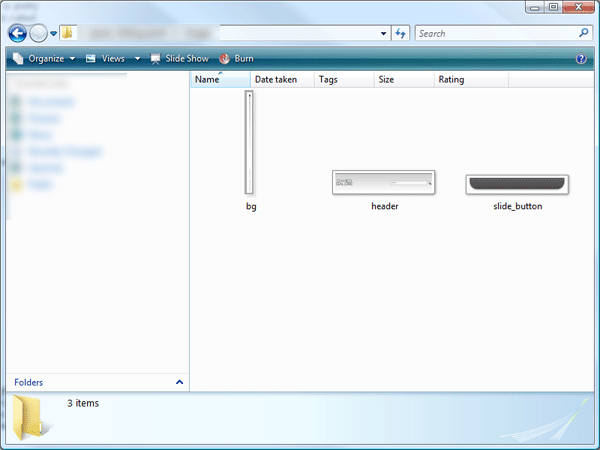
Thats all we need for the markup, time for some CSS, for the purpose of this tutorial im going to code the header as one image, instead of coding it all seperate as we dont really need a proper search from etc.. Firstly lets create our image slices, your going to need a snippet of the background to apply as the body background, then your going to need an image of the header wthout the slide button. See images below.


Your ads will be inserted here by
AdSense Now!.
Please go to the plugin admin page to paste your ad code.
Your also going to need a single image of just the slide button without text.
![]()
You now should have 3 .PNG files inside your images folder.

Head over to your stylesheet and add the following styles. Please refer to the comments for each style.
|
1
2
3
4
5
6
7
8
9
10
11
12
13
14
15
16
17
18
19
20
21
22
23
24
25
26
27
28
29
30
|
/* MAIN BODY STYLES */* { margin: 0px; /*NO MARGIN/* padding: 0px; /*NO PADDING*/}body { background-image: url(images/bg.png); /*BACKGROUND IMAGE*/ background-repeat: repeat-x; /*REPEATS HORIZONTALLY*/ background-color: #E6E6E6; /*SETS BACKGROUND COLOR*/ margin: 0 auto; /*SETS TOP AND BOTTOM MARGIN TO 0. ALSO SETS LEFT AND RIGHT MARGIN TO AUTO*/ padding: 0; /*NO PADDING*/ font-family: Arial, Helvetica, sans-serif; /*SETS FONT FAMILY*/ font-size: 75%; /*FONT SIZE*/ line-height: 100%; /*LINE HEIGHT*/}#container { margin: auto; /*SETS MARGIN TO AUTO, THIS CENTER'S OUR WEBSITE*/ width: 900px; /*CONTAINER WIDTH*/}#header { float: left; /*FLOATS HEAD LEFT*/ height: 165px; /*HEIGHT OF HEADER IMAGE*/ width: 900px; /*WIDTH OF WEBSITE*/ background-image: url(images/header.png); /*OUR HEADER IMAGE*/ background-repeat: no-repeat; /*STOPS HEADER IMAGE REPEATING*/} |
Once you’ve added the styles above you should now see your repeated background and your header image. You may need to adjust the height of the header div to the same height as your header image. We can now add the styles for our sliding panel, again refer to the commented code next to each style.
|
1
2
3
4
5
6
7
8
9
10
11
12
13
14
15
16
17
18
19
20
21
22
23
24
25
26
27
28
29
30
31
32
33
34
35
36
37
38
39
40
41
42
|
/* SLIDING PANEL STYLES */#slide-panel { height: 200px; /*HEIGHT OF HIDDEN SLIDE PANEL*/ width: 350px; /*WIDTH OF HIDDEN SLIDE PANEL*/ display: none; /*THE ELEMENT WILL NOT BE DISPLAYED*/ border-right-width: 2px; /*ADDS RIGHT BORDER OF 2PX*/ border-left-width: 2px; /*ADDS LEFT BORDER OF 2PK*/ border-right-style: solid; /*MAKES RIGHT BORDER SOLID*/ border-left-style: solid; /*MAKES LEFT BORDER SOLID*/ border-right-color: #626262; /*RIGHT BORDER COLOR*/ border-left-color: #626262; /*LEFT BORDER COLOR*/ background-color: #949494; /*SLIDE PANEL BACKGROUND COLOR*/ border-bottom-width: 2px; /*ADDS BOTTOM BORDER OF 2PX*/ border-bottom-style: solid; /*MAKES BOTTOM BORDER SOLID*/ border-bottom-color: #626262; /*BOTTOM BORDER COLOR*/ opacity: .8; /*SETS SLIDE PANEL BACKGROUND'S OPACITY TO 80%*/ margin: auto; /*CENTERS OUR SLIDE PANEL*/}.slide { margin: 0; /*NO MARGIN*/ padding: 0; /*NO PADDING*/ background-image: url(images/slide_button.png); /*ADDS OUR BUTTON IMAGE*/ background-repeat: no-repeat; /*STOPS BUTTON FROM REPEATING*/ background-position: center top; /*SETS BUTTON POSITION*/}.btn-slide { text-align: center; /*ALIGNS TEXT CENTER*/ width: 191px; /*BUTTON WIDTH*/ height: 26px; /*BUTTON HEIGHT*/ display: block; /*DISPLAY AS A BLOCK*/ color: #fff; /*TEXT COLOR*/ text-decoration: none; /*REMOVES UNDERSCORE FROM LINK*/ font-family: Arial, Helvetica, sans-serif; /*FONT FAMILY*/ font-weight: bold; /*TURNS TEXT BOLD*/ font-size: 1em; /*FONT SIZE*/ margin-right: auto; /*MARGIN AUTO*/ margin-left: auto; /*MARGIN AUTO*/ line-height: 22px; /*LINE HEIGHT OF BUTTON TEXT*/} |
The div “slide-panel” is our a panel the other two classes “slide & btn-slide” are for our slide button. Underneath the slide panel ending div in your HTML document add a P tag with a class of slide, add a HREF tag to the word login. Add a class of btn-slide to the link. Use a “#” for the link url.
|
1
2
3
4
5
6
7
8
9
10
11
12
13
14
15
|
<div id="container"><!--CONTAINER STARTS--><div id="header"><!--HEADER STARTS--><div id="slide-panel"><!--SLIDE PANEL STARTS-->SLIDE PANEL CONTENT HERE</div><!--SLIDE PANEL ENDS--><p class="slide"><a href="#" class="btn-slide">Login</a></p><!--LOGIN BUTTON TEXT--></div><!--HEADER ENDS--></div><!--CONTAINER ENDS--> |
You can also now add your content inside the slide panel div. Lets now connect it all together with jquery, the jquery code itself is pretty simple, open up your panelslide.js file and add the follwowing code.
|
1
2
3
4
5
6
7
|
$(document).ready(function(){$(".btn-slide").click(function(){$("#slide-panel").slideToggle("slow");});}); |
Your slide panel should now work, although for the opacity style to work in internet explorer we need to change the way the opacity style is written. We need to setup a new stylesheet just for internet explorer, open up a blank notepad document and save it as ie.css inside the main folder. Open up the ie.css document in your code editor and add the following style.
|
1
2
3
|
#slide-panel { filter: alpha(opacity=80); /*sets opacity of slide panel to 80%*/} |
We now need to link the file in our html file, in the head of the html file add this bit of code.
|
1
2
3
|
<!--[if IE 7]><link rel="stylesheet" type="text/css" href="ie.css" /><![endif]--> |
You will also need another style to work with internet explorer 8, you can either setup another style sheet or you can tell the internet explorer 8 browser to emulate internet explorer 7.
|
1
|
<meta http-equiv="X-UA-Compatible" content="IE=EmulateIE7" /> |
Your sliding panel should now be complete. Heres an example of it empty.
Heres an example with an example login form.
Hope you enjoyed this tutorial, dont forget to subscribe via RSS and twitter. Your support is much appreciated.
Your ads will be inserted here by
AdSense Now!.
Please go to the plugin admin page to paste your ad code.