

October 9th, 2007 in Photoshop Tutorials by Richard Carpenter
Rockband Layout #1 Tutorial
 4 Votes, Rating: 5.00
Create a new document 800×700 pixels, fill the background in the color #1e1414. Now your going to need a picture of an amp of some sort, i just searched google for guitar amps, or you can use my picture.

When you have your picture open it up in photoshop and copy/paste it onto your layout canvas, your going to need to resize it to fit, remove the white background and shave it a little bit. Firstly press “ctrl + T” to resize it, select your desired cutting tool and cut away the background. Once you have done that you will need to cut off the handle. Here how my amp looks.

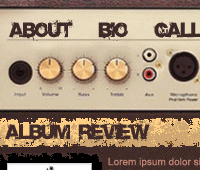
You will notice that i have removed the wording above the buttons and nobs (see image below).

To do this use either the smudge tool or the clone stamp tool, ive already written a tutorial on smoothing, its basically the same and will explain the tools listed above in more detail. The smooting tutorial can be found HERE.
Once you have done all that your layout should look like this. (see link below).
CLICK HERE TO SEE RESULT SO FAR.
Duplicate your amp layer and goto “edit > transform > flip vertical” use this layer to make a reflection, ive already written a tutorial on how to do reflections. My reflections tutorial can be found here.
Once you have your reflection in place add your footer information.

Next place your band title and web address at the top using a nice grundge type font. The font i used is “base 02″ and the colors i used are #cd9385 & #fbcf87.

Using the same font but with the color #402b26 add your navigation titles where you smoothed out the amp words.

CLICK HERE TO SEE RESULT SO FAR.
Now lets start to build out content area. Select the rectangular marquee tool and draw a box across your amp fill with the color #fbcf87.

Set your “background color” as #46312c and goto “filter > brush strokes > spatter” when the options load up set “spray radius” to about 20 and set “smoothness” to about 5, click ok, you should be left with this.

Do the same again adding 2 lines at the bottom.

You will notice on the image above i have more than one color on my rectangles. To ahcieve this effect brush some grundge brushes over the yellow box before applying the spatter filter. Label your area’s.
CLICK HERE TO SEE RESULT SO FAR.
Thats it all done, now with some content added it could be made to look like this.


Be Part Of The Community!
Become part of the hv-designs community.
Subscribe Via RSS or Follow Us On Twitter.


8 Responses to “Rockband Layout #1 Tutorial”